Pages

Saturday, January 29, 2011

Shabby ruffled pillow featured on Etsy

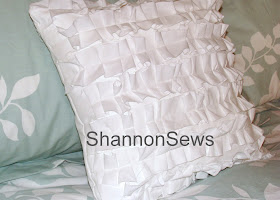
I am so excited to share that my Shabby Ruffled Pillow was featured in an Etsy Treasury,
"Poppies and Lace" by Rachel Heath.

What a lovely way to start!
Thank you Rachel!


Friday, January 28, 2011

Etsy Shop Grand Opening!

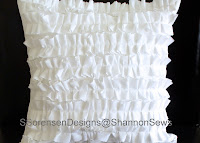
I'm so excited to finally open my Etsy shop and start selling Shabby Ruffled Pillows - one of my all time faves!


Those delicate ruffles get me every time.

Have a great weekend everyone!

Thursday, January 27, 2011

Perfect placemats for round tables

I love our little round glass table. It feels like eating in a quaint cafe and it's perfect for our small space.

For months we've been using rectangle shaped placemats on our round table, because it's all we had.

And while it works just fine, I knew it could be so much better.

And I was right.

I don't know why I hadn't thought of this before.

Semi-circle placemats, also called half moon placemats (which sounds cooler, especially to us Twilight fans) fit perfectly on round tables.


I made a pattern from recycled newspaper by measuring the circumference of the table and shrinking the size down to what I wanted.

For the material, I decided to re-purpose the rest of the Anthropologie tablecloth. You know, the one I used to make that snazzy, colorful apron? Is it weird that my apron will match my placemats?

Anywho, for a little flexible padding I also cut a matching piece of cotton batting for the middle.


I love how they turned out.

Our new half moon placemats will be beautifying our little round table at every meal.


Linked to:

Tuesday, January 25, 2011

Upcycle your recycle: newspaper patterns

I'm in the process of making a set of placemats. Before I could start, I wanted to make a paper pattern so my placemats would fit my small table correctly.

I thought about taping a bunch of pieces of 8-1/2 x 11 printer paper together, but who wants to do that? I figured I could pick up a roll of craft paper the next time I was out, but I hated to have to wait and to spend money on one more thing. So I looked around my house to see if I had something that would work...

And voila! The newspaper that was heading to the recycle bin was big enough and would work perfectly for this project. Why hadn't I thought of it before?


Of course newsprint wouldn't be a good option for light colored fabric, at the risk of getting it dirty, but for darker colors, it's working out just great!

Other options that work: tissue paper, wrapping paper, craft paper, packing paper

Monday, January 24, 2011

Remnants: to buy or not to buy?

I'm in a quandary about remnants.
Do you buy remnants?

I seem to get sucked in every time I see those overflowing remnant bins touting 50% off, or in the case of last week, 70% off!

Remnants are always marked with the yardage in decimals: .634/yd. And with my math skills (or lack there of) I'm always trying to picture how much fabric that would be...what would .634/yard look like? Will there even be enough to make anything?

And the pricing? I don't get it. Something is priced 1.50 yd @ 7.79/yd regularly 19.49/yd at 70% off. I'm sorry, what? And sometimes they are 50% off the current price, sometimes they are 50% off the regular price.

For me, buying a remnant is much like choosing a mystery grab bag. It's not until you walk out those doors and rip open your remnant that you find out what you really got and how much it really cost. And let's be honest, grab bags are never quite what they're cracked up to be.

In my experience, my remnants have ended up being very odd sizes, have stains or pen marks on them, or have some other imperfection hidden at the end of the bolt. And since you can't open them before buying them, or return them after you've bought them, you're clearly taking a gamble.

Last week I was sucked into the remnants...and walked away with 1.5 yds of pink and brown fleece fabric with a very cute design. The remnants were 70% off. I thought at 70% off, it had to be a good deal.

After passing through the cash register, and standing outside dissecting my receipt, I think this snazzy fleeze cost me more than if I had just bought a finished blanket.
That whole 70% off thing? Balonie.
The fact that it was $7.79/yd on sale made no difference. They took 70% off the regular price, which was a ghastly $19.49/yd.

I ended up paying $11.69. Slap me. I never would have bought it had I known it was that much.

Remnants a smart buy? So far, not for me.
You live and learn.
Here's to hoping that lovely, overpriced fleece blanket lasts a long, long time.

Monday, January 17, 2011

Fixing the misfits: fix-up discounted crafts!

If you have a JoAnn Fabrics store near you, you've got to check out the last of the holiday merchandise.

I thought the holiday left-overs would be long gone by now, but I was shocked to find a few cute things today for, get this, 90% off! No, that's not a type-o. It might as well have been free.

Most of the merchandise was in normal condition, but there were a few misfits in the bunch. Take for example this one-eyed Santa.

He was normally $19.99, but came home with me for $1.99.

Poor thing looked so sad without his other eye.

So I gave him another one. Since I didn't have a matching bead, I snipped it off and added two matching eyes with a sharpie. And look at Santa now:

As good as new.

And then there was the nose-less snowman, regularly $24.99, for $2.50.

all he had was an empty post.

So I made him a carrot nose out of a little orange fabric and hot glue.
Ahhh, much better.
Fixing up these discounted items didn't take much time at all and now they're ready for December 2011!
Stop by JoAnn's and see what you can find!


Thursday, January 13, 2011

Take great photos for your blog and online shop


Great pictures are key to showing people the best, most genuine version of what you've created - the look, the feel, the color, the texture.

Have you ever tried to post a sewing or crafting project online, but the pictures you take aren't doing it justice? Have you seen other projects posted that are hard to see due to their dim lighting and blurred photos?

It's a tragedy I tell you! I know how much time it takes for us to create our lovely creations.

Having been a photographer for many years, I wanted to share a few tips with you so you can take the best photos of the precious things you've spent so much time creating.

Tip #1: Use lots of natural light.
  • Photography is all about light.
  • Go outside with your project, if possible. A cloudy day with filtered light or a shady area on a bright sunny day are best (direct sun causes harsh tones and shadows).
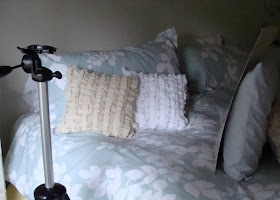
Here's a little behind the scenes for this pillow-

A chair set out on the deck on a cloudy day. The outdoor filtered light wraps perfectly around each delicate ruffle.

  • If you can't go outside, place your project by windows. You might still need a fill flash to avoid blur. When in doubt - turn your flash on. If you don't have enough light to work with and don't use a flash, you'll get blurry photos. Yuck.
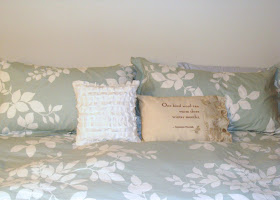
The shot below was taken with window light, a tripod and white poster board to bounce light back onto the pillows. Again, I love the way natural light softly wraps around the pillow detail.
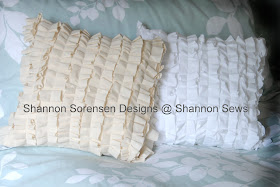
Here is the behind the scenes:

  • When all else fails, if you can't go outside and don't have much light from windows, and can't wait until the next day for daylight, use a flash inside. *Bouncing light off of a white ceiling is best to avoid unflattering shadows.

Tip #2: Get in close!
  • If you were in a shop and were interested in a pillow you saw across the room, would you continue admiring it from afar?
or would you walk up to look at it, hold it, feel it, study the details?
You want your pictures to convey the details, the color, the texture, drawing them in, as if they had it right in front of them.
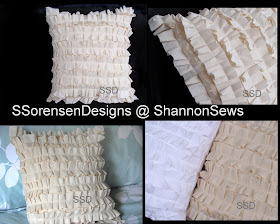

Tip #3: Try different angles and backgrounds
  • Set up your project and take photos as you walk around it, get down low, stand up high, one side and then the other. Try different backgrounds. You'll be amazed at how certain angles highlight just the right details.


Tip #4: Take lots of photos
With digital cameras, we have the freedom of taking as many pictures as we want. Out of 15 pictures, you might find 3 or 4 that work really well.
It's better to take a bunch of pictures and delete what you don't use, then have to re-do your photo shoot because you didn't get any great pictures.
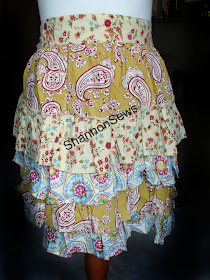

Tip #5: Clean up your background

  • You want your pictures to focus on your creation, not the messy room you're taking the picture in. Take a few minutes to set your surroundings up. Keep it clean and focused. Turn off overhead lights that might be omitting a yellow cast.
haha - this one is so bad in so many ways
Focus on what you're trying to present. Ahhh, much better.


Other tools:

Tripod - keeps your camera stable, you can use it outside, it keeps your hands free, helps in lower light situations with the timer setting to avoid blur.

White pieces of large cardstock or foam board are great for bouncing extra light back into your project.

Use a photo editing program like Photoshop. These programs are great for lightening, darkening, cropping, enhancing or creating photo layouts. Try to take the best photos you can from the start, so you don't have to put all your time and energy into fixing bad ones.

If you have any questions about the tips and techniques I've discussed, please feel free to contact me. I'd be happy to help! Pass this tutorial along to your friends!

~Shannon


Linked to:
FingerprintsontheFridge
TrulyLovely
30Days
AllThingzRelated
SomewhatSimple
TotallyTutorials
ToolsareforWomenToo
FirefliesandJellyBeans

Monday, January 10, 2011

Anthropologie refashion: Tablecloth to apron

Back in December during my Anthropologie shopping spree, I ran across this brightly ruffled 72" round tablecloth in the sale section. It screamed for me to buy it and transform it into something else (since after all, it was just a giant piece of fabric from my favorite store)...so I happily took it home with me.

Here it is in all its 72" glory
And here it is now, in it's lovely new life as a cheery, ruffly apron:


A girl can't have too many aprons you know.

So as not to leave you empty handed, here's a peek at how I put this apron together:

As with my other tablecloth to apron repurposing project, I used a simple apron I had on hand to use as a pattern guide - folded it in half, along with the fabric
And snipped around the outside edges, allowing room for seams
I also made sure I had a nice straight edge on the top of my apron (btw - I LOVE my self-healing mat and acrylic ruler...wouldn't want to sew without it)
Next, I folded over the edges, in preparation to hem. This is where my iron came in handy.

I always wondered what all the fuss was about when people talked about using an iron while sewing, until I tried it. I love my iron! Iron as you fold over and it will stay beautifully, making pinning a hem so much easier.

And then I got the curves ready for hemming...
And made the corners nice and clean


And here is the hemmed apron - all sides and ruffle.
Then the not so fun part...lots of seam ripping to get to that nice big piece of ruffled fabric for the waist band and neck tie
I was glad I ripped the seams like I did though, so I could use as much of the fabric as possible.
For the neck tie, I cut, folded over and straight stitched a long straight strip from the ruffle

For the neckline, I folded over the hemmed edge and stitched, with enough room for the neck tie to be pulled through
I love the natural gathered effect this design gives to the neckline
The waist band was simply folding over the raw edges of another straight strip from the ruffle, and sewing it down on the waist line

With enough room for a long piece of grosgrain ribbon to fit through, for the waist tie

Since I was sewing by the seat of my pants, I didn't think through the waist band completely. I sewed the waist band down without hemming the outer edges. So instead of ripping it all apart, I used a little Fray Check on the outer edges of the waist band. And used a little on the edges of the ribbon. Not the way I would normally finish an edge, but it worked. Next time better planning.


Linked to:
QuiltStory
HopeStudios
TodaysCreativeBlog
SewCanDo
TheGirlCreative
TheCreativeItch
Tearosehome
SewMuchAdo
TheShabbyChicCottage
CreationsbyKara
PaisleyPassions