Pages

Sunday, December 30, 2012

DIY Vacuum Extension Tube Replacement

Missing vacuum extension tubes: a cheap alternative to replacement tubes
ATTENTION: Don't throw away your empty wrapping paper tubes!

Left-over empty cardboard wrapping paper tubes aren't just for kids to shout through or hit each other over the head with (still tempting as an adult). There is a practical and exciting use for them! Yes, I do get excited about the strangest things.

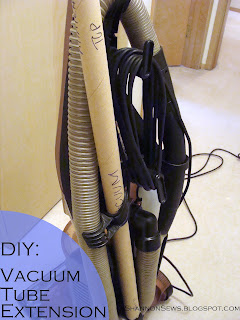
We inherited this vacuum a while back. I love vacuums with hose attachments to reach those hard-to-reach places where dust bunnies like to hide.

The vacuum itself works great, but the extension to the hose is missing. Drat! Still too short to do the best of the dirty work.

{Enter: Empty Wrapping Paper Tubes}
The perfect DIY solution for replacing missing vacuum extension tubes! 

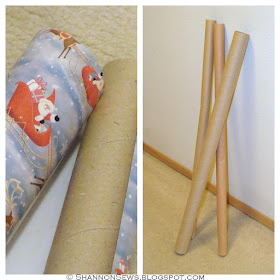
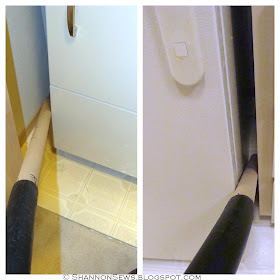
After combining the odds and ends of left-over wrapping paper onto one roll, we ended up with a few empty wrapping paper tubes that fit snuggly into the hole for the hose attachment. Wahoo!

Fit empty wrapping paper tubes snugly into place to act as vacuum attachment


And look! My empty cardboard wrapping paper tube works perfectly. I'll take that over spending a bunch of money on a replacement vacuum extension tube. And it works just as well! Look out dust bunnies!


easy, cheap vacuum extension tube replacement do it yourself solution
A few quick tips:

  • Make sure the tube fits snugly in place.
  • Label the top and bottom of the tube and attach the top to the vacuum each time (after using it several times the bottom end starts getting a little beat up). 
  • Do not alter the end of the tube (I tried squeezing one end together to mimic a skinny spout and the suction of the vacuum ended up sucking the tube together. Oops.)


Happy New Year image
Only 1 more day til 2013. Crazy!
Have a Happy New Year!


Never miss a post! Subscribe to ShannonSews
Like on facebook.com/SSorensenDesigns
Follow @ShannonSews1 on Twitter
Subscribe to youtube.com/ShannonSews

Wednesday, December 26, 2012

Make your own Italian Sausage

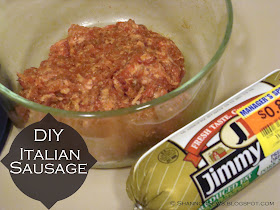
Make your own Italian sausage from plain pork sausageFor our big family Christmas Eve dinner festivities, we all decided to bring soups to share.

I've been craving a good sausage lentil soup lately, so that was my pick.

As I reached in the freezer for the package of sausage (one of my many great coupon finds!), I realized it wasn't flavored. Ugh. Please don't make me go back to the grocery store on the morning of Christmas Eve.

Thanks to an Italian Sausage Recipe I found online, I was able to turn my regular old pork sausage into flavorful Italian Sausage! The internet saved the day!


How to make your own Italian Sausage from regular Pork Sausage


In a glass bowl with an airtight lid, add the following ingredients and refrigerate over night:
(I only had just under 1 lb of pork sausage, so I halved the ingredients below, minus a dash)

2 lbs pork
1 Tbsp salt
1 Tbsp ground fennel seed
1-1/2 Tbsp paprika
1 Tbsp minced garlic
1 Tbsp sugar
1 tsp black pepper
3 Tbsp red wine vinegar

Mush ingredients all around in your raw pork and refrigerate over night in an airtight container to increase the flavor absorption. Cook normally the next day.


We even ground our own fennel seed with a mortar and pestle. Fancy, I know. It smelled SO good! Like licorice actually. I couldn't believe how fragrant it was.

Incidentally, the soup was a fiasco, so I'll spare you from that recipe. Midway through cooking, it seemed too bland so we added a bunch more flavorings. In the end, it ended up being way too salty and we didn't eat much of it. Drat! Note to self for next year's Christmas Eve dinner dish? Keep it simple!


Hope your holiday was happy and bright!


Never miss a post! Subscribe to ShannonSews
Like on facebook.com/SSorensenDesigns
Follow @ShannonSews1 on Twitter
Subscribe to youtube.com/ShannonSews

Sunday, December 23, 2012

Nutella Coconut Cookies: easy and delicious!

Nutella Coconut Cookies are a quick, simple chocolate cookie recipe
A couple nights ago my husband came home at 7pm and informed me that he signed up to bring a dish for tomorrow's potluck. Oh, and a couple dozen cookies.

For a brief moment I felt like the mother of a 2nd grader who was just told while tucking in her child,  "Oh by the way, I'm supposed to bring 3 dozen cupcakes for a class party tomorrow. Goodnight." I'm sorry, wha??

It wouldn't have been a huge deal, except for the fact that I was exhausted from being sick the past several days with a sore throat & stuffy head. Top of my list? Not so much baking batches of cookies.

However, having been home pinning things on Pinterest, uh ehm, recovering that day, I suddenly had a moment of IPR (Instant Pinterest Recall). Some call it a disease, I call it a miracle.

"Nutella Cookies! Only 3 ingredients! Bake for 8 minutes!", I blurted out as Pinterest took over what little brain power I had left.

Crisis averted. My sanity, and the potluck, were saved. Thank you Tasty Kitchen!

Nutella Coconut Cookies

*Revised from Tasty Kitchen's Nutella Cookies Recipe

These cookies are like a little brownie bite - lightly crispy on the outside and soft and chewy on the inside. If they weren't for the potluck I would have eaten all 24 of them!

Ingredients
1 cup Nutella
½ cup Sugar
1 cup All-purpose Flour
1 whole Egg
*we added 1 Tbsp water
*we added 1/2 c. shredded coconut

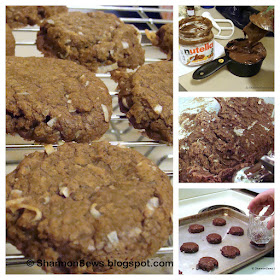
Preheat oven to 350 F. Blend all ingredients together well. Form into 1" balls. *I used a cookie scoop. Place on a cookie sheet. Press down firmly with the bottom of a glass. Bake 7-8 minutes or until set. *I ended up baking them for 10 minutes maybe because mine were a little thicker. Cool on a baking sheet.

Nutella cookies are easy chocolate cookies with a soft, chewy texture

YUM!
Bring these to your next holiday party!

Holly Berries Happy holidays from Shannon Sorensen DesignsHappy Holidays my friends!


Never miss a post! Subscribe to ShannonSews
Like on facebook.com/SSorensenDesigns
Follow @ShannonSews1 on Twitter
Subscribe to youtube.com/ShannonSews

Friday, December 21, 2012

Remembering Newtown

It's surprising to me that the tragedy in Newtown happened 1 week ago today.

It feels like just yesterday.

My heart is still heavy for all those lost and their grieving families.

We've seen an outpouring of love and prayers for people we may not even know, but we feel for them and love them anyway.

We've seen an inspiring tribute to those lost, by many who have chosen to focus on giving through acts of kindness and spreading love throughout the world.

We'll never forget those little ones and the heroes that lost their lives trying to protect them. They'll forever be in our hearts.


Never miss a post! Subscribe to ShannonSews
Like on facebook.com/SSorensenDesigns
Follow @ShannonSews1 on Twitter
Subscribe to youtube.com/ShannonSews

Wednesday, December 19, 2012

Couponing in Seattle

couponing and saving money in Seattle
Sorry I disappeared again. I've been clipping coupons.

During a free trial of netflix, I stumbled upon the show "Extreme Couponing". Maybe you've heard of it? There's a buzz of controversy about it these days - primarily about the extreme part.

The show was fun to watch, but I'm not the extreme type. I'm not interested in having giant stockpiles of deodorant.  I'm not diving into stinky dumpsters hoping to score a few extra coupons. I'm not buying loads of cat food when I don't have a cat because buying-it-gives-me-points-that-lead-to-free-stuff.

What I do have time for, is smart couponing to save money on groceries and other necessities. Woohoo! With my husband out of work for several months, it has helped tremendously.

Tips for couponing

I've learned so much about making the most out of couponing since I started. Myfrugaladventures.com and Thecrazycouponlady.com are great sources of information.

Here are a few valuable things I've learned that might help you stretch your dollar too!

Tip 1: Where to get coupons

  • Sunday Newspaper inserts (Red Plum, Proctor & Gamble, Smart Source, some in Parade)
  • Weekly local newspapers (Red Plum inserts. Check your area)
  • Ask family and friends to save them for you!!
  • Some libraries give out the Sunday paper for free (Check your area)
  • Community recycle bins (I wouldn't recommend dumpster diving)
  • Print coupons online i.e. coupons.com, myfrugaladventures.com, thecrazycouponlady.com, "like" companies on facebook, and sign up through their websites
  • Look through the grocery store for manufacturer coupons next to products
You'll be AMAZED at how many coupons are floating around out there once you look for them.


Tip 2: Find coupon match-ups

Look for sites who match-up coupons with current store sales: Myfrugaladventures.com, Thecrazycouponlady.com. Or for those of us in the Seattle area: http://www.thriftynorthwestmom.com, http://www.frugallivingnw.com, http://queenbeecoupons.com; and match up your own (they don't always catch them all).

Tip 3: Match up your coupons with rock bottom prices

Paying attention to the sale cycles (see tip 4) will help you make the most of your coupons. For example, saving $1.00 on $4.00 toothpaste is good, but what if you could save $1.00 on toothpaste when it's on sale for $1.99? When you match up great coupons with great sales, you get great savings! Be sure to look in clearance sections for even hotter deals.

Tip 4: Learn store sale cycles

Did you know store sales operate on a 6-8 week cycle? At some point during that cycle certain products will hit their rock bottom price. Once you identify that, stock up and don't buy again for 6-8 weeks. If you have coupons in addition to the rock bottom prices - SCORE! *Meats are also on a cycle which rotates every 3 weeks or so (beef, poultry, pork). 

Tip 5: Stack manufacture coupons with store coupons

The best scenerio? Your store has a coupon for a product AND you have a manufacture coupon for it and what if it's even on sale?! Check your store's coupon policies to see if you can stack or double coupons. In Seattle's east side suburban area, Albertsons is the only store I've found that doubles coupons. QFC, Fred Meyer & Safeway let you stack.

Tip 6: Create meal plans around whats on sale

Instead of looking through recipes and creating a weekly plan, I look through grocery circulars and coupon match-ups and create my meals and shopping trips around what's on sale and what coupons I have. It actually makes shopping and meal planning a lot easier! 

Tip 7: Organize your coupons and shopping trips

Some use notebooks with baseball card page organizers, others (like me) use small plastic expandable folders. Use the method that works for you to organize and tote your coupons along for each trip. For an optimal couponing experience, separate each shopping trip into its own envelope with coupons and lists for each store. It has also helped me to count the number of coupons I'll be using, and have an estimate of what I'll be spending so I can tell right away if something's out of whack. Watching the register is important to make sure everything's scanning correctly!

Couponing does take time and preparation (and a stink-eye or two from impatient customers behind you), but when you end up saving 50%-80% on each shopping trip, it's worth it!

Here are a few of my favorite couponing deals so far:


favorite ways I have saved with coupons in seattle
$50.00 free groceries! Transferred a prescription and got a $50 credit

Paid only .50 cents for a premium package of sausage! Used a $1.00 off coupon for sausage that was on sale for $3.50 + a manager's special $2.00 off. Best sausage we've ever eaten! The better the deal, the better it tastes!

Saved over 80% on Ocean Spray bottled Juice! Paid .69 each (regularly $3.69) after sale, store promo and manufacture coupons

Paid only .70-.80 for cereal! With store deals, manufacture coupons and doubling coupons we saved big and stocked up on cereal normally priced at $4-$5 each.

Since starting my couponing adventures I've learned to look at what we eat and buy in a whole new way and it makes me feel good to know I'm saving us money.

Between getting our free Sunday paper, having my sister and mom set their ads aside for us, checking community recycle bins and printing them off online, we've got more than enough coupons to help us save.

Now does anyone have a coupon for printer paper? ;)


Never miss a post! Subscribe to ShannonSews
Like on facebook.com/SSorensenDesigns
Follow @ShannonSews1 on Twitter
Subscribe to youtube.com/ShannonSews

Saturday, November 10, 2012

{HUGE SALE} Great gifts for the holidays!

Hi friends! Sorry I kind of disappeared for a month. Every day I wanted to catch up, but you know how that goes...do I fill you in on the last month's happs or just call it good and start from today?! That's why my journal has been empty for hmmm....about 15 years?!

Anywho, lets jump in head first with today.

Enter HOLIDAY SHOPPING 
Yes, it's that time of year again. How'd it get here so fast??

If you're looking for some great deals on holiday gifts, check out my etsy shop. I just put the majority of my inventory on a huge 40% off sale! Woohoo! Baby bibs and burp cloth sets, Ink Blot Bibs, Onesies and T-shirts, Pillows and Pillow cases.

Buy baby bibs and burp cloths sets on sale now at SSorensenDesigns


Unique baby gift idea ink blot baby bibs on sale now


buy ink blot designed onesies unique baby gift idea


baby gift idea, unique baby onesies with ink blot designs


buy unique t-shirts for adults and kids on sale now through shannon sorensen designs


buy handmade pillow cases on sale now through SSorensenDesigns

Happy Shopping!

Sending my love and happy thoughts to everyone on the east coast!!

P.S. In case you don't know, Nov. 1st - Dec. 16th 2012 (excludes 11/22-11/26), Target stores nationwide will price match Amazon.com, Walmart.com, BabiesRUs.com, ToysRUs.com and BestBuy.com. You have to check out at customer service and tell them which retailer you are price matching & they will look it up online right there at the counter. You don't need to print anything. PLUS, if you buy something at Target and find a cheaper price from one of these retailers later, you can take in your receipt for a price adjustment. Amazing! Great money saving tip from TheKrazyCouponLady.com.


Never miss a post! Subscribe to ShannonSews
Like on facebook.com/SSorensenDesigns
Follow @ShannonSews1 on Twitter
Subscribe to youtube.com/ShannonSews

Monday, October 8, 2012

Soft Washcloths for Cold and Hot Compresses

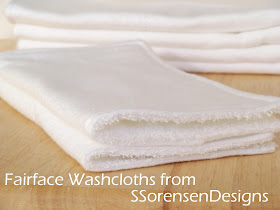
buy Fairface soft washcloths for sensitive skin and cold compress relief
As I mentioned in my Why Buy Handmade post, I put a lot of love into everything I make.

Recently, I was reminded why making things with love matters.♥

It was like any other sale. At first. A few sets of my soft Fairface Washcloths for sensitive skin. Since they are all I can use for my super sensitive skin, I make them with lots of love in hopes they can help someone else like they've helped me.

It turns out, my sweet customer needed these soft washcloths made with an extra dose of love. These soft washcloths will be used as a cold compress to soothe her face, as she goes through a chemotherapy treatment.

It's moments like this that make it all worth it. Knowing that I am helping someone else with what I make, is as good as it gets.

As it turns out, there are a lot of conditions where a soft washcloth cold compress or hot compress can bring relief. 


Using a Soft Washcloth 
as a Cold or Hot Compress
Sources: Livestrong.com, Mayoclinic.com, Webmd.com


COLD COMPRESS REMEDIES:
Cold compress: Reduces inflammation (swelling), itching, irritation, bruising, and constricts blood vessels. A cold compress can be made by soaking a soft washcloth in cold (ice) water or placing a cold, damp washcloth in the freezer for 10 minutes and then applying. When the washcloth warms up, cool off again, ring out and reapply.

Headache
Place a cold washcloth compress on your forehead allowing blood vessels to constrict and reduce the inflammation that causes the pressure and pain in your head.

Eczema or other Itchy Skin
Apply a cold, soft washcloth compress for 10 minutes to ease itchy skin. Repeat as needed until itch subsides.

Puffy eyes
Put a soft, clean washcloth in cold water, ring it out, and place it on your puffy eyes (best time right after waking). Repeat until the puffiness subsides.

Vaccination sites *See heat also
Place a cold compress on the site to reduce swelling, redness and tenderness within the first 12 to 24 hours. *See heat for next step

Wisdom tooth or other tooth pain
Hold a cold compress against your jaw to relieve pain for about 10 minutes, keeping cloth cool.

Fever
Cool your body down by placing a cold, soft washcloth compress on the forehead or nape of the neck where the hypothalamus is located for optimal cooling effect.

Sunburn Relief
Cold washcloth compresses can help relieve the heat of your sunburn, even if it's only temporary. Also try putting your clothes in the freezer before wearing to keep sunburned body cool (never thought of that before!).

Acne *also see hot compress
Temporarily relieve cysts, or other painful acne that haven't come to the surface. A cold compress (dampened, then frozen for 10 minutes) can reduce inflammation and pressure (gives you a numbing affect). 

Breast feeding *see also hot compress
Cold compress after nursing can bring comfort. Heard this from a friend, so do what works best for you.  

Sinuses, Allergies *see also hot compress
Alternate between hot and cold compresses to relieve a stuffy nose. Hot loosens the mucus, cold reduces nasal swelling and pressure. Use two separate washcloths. Soak one washcloth compress in hot water and lay over sinuses, below eyes, over nose. After 1 minute, rotate out with new cold compress at same location. Continue rotation about 10 minutes until you find relief.


HOT COMPRESS REMEDIES:
Hot compress: Increases blood flow, loosens and relaxes sore, stiff, achy muscles, tired dry eyes and relieves arthritis. Heat can also promote healing acne. Hot compresses are made by soaking a soft washcloth in hot or warm water (not too hot to burn yourself), ringing it out and using it on the affected area. When the washcloth cools, re-submerge in hot water, ring out and repeat.

Eyes
Ease tired dry eyes, reduce muscle pain, relieve a stye, and increase circulation around your eyes. 

Vaccination *See cold compress
During the 24-48 hours after the shot, elevate and apply a warm compress to the vaccination site to help relieve the muscle pain. *See cold for first 12-24 hours.

Sinuses, Allergies *listed in cold compress
Alternate between hot and cold compresses to relieve a stuffy nose. Hot loosens the mucus, cold reduces nasal swelling and pressure. Use two separate washcloths. Soak one washcloth compress in hot water and lay over sinuses, below eyes, over nose. After 1 minute, rotate out with new cold compress at same location. Continue rotation about 10 minutes until you find relief.

Acne *also see cold compress
Moist heat helps bring white blood cells to the affected area, speeding healing, and bring impurities to the surface. To close your pores again, rinse with cold water.

Breast feeding *see also cold compress
Warm washcloth compress before nursing can bring comfort. Heard this from a friend, so do what works best for you.


Who knew there were so many uses for a soft washcloth? Instead of reaching for an ice pack or heating pad, which can sometimes damage skin tissue if used incorrectly, reach for a soft washcloth compress. Hope it helps! xo


Never miss a post! Subscribe to ShannonSews
Like on facebook.com/SSorensenDesigns
Follow @ShannonSews1 on Twitter
Subscribe to youtube.com/ShannonSews


Linked to:
http://sewmanyways.blogspot.com/, http://www.iheartnaptime.net, http://www.flamingotoes.com, http://sewchatty.blogspot.com, http://www.thegirlcreative.blogspot.com http://www.ishouldbemoppingthefloor.co m, http://sewcando.blogspot.com, http://creatingreallyawesomefreethi ngs.com, http://makingtheworldcuter.blogspot.co m, http://craftomaniac.blogspot.com, http://www.betweennapsontheporch .blogspot.com, http://www.skiptomylou.org, http://diyshowoff.com http://www.linesacross.com  http://www.keepingitsimplecrafts.com/ http://sarahdawndesigns.blogspot.com

Friday, October 5, 2012

{Grow} your Blog through Guest Posting

Guest posting to grow your blog and gain new readers
Want to grow your blog and gain new readers?

Guest posting 
is a great way to do it!

If you have something crafty to share and want to share your talents with a new community of readers, I'd love to have you as a guest writer on ShannonSews!

Simply contact me through ssorensendesigns [at] hot mail [dot] com (sorry I have to write it that way or the email spammers will get me) and I'll share the details with you.

Guest Posting doesn't cost a thing, so think of it as a little free publicity! And in this economy, free is always a plus. Am I right?

Looking forward to hearing from you.
Happy Friday!
Enjoy your weekend my friends! xo


Never miss a post! Subscribe to ShannonSews
Like on facebook.com/SSorensenDesigns
Follow @ShannonSews1 on Twitter
Subscribe to youtube.com/ShannonSews
Wednesday, October 3, 2012

Create your own Stencil with Freezer Paper

Use freezer paper to make your own stencilsGive a crafter 5 minutes and she'll find a new use for something.

Did you know Freezer Paper can be crafty? Oh yes, it's not just for meat, my friends.

It can be used as a fabric stabilizer when painting on fabric, and it can also be used to make your own stencil designs. I'm sure there are many other things its good for that have nothing whatsoever to do with meat.

I've been wanting to try making my own stencil using Freezer Paper for a long time. When I made my niece's Domestic Diva Tool Pouch, I finally found a good excuse to try it.

Freezer paper is like magic! Try it once and you'll be hooked. You'll want to stencil everything in the house.


How to create your own stencil with freezer paper


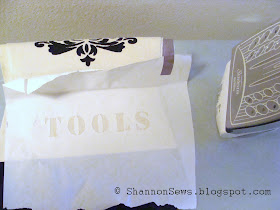
First step: (shown in the photo above) Print out the words or image you want to stencil and tape it to the freezer paper's non-waxy side. (You may be able to print directly on your freezer paper, if your printer doesn't use heat.) 

With something underneath to protect your cutting area (self-healing mat, cardboard, magazine) carefully cut out each letter through the paper and freezer paper.


Cut out your stencil design with a sharp exacto knife

Carefully peel off your taped paper. If you have cut out letters that have a center to them, be sure to keep those little pieces. You'll need to iron them on.


Once your design is cut out and tape peeled off it's ready to be iron on

Iron the shiny (waxy) side down to the fabric. Make sure to adhere especially around each letter.

Place the freezer paper stencil's waxy side face down on the fabric and iron on

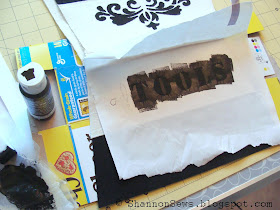
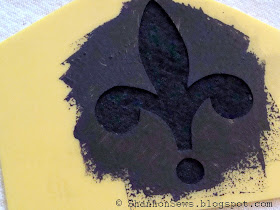
Apply your fabric paint with a sponge directly over the stencil and allow time to dry.

Paint directly over stencil with fabric paint

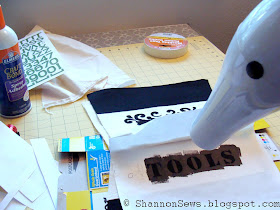
I was a little pressed for time, so I whipped out the hair dryer to cut the drying time.
Before removing stencil allow to dry or use hair dryer


I added a pre-made stencil design before the front was complete. I used spray adhesive on the back of this plastic stencil and adhered it to the fabric. Both the freezer paper and bonded plastic stencil peeled off easily when dried.

Adhere pre-made plastic stencils to fabric with spray bond


And here is the finished stencil. I really love the way it turned out.

Freezer paper stencils and adhered stencils peel away easily to reveal the design

There was a little bit of paint bleeding on the letters, but I think it will just take time to perfect the art of stenciling.

Cutting small details with an exacto knife also takes patience and practice. Since making this pouch, I purchased a knife with a skinnier blade and will see if it makes cutting with precision a little easier.

For the back of the pouch, I used a pre-made plastic stencil and adhered it with Craft Bond spray adhesive.

Use adhesive bond to adhere pre-made stencils to fabric


Here's the back. The paint bled a little through the stencil, but still looks nice. I guess I'll just need to spend more time stenciling. Practice makes perfect, you know.


Add personal details to fabric with freezer paper stencil designs

Here is one last look at the tool pouch, in case you haven't seen the finished product. Read about how I made this Domestic Diva Tool Pouch and what gems are tucked inside.

Finished zipper pouch showing freezer paper stencil designs


Never miss a post! Subscribe to ShannonSews
Like on facebook.com/SSorensenDesigns
Follow @ShannonSews1 on Twitter
Subscribe to youtube.com/ShannonSews
Monday, October 1, 2012

Why buy Handmade? {Reasons you should}

Buy Handmade for yourself or gifts for someone else.
We are the creators

the architects

the authors and fabricators

We are the inventors, the planners and producers

We are the originators, the engineers and the designers.


We are the makers of handmade


As a maker and seller of things handmade, I can tell you there's a little bit of magic that goes into everything I create. An intermingling of dreams and imagination, a dash of determination and a lot of heart. To me, it's personal.

Each item I make is made with another in mind, for one day it will find a place in someone's home. And being a perfectionist at heart? Only my best craftsmanship will do.

And for the buyer or the giver? It's personal too. Anyone can run to a retail outlet and find something that 3,856 other people have, but handmade? Handmade is one of a kind. It's like a snowflake. No two are exactly the same. And that's what makes it so special. That's what makes it so unique. That's what makes it so personal.

Our world is made up of so many amazingly creative people. It's a shame we don't know most of them, but they are out there. If you look. With their little shops, sharing the things they've created with the world.

They are people like you and like me. Instead of long commutes, it's a walk down the hall. Instead of large board rooms, they're small spaces. Instead of 8-5, they're open all hours. Instead of a marketing team, it's one creative mind. Instead of machinery, two hands carefully put it together. You're supporting a craft. You're supporting hard work. You're supporting a family. You're supporting a dream.

And I've got to tell you, there's no better compliment than someone thinking enough of what I've made to buy it and have it in their home. Sheer bliss.

So the next time you're looking for a gift for someone you love? Your mom, dad, niece, nephew, son, daughter, a new mom, a cute baby, a friend's birthday, a wedding, an anniversary, a holiday, share a little magic and shop handmade. It's like mailing a letter, instead of an email. And these days it means that much more.♥

.............................................................................
If you are a maker of things Handmade or know someone who is, share this post and spread a little Handmade love today! xo


Never miss a post! Subscribe to ShannonSews
Like on facebook.com/SSorensenDesigns
Follow @ShannonSews1 on Twitter
Subscribe to youtube.com/ShannonSews

Friday, September 28, 2012

Add Seam Allowance {when you don't have a pattern or your pattern doesn't have it}

How to add seam allowance to a sewing project if you don't have a pattern or the pattern doesn't have it
I have never sewn from a pre-made pattern before. I don't know whether I'm just stubborn, intrigued by a challenge, or lazy (maybe a bit of all 3) but I've always just tried to envision how something would fit together, and then make it.

In one of my sewing escapades, I created a pattern for something but realized I hadn't accounted for the seam allowance. Oops. If I had made it as-is, it would have ended up too small.

When joining two fabrics together, that important extra allowance of fabric (generally 1/2" all around), prevents your creation from falling apart at the seams. Literally. As well as preventing fraying from occurring right on the joining seam.

If you forget to add seam allowance and realize it after you've cut out your fabric? Move your breakables and tell your husband to exit quickly, because you'll want to punch something.

If you forget to add seam allowance to your pattern before you've cut out your fabric? No problem! Everybody's safe! I have an easy solution.

First let me tell you about my go-to cutting tools.

I love my Fiskars Rotary Cutting Set. It comes with a self-healing mat, rotary cutter and acrylic ruler. If you don't have these three things? Get them. I use them all. the. time.
Fiskars Rotary Cutting Set is essential for any seamstress and comes with a self-healing mat, rotary cutter, and acrylic ruler
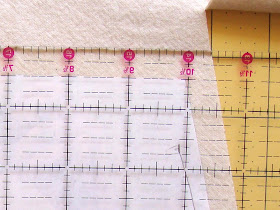
The Acrylic ruler is what I use to add and cut my fabric with seam allowance when my pattern doesn't have it. It has little measurement lines that help you see exactly where 1/2 inch is, so you can add it easily before cutting. And it's the perfect straight edge.

Acrylic rulers help measure seam allowance and can be used as a precise straight edge

For something straight, it was simple to add 1/2" and simply cut with the acrylic ruler in place. The white paper is my pattern without seam allowance. With the ruler in place, I added 1/2" on each cutting point.

Place acrylic ruler on top of fabric, adding seam allowance of 1/2 inch to all sides

For adding seam allowance around a curve, you can use a regular ruler, or cloth measuring tape. At the 1/2" mark, go slowly around the curve, making marks directly on your fabric every so often to keep it even, with a disappearing ink pen (this photo is of me adding it to a pattern, but if you've already cut your pattern, write directly on your fabric).

*disappearing ink pens allow you to write on fabric and then blot off color with a damp cloth. They come in very handy!

Add seam allowance to a curve by using a ruler at 1/2 inch and mark spots with pencil


Don't fret if you made your own pattern or bought a pattern that doesn't have seam allowance! It's easy to fix BEFORE you cut...or husbands be warned. :)


Never miss a post! Subscribe to ShannonSews
Like on facebook.com/SSorensenDesigns
Follow @ShannonSews1 on Twitter
Subscribe to youtube.com/ShannonSews

Wednesday, September 26, 2012

Thrifted Table Makeover

Makeover a thrifted table to look like newI've been looking for a little table to put next to the couch for many moons. Something small and simple. It's way too easy to drop mail and keys on the coffee table and in three seconds it looks like a big old mess.

As luck would have it, my manager was going to give away this little red table from our after-school program room, so he said I could take it.

Free furniture! And just the kind of table for that little empty spot next to the couch. It would be perfect! But not red.

Eeek gad! That meant another painting project. After updating my dressers and desk I thought I was done with the painting projects already. Not sooo fast.


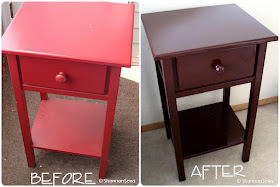
So off to Home Depot I went for a can of moca brown spray paint.  I already had sandpaper and a tarp from my other furniture makeovers, so I was all set.

After a little elbow grease with the sanding block and a shake, shake, shake of the moca brown spray paint, it was as good as new.

Spray paint an old table to look like new

It took a little finagling to spray the whole thing inside and out (I took the drawer out, knob off and was down on my knees in strange positions as I sprayed them all out on the confined space of my small deck), but was totally worth it.

Fix up a thrifted table with spray paint

I love the dark brown color. I thought about distressing it, but decided just to keep it clean and simple. It now sits perfectly by the side of the couch. And for only the cost of a can of spray paint? Fabulous!

Fixing up thrifted furniture is a cheap alternative to buying new

Looking for new furniture for your house? Before you start shelling out the big bucks, check out the pieces at your local thrift stores. Fixing up thrifted furniture is a cheap alternative to buying new and as you can see, with a little love and spray paint? It can look as good as new!


Never miss a post! Subscribe to ShannonSews
Like on facebook.com/SSorensenDesigns
Follow @ShannonSews1 on Twitter
Subscribe to youtube.com/ShannonSews
Monday, September 24, 2012

Low cost {Big Impact} Gift Idea: Memory Book

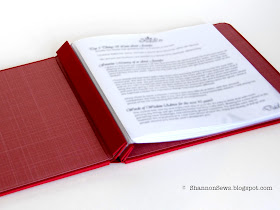
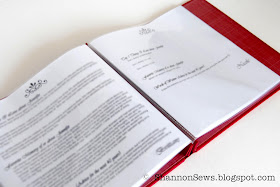
Great gift idea on a budget to compile thoughts, memories and advice for someone you love My sister celebrated a big number birthday this year - the big 40 - and was feeling a little less than celebratory about it.

Age has a way of creeping up on you and kicking you in the shorts. I knew just how she felt. I'd been there not long ago myself.

What to give her? No little gift would do. Not for this birthday. I wanted to give her something she would treasure. Something that would lift her up. Something that would make her feel the strength of 40 years, instead of feeling worse for wear from them.

No small order, right??

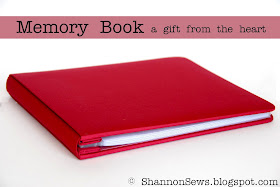
With finances tight, I didn't have a lot of options so I had to think outside the box. But you know what they say? Some of the best gifts are the ones money can't buy, or in my case, just enough money to buy a memory book to store them in.
Write your memories, advice, what you love about a person and put it in a book for them

My goal: to compile a little book of thoughts for my sister from each member of our family. I decided to help guide each response by giving it some structure.

Structure the format with pre-set questions and/or statements to unify the book

I had each person share the top 3 things they love about her
A favorite memory with her or about her
and advice for the next 40 years

Great gift idea if you're on a budget to compile memories and thoughts of someone you love

It may just be that I have the most wonderful family in the world, and yes, I'm a little biased, but their words were so touching and sincere. Who wouldn't want a book about how much people love you? 

♥ I hope this memory book will be something she'll cherish for years to come.
♥ I hope it brings her comfort when she's feeling down.
♥ I hope it lifts her up when she's not feeling good about herself.
♥ I hope it gives her a fresh perspective when she's lost her way.
♥ I hope it reminds her how much she is loved.
♥ I hope it gives her peace in her past and present and hope in her future.

I don't think a flashy new car or dream vacation can give you that. But it can't hurt, can it? hahaha
For now, I hope it's just what she needed to stare 40 straight in the face and laugh. xoxo


Never miss a post! Subscribe to ShannonSews
Like on facebook.com/SSorensenDesigns
Follow @ShannonSews1 on Twitter
Subscribe to youtube.com/ShannonSews

Friday, September 21, 2012

Add Slip Pockets to a pouch, tote or purse

Slip pockets: Tool Pouch

 I love little "extras" that keep things organized.

Adding slip pockets to the lining of totes, purses or pouches is a great way to keep the quick reach items handy, while keeping them separated from the black hole (aka the rest of your purse "stuff")....I know it's in here somewhere...
Adding slip pockets to my Ruffled Tote was the perfect way to separate my cell phone, keys and pens from the rest of my useless clutter necessities. (I used Method 1 for this purse)

Slip Pockets in Ruffled Tote on one side, zippered pocket on the other

{2 methods}: Adding Slip Pockets to a Pouch, Tote, Purse or Bag


There are a couple useful methods I've used to add slip pockets to purses or pouches. You can also add them to existing totes, if you don't mind stitching showing on the outside.

Method 1: Top Stitch

For this method, cut the fabric for your pocket double the length, fold it over (right sides together) and sew it together, leaving an opening to turn it.

It will create sort of a tube of fabric

With your "tube" right side out, the fold at the top of your slip pocket, and the open section at the bottom -  tucked together, Top Stitch your slip pocket to your lining, leaving the top open for your pockets. Add separating lines by stitching right down the pocket to create as many sections as you need. 

add slip pockets to purses, totes or pouches by folding fabric in half, sewing them together and top stitching to lining
Slip Pocket added to Ruffled Tote purse lining (Top Stitch Method)

Method 2: Flip Up

I used this method for my Tool Pouch. I only used one layer of fabric, but you can sew a "tube" as shown above in Method 1 and follow this to add it to your lining.

Take your tube or one layer of fabric, the length of your slip pocket and lay it upside down, right sides together. Fold in the side seams and stitch just along the bottom.

Add easy slip pockets to lining with this easy method


I also added a small zig-zag stitch to secure the fabric from fraying.


Now flip up your fabric


Pin the sides down (with seams folded under). 


Top stitch just the side seams to secure
Add separating lines through the pocket and lining.


Adding slip pockets to your tote, purse or pouch really is one of the easiest pockets you can add for a bit more organization. Try it, you'll like it! I promise!


Never miss a post! Subscribe to ShannonSews
Like on facebook.com/SSorensenDesigns
Follow @ShannonSews1 on Twitter
Subscribe to youtube.com/ShannonSews