Thursday, May 24, 2012

Baby Bibs: Ink Blot Style

Don't tell me you didn't see this coming.
You knew I'd find something else to put an ink blot on.
And I did.


Introducing the newest ink blots in the shop.


::Ink Blot Baby Bibs::
All the smart babies are wearing them.


All bibs are made with soft white jersey on the front, and absorbent white terrycloth on the back.


And an easy on-off velcro closure.


One of my favorite parts about ink blot designs is figuring out what I see when I'm done.
1. Bunnies dancing
2. Spider smiling
3. People dancing
4. Storm trooper

{What do you see?}


Never miss a post! Subscribe to ShannonSews
Like on facebook.com/SSorensenDesigns
Follow @ShannonSews1 on Twitter
Subscribe to youtube.com/ShannonSews

Monday, May 21, 2012

Decorated Baby Onesie Bums

A week just isn't complete without making at least one Ink Blot Onesie.
After I drip and splatter the paint, it's like Christmas to open up the fabric and see what appears!

After the original purple "Orbiting Planets" Onesie was made (front design only), I decided to give it a little extra sumpin sumpin.

Who can resist a cute little decorated Onesie Baby Bum?
I certainly can't. And I figured since they make them with ruffles, why not Ink Blots?


It's kind of a two for one!
A fun little ink blot design on the front.


And a little surprise bum blot on the back.
What do you see?


This Onesie (size 18 months) is available here.
{Watch How This Ink Blot Designs was Made}:


*************************

But I couldn't stop with just one. So I made another.

This next one I see a Rabbit on the front and a Tiger on the back
...but maybe that's just me.
What do you see?


This 18 month Ink Blot Onesie is available here.
{WATCH to see how it was made}


Have you tried making your own yet? You can always buy yourself an Ink Blot Onesie Kit here. They're more fun that a barrel of monkeys! Or rabbits, or tigers, who knows what you'll come up with?!


Never miss a post! Subscribe to ShannonSews
Like on facebook.com/SSorensenDesigns
Follow @ShannonSews1 on Twitter
Subscribe to youtube.com/ShannonSews

Friday, May 11, 2012

DIY Brown Bag Microwave Popcorn

I love popcorn.

Back when I was a kid, one of my favorite memories is when my dad made us popcorn fresh from the stove.

Oil, pot, popcorn kernels, butter and salt, and of course, our super-sized yellow tupperware bowl. He'd fill it to the brim with piping fresh popcorn and we chowed down as many handfuls as we could.

Realizing I ran out of microwave popcorn the other day, my husband suggested making popcorn in a brown paper bag. Ha! Whatever you say. (I'll be honest, I was doubtful. Shame on me.)

BAM! Turns out, it's just as good, if not better than the microwave popcorn you buy in the store. And it's cheaper overall. We bought a whole stack of brown paper sacks for $1.99 and a bag of popcorn for about the same price.

Okay, I'll get to it. You've got to try it for yourself.  
Here's what you need to make your own Brown Bag Microwave Popcorn:
  • 1 Brown Paper Sack
  • 1/3 c. dry popcorn kernels
  • between 1/2 to 1 Tbsp butter OR olive oil OR canola oil
  • Shakes of salt
  • Melt your butter or pour your oil in a measuring cup
  • Add kernels
  • Add salt
  • Stir around, coating all kernels

Pour your buttery/salty goodness right into the bag. I put a plate under the bag to prevent an oily mess.


Fold over the brown bag 3 times to seal. It will slightly unfold during cooking which is ok as long as its not all the way.


Put it in the microwave on its side for 3 minutes, but be prepared to stand by and listen to see when the popping starts to slow down. Mine took about 2-1/2 minutes or so. It can burn. So beware. Put your listening ears on.


When it first started popping it was like a happy surprise! It's working!!


Transfer freshly popped popcorn into a bowl.


Mmmmm...light and fluffy just like Orville makes it.


And if you time it right, only a few stragglers remain unpopped, just like in those "other" microwave bags.


So far we've made 3 different batches, trying for perfection.
  • Butter & salt = really good
  • Touch of butter + Olive Oil & salt = maybe even better than just butter
  • Just plain kernels, nothing added = burned. I'm still smelling it, thank you very much.

Make a new fun family tradition of making your own brown bags of microwave popcorn! Try different combinations, add different flavorings, and you'll get to eat the whole bag yourself! (That's the best part!)


Never miss a post! Subscribe to ShannonSews
Like on facebook.com/SSorensenDesigns
Follow @ShannonSews1 on Twitter
Subscribe to youtube.com/ShannonSews

Wednesday, May 9, 2012

Add Belt Loops to a Shirt - it's so easy!

Want an easy way to add definition to your waist?
Add simple belt loops to your favorite top, along with a coordinating belt or ribbon, and all at once, you've improved your waistline!

A while back I posted a very similar tutorial on how to add belt loops to a shirt. It's so easy, that I decided share this tip again, this time with a cute sky blue linen tank.


This is the shirt before adding belt loops. 
All you need is a measuring tape, piece of matching embroidery floss and a needle with a medium width eye.


First, put your top on and decide where you want your sash/belt/ribbon to be. Your belt or sash should hit the smallest part of your waist.

Either check the measurement from your armpit down, or mark the spot with a safety pin and then take it off and measure the length. Make the measurement the same for both sides.


Next, cut off 2 pieces of embroidery floss. Mine were about 3 inches long. If you have a wide belt, you'll want to cut bigger pieces.  Tie a knot on one end of each piece.

Thread your floss through your needle, careful not to split the threads.


Insert your needle from the inside seam out.


Then go back through the seam to the inside. Make sure your width is wide enough to accommodate your belt/sash/ribbon.


Tie a knot on the inside, other end.


Gently pull the loop out on the right side of your top. Now on to the other side.


 It's kind of hard to see (and that's a good thing!), but this is the tank top with the added belt loops.


Now just add a ribbon, belt or whatever you choose.


Looks like it was made this way!


And the great thing about these simple little belt loops, is that if you're not in the mood to accentuate your waist? You can go inside the shirt and pull the floss tight and it barely shows on the outside.


Never miss a post! Subscribe to ShannonSews
Like on facebook.com/SSorensenDesigns
Follow @ShannonSews1 on Twitter
Subscribe to youtube.com/ShannonSews

Monday, May 7, 2012

Make a Small Shirt Bigger II

With summer just around the corner, I thought I'd better get this white under-tee ready for use, to wear under sheer tops or anything needing a little extra coverage.

Many moons ago, I posted How to Make a Small Shirt Bigger with a black under-tee, that was very popular. Hopefully this will help many of you as well. Same idea, different color.


This under-tee is meant to be tight fitting, but after washing it, it became more of a sausage casing. I hate the feel of underarm squeeze.


By adding panels to each side, it gives the under-tee a little more breathing room and is much more comfortable.  This easy adaptation can be applied to any small t-shirt to give it some more room.

Here's how:

First, measure the side seam from the armpit down to the base seam. 
*For a sleeved t-shirt, measure from the outer edge (under the sleeve) down to the base. 


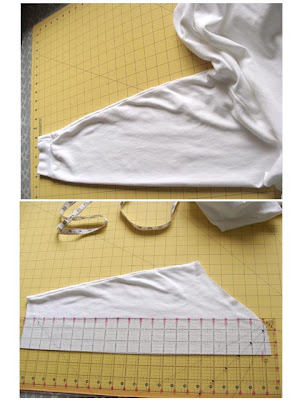
Find t-shirt material you want to insert into the side seams. I chose to cut up a white clearance t-shirt, into two 3" strips. How much wider you want your shirt will determine how wide your inserts should be.


Next, lay out your shirt and cut off the side seams on both sides, just up to the armpit.


Pin your strips right sides together, to each side seam.


For jersey knit, I use a ball point needle. Regular needles can make permanent holes in knit. And, since knit is stretchy, I also turn my pressure dial down to between 1-2, to prevent a wavy seam.


Sew the seams together.


Once your panels are added, turn the shirt right side out and trim off the excess. Knit doesn't fray, so you're safe to have a raw edge. You could also have turned the edge under previous to sewing, but since my knit was a little heavy, I left it raw to prevent bulk.


And you're all done! It really is quite simple.

Here's the before again...


And the after:


See how those panels give it a little more room? No more sausage casing.
Now it's ready to wear...and much more comfy.

You might also want to try adding colorful side panels to a top for a little color blocking. Might be fun to try for summer. Even with a top that already fits!


Never miss a post! Subscribe to ShannonSews
Like on facebook.com/SSorensenDesigns
Follow @ShannonSews1 on Twitter
Subscribe to youtube.com/ShannonSews
Blogging tips