Friday, May 31, 2013

Add Belt Loops to Pants Tutorial

Tutorial: add belt loops to pants
Several weeks ago, when the warm sun made an appearance in Seattle, I reached for my capris, excited to put them on again after a long winter sabbatical.

As I clasped the front blue button, all at once I had flashbacks of previous summers, hiking them up every 5 seconds as they shimmied down my hips. Blasted hip huggers. I'm not one for peekaboo undies, thank you very much.

I needed to keep these capris nice and snug above the underwear line, without having to constantly keep pulling them up. Easy solution? Add simple belt loops to these pants to keep them right where they should be. It worked perfectly! No peekaboo's. We're all grateful for that.

How to Add Belt Loops to Pants

make your own belt loops using existing belt loops as a guide
STEP 1: Cut your belt loops. There are generally 5 belt loops on pants. Two in the front and 3 in the back. Decide how wide and long you want your belt loops. Look at an existing pair of pants if you need help with sizing. Make sure your belt loops are long enough to fit your favorite belt. I cut 5 pieces of jean fabric 3-1/4" long x 2" wide.

STEP 2: Fold your fabric in 3rds

STEP 3: Iron or pin your belt loop fabric. Now you're ready to sew.


Add belt loops to pants by making your own with fabric

STEP 4: Choose your style and stitch. I decided to zig-zag stitch directly over the center of the belt loop to secure the raw edges and give it a unique finish. You can also choose to secure the edges with a zig-zag stitch, fold the edges in, and finish the outside with straight stitches on either side (as is shown above on the pair of jeans).

Sew your own belt loops to add to pants

STEP 5: Attach the base of the 1st belt loop to the center back of the pants. Put the edge of the belt loop at the base of the waistband and stitch in place. My machine doesn't take bulk very well, so I zig-zagged the loop on the underside instead of top stitching it (as is seen in step 6).

Add belt loops to pants by sewing loop to the base of the waistband

STEP 6: Secure the top of the belt loop. Fold the raw edge under, flush with the top of the waistband, and stitch to secure. I top-stitched with a zig-zag, but you can also use a straight stitch.

Fold under and sew remaining edge of belt loop to top of waistband

STEP 7: Decide placement of your remaining belt loops and mark. Look at a pair of your favorite pants with existing belt loops to help with placement. Generally there are two belt loops in the front - mid way between your hip and fly; and three in the back - one centered and two mid-way between center and hip on either side. I measured and marked with pins.

How many belt loops are on pants? Usually 5. Measure and mark where you'll sew your loops.

STEP 8: Sew on the remaining belt loops. Re-read the instructions above if needed for adding your additional belt loops.

Tutorial on how to add belt loops to pants is complete. Finished DIY belt loops.


It worked perfectly! Now my pants stay up without having to constantly yank them up to my chin (wouldn't that be a sight). I used light-weight jean fabric I had on hand which didn't totally match the dark wash capris, but since I'm not a shirt-tucker, my belt loops won't ever show.

Side note: I only got to wear these capris 1 day after adding my new belt loops because the weather here in Seattle turned a bit more like fall, than spring. Boo. I'm willing the sun to come back so I can take these capris back out of hybernation!


Job Update:

Some of you know this has been a really rough week with all that's happening with my job. I still have no answers. I haven't heard back from the program manager about my request to meet with him, so I still don't know if the next two weeks will be the last with my sweet kiddos. It's such a punch in the stomach. It's hard to keep off my mind. If I were independently wealthy I would stay right where I am, even if I didn't have a paycheck. But alas, that's not the case.

Thanks to all of you who have contacted me through twitter, facebook, email, blog, etc. and sent me your happy wishes. It means a lot.

UPDATE:
Follow updates on my job change:
First Post: Bad news (bottom of post)
Next post: When it's more than just a job
Final post: Miracles! (bottom of post)


Never miss a post! Subscribe to ShannonSews
Like on facebook.com/SSorensenDesigns
Follow @ShannonSews1 on Twitter
Subscribe to youtube.com/ShannonSews

Wednesday, May 29, 2013

When it's more than just a job

When work doesn't feel like a job, you know you've found your passion
It seems so ironic, with all that's happening at work, that just a week or so ago I posted this tweet:

"When you enjoy your work so much that it doesn't feel like a job, 
you know you've found your passion." #sewing #etsyshop

I didn't have enough room for one more hashtag: #workingwithkids

Yes, I love to sew. That's one of my jobs that doesn't feel like work because I enjoy it so much.

But I'm also the assistant manager for an after-school program. And that job doesn't feel like a job either. It's  much more than a job. I love what I do. I love going in to work every day. And that's a rare thing. It's where my joy comes from. It's where my heart is. When you work with kids, it can't be any other way. Unless you're an evil grinch.

I mentioned a couple days ago that the program manager over the entire after-school program decided to shuffle staff without any notice and move me (after going on 5 years) to a different school next year with different kids, families and staff. It's been a very emotional week. I couldn't even drive up to the school without getting a lump in my throat.

The program manager seems to think these changes will improve the program overall. But my focus is on the individual child. And I know a lot of individual children who will have a very difficult time having me leave. Including myself.

We have created a safe haven. We are the ones they share almost 5 to 7 hours a day with. We're the ones who listen to their stories, watch their tricks, praise their talents, resolve their struggles, build their confidence, protect their secrets. We provide consistency through their ups and downs, and are especially important to those kids who come from homes and backgrounds that are less than perfect.

I was born with a mother's heart, but wasn't able to have my own kids. I love these kids like they were my own. They matter to me. This job matters to me. In this place. With these children. With these families. Nothing on paper can show you that.

I'm hoping to meet with the manager and ask for him to reconsider, but it seems very unlikely he will change his decision. I have a feeling he'll hear me out and simply pat me on the shoulder and tell me change is hard. I know time can heal my sadness and I can start over at a new school, love new children, and bond with new staff, but WHY break up something that is already working well to fill holes in other places?? It just doesn't make sense to me. It can all be avoided by hiring and training good people without breaking up the great teams to fill the empty spaces.

I feel drained, defeated and very sad. I don't know entirely what the end looks like, but I'm hoping it's better than it seems right now.

Thanks for listening. Send prayers that the big boss will change his mind.

{Just a few of the reasons I love these kids}

UPDATE:
Follow updates on my job change:
Next post: Still no answers (bottom of post)
Final post: Miracles (bottom of post)


Never miss a post! Subscribe to ShannonSews
Like on facebook.com/SSorensenDesigns
Follow @ShannonSews1 on Twitter
Subscribe to youtube.com/ShannonSews

Tuesday, May 28, 2013

Weekend Recap + job changes

taking a break from sewing with a peaceful country retreat
{One of my favorite places}
This Memorial Weekend I took some time for a little R&R. It never feels like quite long enough though, does it?

I spent time at one of my favorite places with some of my favorite people (family). 

My husband had to stay behind for work, so I came back early to spend some time with him Monday. 

We decided to keep it simple to avoid the crazy holiday traffic, and keep it close to home, but far enough to get out of dodge.


It was pouring rain, but we didn't let that stop us! First stop, Tolt River Suspension Bridge in Carnation, WA. It's so beautiful out there with all the lush green fields and swift rivers. There were quite a few campers, so walking over the bridge got a little more tipsy than usual, but we made it without getting too sea sick.

Seattle are day trip Tolt River Suspension Bridge Carnation, WA
{Tolt River Suspension Bridge Carnation, WA}

We walked along the river trails and enjoyed the peace and quiet and deep green moss covered trees. At the end of the trail we ran across a Bat House (skinny narrow black "house" on the top of a pole). I had visions of bats swarming the area. Don't make me walk down there at night!

Seattle day trip Tolt River Bridge Trails
{Tolt River River Trails}

Turns out a Bat House (also called a nest box), is made for animals to nest in and helps maintain threatened bat species. I had no idea, but bats are a means of natural mosquito and insect control in some parts of the world. If they'll keep the mosquito's down in the area, great. Just stay out of my hair.

After grabbing a quick bite to eat, we stopped by the ever scenic Snoqualmie Falls on our way home. I love to see the falls when the water is full and roaring. Although it was still pouring rain, we managed to get a few peeks at the falls before we got back in the car. I was surprised at how many tourists ventured out in the rain. I guess if you're visiting Seattle, you can't wait for the weather to clear.


Snoqualmie Falls Seattle Day Trip
{Snoqualmie Falls - Snoqualmie, WA}
Combined with my time in eastern WA, it turned out to be a nice little getaway. Unfortunately, I had some very upsetting news from my job Sunday that has turned my life and emotions upside down, so there was a bit of a damper on my weekend, but I'm glad I could get my mind off of it for a little while anyway.

In a nutshell, they are shuffling staff around in our after-school program and decided to move me to a different school next year with a different manager and different kids to help manage their program. I'm devastated. I have developed such a strong bond with the kids I work with, as well as my manager and staff over the last 4 years. I'm so upset by this, as is my manager. We had no warning whatsoever. It may look good to them on paper, but they have no idea how it's affecting me, or the kids who have grown so close to me. Heart. Breaking. I'll keep you posted.


UPDATE
Follow updates on my job change:
Next post: When it's more than just a job
Next post: Still no answers (bottom of post)
Final post: Miracles (bottom of post)


Never miss a post! Subscribe to ShannonSews
Like on facebook.com/SSorensenDesigns
Follow @ShannonSews1 on Twitter
Subscribe to youtube.com/ShannonSews

Wednesday, May 22, 2013

Sew a basic cotton top: round or scoop neckline

sew a basic cotton round neck top
I've vented many times about how I never have anything to wear. I know, ironic, isn't it? Someone who loves to sew but never has anything to wear.  Hmm. Still stumps me.

Anywho, the other day I ventured out to Old Navy to find "something to wear", but came up empty handed. Shocker.

I did, however, do some snooping, as is often the case for me when I shop. I love to look at how things are made. I'm sure some poor shop has footage of me studying the inside of garments, while snapping a pic or two with the old camera phone. I have no shame.

ENTER Old Navy dressing room: (Like I said, no shame) I wanted to know how this simple top was made, so I laid it down in the dressing room to see the actual shape of it.

sew a basic shirt design like this top from Old NavyLook at how basic this pattern is! It's practically a square!  If only I could have lugged my pattern paper in there with me... ha! I guess I have a little dignity.

When I left the store, I didn't have a bag, but at least I had an idea. I was going to sew my own basic round neck top, because why buy something when you can make it yourself?! I'm so cheap frugal that way.


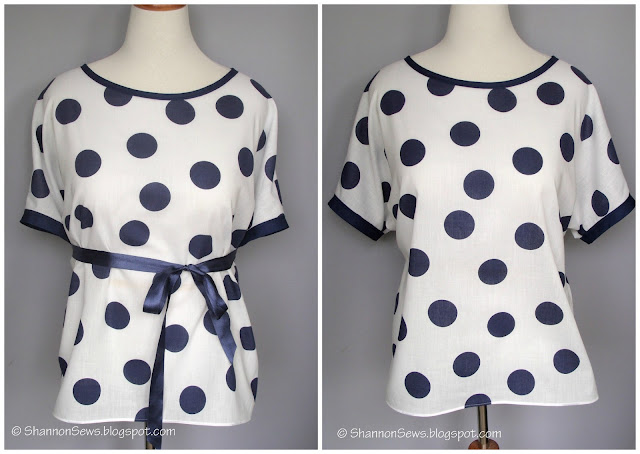
Sew your own basic cotton top


Start with a Basic Shirt Pattern

Be sure to read my post on how to make your own basic shirt pattern. This is the exact pattern I used to make my cotton polka dot top.

Here's a quick photo recap of how I made my own basic shirt pattern:

sew your own cotton top by making your own shirt pattern

Cut out the shirt and necklines

As mentioned in my previous post, I laid out the fabric in half and then folded it under in half again, to cut both shirt pieces out at once (except for the neckline).

secure your pattern to your shirt with fabric weights or pinscut out your cotton fabric front and back when making your own shirt

The necklines are different for the front and back. The back is higher than the front, so I cut both separately, based on the estimated measurements from my pattern. I always opt to cut shorter initially, so I can lower the neckline if needed.

cut shirt necklines lower in back and higher in front when making your own shirt

With both pieces cut out, I was ready to sew the shoulder seams together. Serge or zig zag stitch the raw shoulder edges to secure.

Sew the Shoulder Seams

I laid both shirt pieces (right sides together), pinned and sewed the shoulder seams. Then ironed them open nice and flat.

sew shoulder seams together first when making your own shirt

Finish the neckline and dolman sleeves with bias tape

I finished the neckline and sleeves with navy blue double fold bias tape. It was really easy to work with.

I simply opened the folded tape, laid it edge to edge right sides together, sewed on the fold, folded the tape over and stitched the other side to secure. I may be investing in a bit more bias tape after seeing how easy it was!  *Here's a good tutorial from Coletterie on bias binding


use bias binding tape to finish neckline and sleeves

Stitch up the side seams & hem the waist line

After finishing the neck and sleeves, I laid the top right sides together again and stitched up the side seams. I did a simple zig-zag stitch to secure the raw edges of the fabric.

I hemmed the bottom of the shirt using a rolled hem foot. I posted here about using a rolled hem foot (a.k.a sewing a rolled hem). It was incredibly simple.

simple shirt hemline using a rolled hem foot

And that's all there was to it!

Give necklines and sleeves a clean finish by sewing with bias binding tape

It's a cute top with or without the ribbon. I may even go crazy and use a bright ribbon like yellow, red or orange. How daring of me.

make your own round or scoop neck cotton top

I think it's safe to say there may be more summer tops in my future. This pattern is so versatile I could make t-shirts or add details to cotton tops. Lots of possibilities!


Never miss a post! Subscribe to ShannonSews
Like on facebook.com/SSorensenDesigns
Follow @ShannonSews1 on Twitter
Subscribe to youtube.com/ShannonSews


Linked to: http://www.diybydesign.blogspot.com/, http://www.733blog.com/,http://www.sew-much-ado.com/, http://www.mygirlishwhims.com/,http://somedaycrafts.blogspot.com/, http://www.gingersnapcrafts.com/, http://www.rolleduppretty.com/,http://raegunwear.blogspot.com/, http://www.adornedfromabove.com

Sunday, May 19, 2013

Make a Basic Shirt Pattern

make your own easy shirt pattern
It may seem daunting, but making your own basic shirt pattern is as easy as laying down a t-shirt you like, and tracing around it.

Then end.

Well, okay, it's not really the end, but it really is simple!


Make your own Basic Shirt Pattern

Round Neck Top

This shirt pattern is the one I used to make my new cute blue and white polka dot summer top. I gave you a sneak peek on facebook, but will share more pictures and details this week!

Trace a Shirt

The first step in making your own basic dolman sleeve shirt pattern is to find a shirt to trace that you already like the fit of. *[for more info, see dolman sleeves versus in-set sleeves]

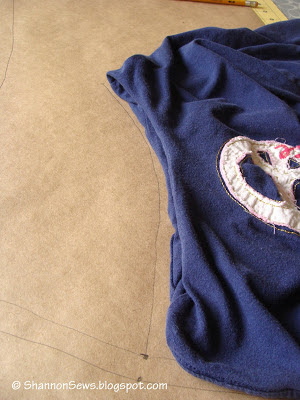
Fold the shirt in half, shoulder seams together, and lay your shirt down on a piece of pattern paper. (I use craft paper)

make a basic shirt pattern by tracing an existing shirt

Trace around your t-shirt with a pencil.
I made an "actual shirt line" and "with seam allowance line"

*I'm tracing a t-shirt, so keep in mind if you're using the pattern for a cotton shirt you'll need to add a little extra room to account for the difference in fabric and lack of stretch.

trace around an existing shirt to make your own shirt pattern

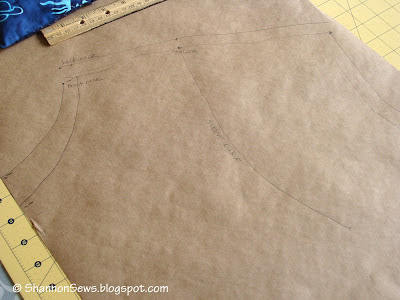
I won't be sewing an in-set sleeve this time around, but I decided to add a sleeve curve line on my pattern in case I ever wanted to. To do this, I tucked the sleeves inside and traced the curve.

trace the sleeve curve to add a sleeve to the shirt pattern

Label & cut out the pattern

I traced the back neckline, eyeballed the front, and labeled everything (i.e. front fold, necklines, shoulder seam, where the sleeve ended, etc).

label the shirt pattern with necklines, shoulder seams, etc.

Cut out your pattern along the seam allowance line.

cut out your self-made shirt pattern along the seam allowance line

Use the new shirt pattern

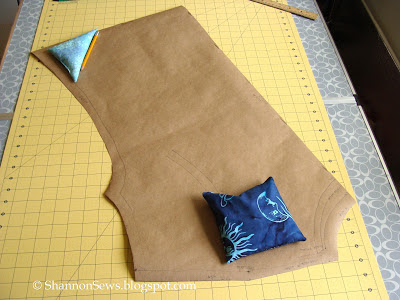
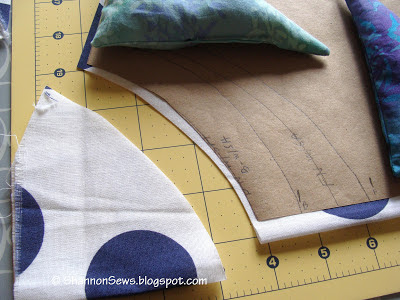
Lay your shirt pattern down on your fabric. I held down the pattern with easy fabric weights I made, but you can also pin down your pattern.

I laid my fabric in half and then turned it under in half so I would be cutting both pieces at once.

lay down the shirt pattern you made on your fabric with fabric weights


I used a rotary cutter to cut all around the pattern except for the neckline. I gave it a little extra fabric since I'm not using a knit or stretchy fabric.

Make a cotton round neck top pattern, lay on folded fabric, and cut both pieces at once


When cutting the necklines, I generally start a little higher to give myself room to cut lower. The back neckline is higher than the front.

I removed the 2nd layer of fabric and cut each neckline individually.

making your own cotton scoop neck top, cut each neckline separately

New shirt

Here is the start of a cute top, based on my new pattern. You'll have two fabric pieces for front and back.

⇒ Check back later this week to see how this shirt is put together!

simple cotton round neck top made my own pattern

This is a great basic pattern for a t-shirt or round / scoop neck cotton top and can be re-used and re-used and re-used with any number of fabrics and patterns. You can also change it up by altering the neckline, adding darts, sleeves or a different hemline for some variety.


Never miss a post! Subscribe to ShannonSews
Like on facebook.com/SSorensenDesigns
Follow @ShannonSews1 on Twitter
Subscribe to youtube.com/ShannonSews

Thursday, May 16, 2013

How to fold your fabric: neat and organized

how to fold fabric the right way to keep it organizedI love fabric. Sometimes I just like to walk by my sewing room and look at it. Or touch it. I know, I'm obsessed.

Did you know that what you look at in your creative space can either spark or dim your creativity? Cluttered or clean? Bright or dark? Organized or a big fat mess?

In an effort to create a more inspiring sewing room, I determined that a great 1st step is to organize my fabric.

How to Fold Your Fabric


A 6" plastic sewing ruler makes a great folding tool. By creating a uniform size and shape, you can store your fabric in neat little stacks. Keep it out on a shelf to get your creative juices flowing, or tuck it neatly away in an organized bin.

It take a little time, but is well worth it! I can't tell you how many ideas ran through my head just by looking at each fabric as I folded it neatly into place.

Steps to getting a neat fabric fold

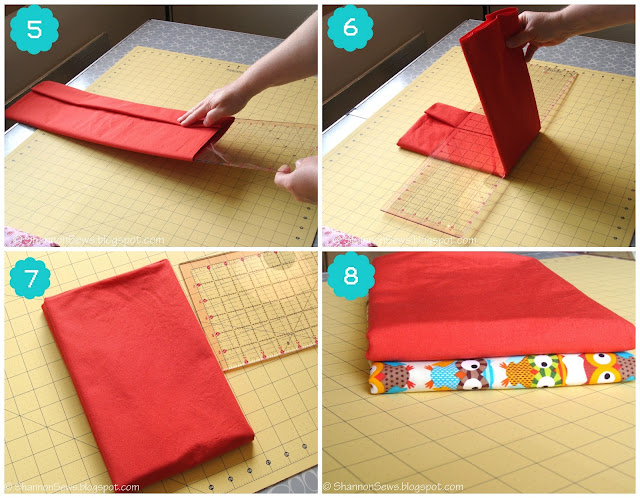
1st: Fold your fabric in half, selvedge to selvedge, and begin to wrap it around a 6" plastic sewing ruler, starting at the end. (*affiliate link included)
2nd: Wrap your fabric neatly around the plastic ruler
3rd: When you reach the "start" of your fabric, tuck the raw edge under
4th: Fold the last piece over neatly


how to fold fabric neatly using a plastic sewing ruler

5th: Gently slide the plastic ruler out from between your fabric layers
6th: Use the straight edge to create a clean fold
7th: Admire your neatly folded fabric
8th: Fold additional fabric and begin to stack and organize

fold fabric into uniform sizes for storage or display

Some like to sort these lovely folded stacks by color, others by fabric type. Decide what works best for you.


folding and storing fabric

Going through all your supply is like opening boxes of old belongings you forgot you even had! Let the new ideas and creativity begin!


RELATED POST YOU MIGHT LIKE:

*affiliate link disclosure: as an Amazon Associate I earn from qualifying purchases through Amazon.com. 

Never miss a post! Subscribe to ShannonSews
Like on facebook.com/SSorensenDesigns
Follow @ShannonSews1 on Twitter
Subscribe to youtube.com/ShannonSews


Linked to: http://sewmanyways.blogspot.com/, http://www.iheartnaptime.net, http://www.flamingotoes.com, http://sewchatty.blogspot.com, http://www.thegirlcreative.blogspot.com, http://www.ishouldbemoppingthefloor.com, http://sewcando.blogspot.com, http://creatingreallyawesomefreethings.com, http://makingtheworldcuter.blogspot.com, http://craftomaniac.blogspot.com, http://www.skiptomylou.org, http://diyshowoff.com http://www.linesacross.com  http://www.keepingitsimplecrafts.com/ http://sarahdawndesigns.blogspot.com http://www.reasonstoskipthehousework.com/, http://www.sugarbeecrafts.com/, http://www.sweetlittlegals.com/, http://www.hopestudios.blogspot.com/ http://todayscreativeblog.net/http://www.craftyconfessions.com/, http://www.diybydesign.blogspot.com/, http://www.733blog.com/,http://www.sew-much-ado.com/, http://www.mygirlishwhims.com/,http://somedaycrafts.blogspot.com/, http://www.gingersnapcrafts.com/, http://www.rolleduppretty.com/,http://raegunwear.blogspot.com/, http://www.adornedfromabove.com

Monday, May 13, 2013

Fix a low neckline: adding a neckline binding to knits

fix a low neckline v-neck t-shirt tutorial
I've had this cute striped dip-dyed t-shirt for a while, but rarely wore it because the neckline was just too low.

I tried wearing a cami under it, but it felt a bit too bulky. A while back, I had even come up with a few different ideas for altering this low neckline, but in the end, nothing seemed right.

In an attempt to find something to wear the other day, I decided I'd take the time to fix the neckline as simply as I could. If I ruined it, it would still just be in the closet anyway, so nothing lost, right??

FIXING A LOW NECKLINE

Fixing a low neckline on a t-shirt is really easy, especially after I stumbled upon the BEST video tutorial on adding a neckline binding to knits, which I promptly pinned to my Pinterest Sewing Tips Board!

She shows you how to pin and stretch your neckline binding at  just the right time to ensure your neckline doesn't bubble or gape. I could seriously hug this woman! She has taken the mystery out of altering t-shirt necklines forever!

To fix this v-neck, I first measured the existing neckline and cut a strip that size (you will end up cutting some off). I ended up just using the bottom hem from a dark blue t-shirt, but it was the equivalent of cutting a 2" strip and folding it over. 

fix a low t-shirt neckline with a strip of binding

To create the v-shape, I folded the middle of the strip in half (right sides together) and stitched on a diagonal.

Easy v-neck t-shirt alteration new neckline

When adding binding to your t-shirt neckline, the binding will be smaller than your neckline. Watch the Threads neckline binding tutorial to see how to measure and where to pin and stretch in all the right places! It seriously will change your life.

altering a t-shirt neckline using binding

After pinning and stretching and stitching in all the right ways, my neckline turned out just the way I hoped it would. Shocker!

fix a low neckline on a t-shirt by adding knit binding

Now I have one more thing to wear!
{the crowd cheers!}
And it looks like it could have easily been made that way from the beginning.
How's that for an easy breezy neckline?!

tutorial how to fix a low neckline


Never miss a post! Subscribe to ShannonSews
Like on facebook.com/SSorensenDesigns
Follow @ShannonSews1 on Twitter
Subscribe to youtube.com/ShannonSews


Linked to: http://www.ishouldbemoppingthefloor.com, http://sewcando.blogspot.com, http://creatingreallyawesomefreethings.com, http://makingtheworldcuter.blogspot.com, http://craftomaniac.blogspot.com, http://www.skiptomylou.org, http://diyshowoff.com http://www.linesacross.com  http://www.keepingitsimplecrafts.com/ http://sarahdawndesigns.blogspot.com http://www.reasonstoskipthehousework.com/, http://www.sugarbeecrafts.com/, http://www.sweetlittlegals.com/, http://www.hopestudios.blogspot.com/ http://todayscreativeblog.net/ http://www.craftyconfessions.com/ http://www.diybydesign.blogspot.com/, http://www.733blog.com/,http://www.sew-much-ado.com/, http://www.mygirlishwhims.com/http://somedaycrafts.blogspot.com/, http://www.gingersnapcrafts.com/, http://www.rolleduppretty.com/http://raegunwear.blogspot.com/, http://www.adornedfromabove.com

Friday, May 10, 2013

Belly button lint and other funny things kids say

funny kid quotes
I couldn't help myself. I had to share a few more of the funny things the kids have said at school this week. The winner this week? It's a DOOZIE! I was laughing out loud.


3rd grade girl: "Ugh! Dillon is driving me nuts with a capitol Z!"


3rd grade girl: "The presni...the presnited state...Ms Shannon, what's the guy called that's in charge of the world?"


Me: Singing with a make-shift popsicle stick microphone to a song from the 70's. (I'm so ashamed)
3rd grade girl: "If you were my mom right now you'd totes embarrass me."


2nd grade boy: [saw a hand held mirror on the manager's desk] "What, does he think he's a girl or something?"
1st grade girl: "Boys can look in mirrors too, you know."


2nd grade boy: [trying to encourage another boy to keep climbing to the top of a pole] "Come on! Are you a man or a muppet?"


AND THE WINNER OF THE WEEK BY A LANDSLIDE:

2nd grade girl: "When my dad's sleeping, I like to put my finger in his belly button because there's a lot of gunk in there and I like to pick it out."

You did not just say that.

Enjoy your weekend!


Never miss a post! Subscribe to ShannonSews
Like on facebook.com/SSorensenDesigns
Follow @ShannonSews1 on Twitter
Subscribe to youtube.com/ShannonSews

Monday, May 6, 2013

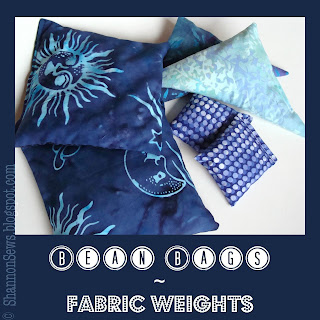
DIY Fabric Weights / Bean Bags / Rice Bags

make your own bean bags or rice bags for fabric weights
As I drafted my straight skirt pattern, and the blasted craft paper kept rolling up on me, I finally did something I should have done a long time ago!

No more fabric sliding off the table while I'm trying to cut. No more craft paper rolling back up into it's tightly wound tube.

I would finally stop the madness and take the time to make myself a set of fabric weights. Long overdue!!

Making fabric weights (or rice bags / bean bags) is probably one of the easiest sewing projects around. It got me thinking that it would be a great kids' sewing project to do at school. What kid wouldn't want their own set of beanbags? Or am I totally old school?


How to Make Fabric Weights / Bean Bags / Rice Bags

easy kids sewing project make bean bagsLets start with bean bags. Perfect for Fabric Weights to keep that pesky slippery fabric and rolling paper in place.

Materials:
-2 squares of fabric
-Thread
-Point tool (pencil, chopstick)
-8 oz Dry Beans per bean bag depending on size (I used pinto)
-Funnel or spoon


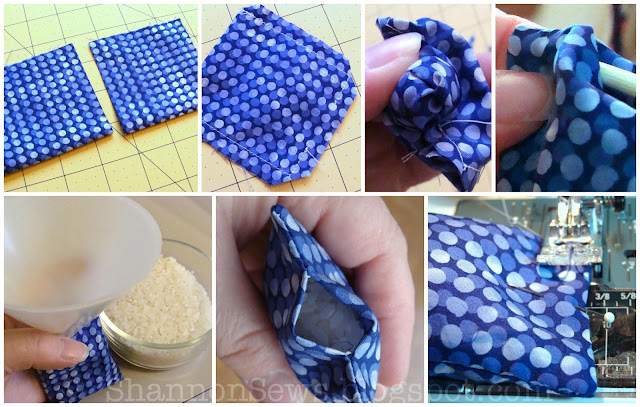
1. CUT TWO FABRIC SQUARES
I made my bean bag fabric weights using 6 inch squares.
Great project for using up some of the odds and ends in your fabric stash.

2. PIN FABRIC SQUARES RIGHT SIDES TOGETHER

3. STRAIGHT STITCH AROUND THE OUTSIDE OF THE SQUARE, LEAVING AN OPENING (TO TURN AND INSERT BEANS). It's easiest to leave an opening at the bottom center, rather than on a corner, to keep a square shape.


Sewing your own bean bags is so easy

4. CUT THE CORNERS TO PREVENT BULK
5. TURN THE SQUARE RIGHT SIDE OUT
6. USE A POINT TOOL TO GENTLY SQUARE CORNERS
7. INSERT BEANS WITH A FUNNEL OR SPOON *Don't fill it too full! You still have to stitch the hole shut.
8. PIN HOLE AND STITCH SHUT You can do this by hand or machine stitching. I used my machine. Just be sure to keep the beans out of the way of the needle!

DIY bean bags filled with pinto beans

That's all there is to it!
And now you have a great set of Bean Bag Fabric Weights!
These turned out to be my favorite because they are heavy enough to stop ANY amount of sliding or rolling. 

How to stop fabric from sliding while cutting: make fabric weights bean bags


Rice Bags

make your own rice bags for cold or warm compress or aromatherapy
Rice bags are another great option for Fabric Weights. But don't stop there. Make a few for your medicine cabinet!

Throw a rice bag in the freezer or microwave and use it as a cool or warm compress to soothe headaches, tired eyes, skinned knees or other sore spots.

Plus, you can add a few drops of essential oils like lavender or peppermint to the rice for a little aromatherapy!


The materials and instructions for making rice bags are almost exactly the same as making bean bags. The only difference is using dry rice instead of dry beans.

Like I said, easiest project ever. My favorite!


easy children's sewing project make rice bags

Once I got started, I couldn't stop. I made triangles too, because, why not?
Now I have exactly what I have needed for so long.
Fabric weights made with beans and rice. Now all I need is a taco!

sew your own rice bags or bean bags for fabric weights


Never miss a post! Subscribe to ShannonSews
Like on facebook.com/SSorensenDesigns
Follow @ShannonSews1 on Twitter
Subscribe to youtube.com/ShannonSews


Linked to: http://sewmanyways.blogspot.com/, http://www.iheartnaptime.net, http://www.flamingotoes.com, http://sewchatty.blogspot.com, http://www.thegirlcreative.blogspot.com,
Blogging tips