Saturday, January 24, 2026

DIY: How to Clean Toilet Stains and Look New Again!

toilet before and after stain removal
If you are wondering how to get stubborn toilet stains out of your toilet bowl, you've come to the right place! 

[*Disclosure: This post contains Amazon links. As an Amazon Associate I earn from qualifying purchases.]

How to Clean Toilet Bowl Stains So It's Like New Again!

Stains can form on the inside of your toilet bowl over time, that are just too hard to get out with regular cleaning products. 

On the well water system where we live, our toilet bowl consistently ended up with dim brown residue that stained the toilet bowl. We tried to get these toilet stains out with natural products, regular cleaning products, and even scrubbing our toilet with bleach cleaners, but nothing really seemed to make a difference. The stains didn't budge and we figured eventually we would just need to replace the toilet.

It was only after my husband found the right product to deep clean our toilet with, that our toilet bowl looks almost new again! I was shocked!


How to Clean Toilet Bowl Stains Fast 

CLR Toilet Stain Remover Product
CLR Brands® Calcium, Lime & Rust Remover (*BUY HERE) is hands down, the best cleaning product we have found to remove toilet bowl stains. (*Amazon link: As an Amazon associate I earn a small commission on purchases made through my link) 

Try it and you won't be disappointed.


Here are some tips that helped us get our toilet bowl so clean, it looks almost new:

FOR BEST RESULTS YOU NEED-

  • Bottle of CLR (linked above) 
  • Disposable gloves
  • An old rag you can throw away

How to clean your toilet bowl stains with the BEST results:

CLEANING METHOD 1:

  • This method gave us the best results. If possible, empty your toilet bowl and let it dry. Do this by turning off the water to your toilet (or the main water) and then flush the toilet so it's empty of water. Let the toilet bowl dry before applying the solution. 
  • Put on your disposable gloves
  • Pour some of the CLR on your rag and wipe the dry, stained toilet bowl directly. You will immediately see a difference as you wipe the solution on the stains.

CLEANING METHOD 2:

  • If you are not able to empty your toilet bowl water, you can- 
  • Put on your disposable gloves and 
  • Pour some of the CLR solution directly into the toilet bowl (read instructions on the bottle) and
  • Let it soak for about an hour and use a toilet brush or rag to wipe the bowl as needed. 


Did you try it? 

Leave a comment and let me know if it's the best toilet cleaning product you've ever used, to finally get rid of those annoying toilet stains!

++++++


Is your Toilet Seat also in need of a fix? See our Popular Post: DIY Fix: Paint your toilet seat so it's like new again!

before and after toilet seat painted

Saturday, November 22, 2014

DIY Fix: Paint your toilet seat so it's like new again!

diy toilet fix paint toilet seat get rid of marks look new again
"Want to see my toilet?" said no one. Ever.
Well, except for me that is, because I seriously want to show you my toilet.

This DIY fix was just too good not to share because it worked like a charm!

Why are you so worried about your toilet, you ask? We are in the process of moving, and by in-process I mean I think about how much I need to pack. Every day. And then I blog about painting my toilet. 

[*Disclosure: This post contains Amazon links. As an Amazon Associate I earn from qualifying purchases.]


We are finally leaving a loud city apartment and upgrading to a house in the quiet tranquility of a rural small town, just outside Seattle. We're really excited, but the packing, cleaning and moving part isn't so much fun (especially since in July we actually packed and moved everything out, but due to a bad situation, ended up having to move right back in. Blah!).

So, in an attempt to leave this place better than we found it (and a full deposit refund!) we need to pretty up the old toilet seats that have been cleaned so many times the paint has started to rub off. They're not gross and dirty I promise! Just in need of a little re-painting so they look as clean as they really are.

I stumbled on this Toilet Seat Makeover post that gave me the how-to's, and promptly ran over to Home Depot to grab some spray paint. And away I went.

HOW TO PAINT YOUR TOILET SEAT SO IT LOOKS LIKE NEW

WHAT YOU WILL NEED (*product links included)
  • Rust-oleum Painter's Touch 2x Ultra Cover Spray Paint + Primer in Gloss White - through Amazon or Home Depot (as recommended by the other website & worked great; unless your toilet's a different color)
  • A well-ventilated area such as outside or a garage  (*I tried to spray paint the toilet seat in the bathroom as the other site directed, but I fumigated myself. Gah! So I took it outside, even though it was like 30 degrees. I'd rather freeze than faint.)
  • Newspaper, painters cloth or other cover that can get painty
  • Clothes to spray paint in
do it yourself fix toilet seat spray paint look new again
PAINTING INSTRUCTIONS

STEP 1: Give your toilet a quick and thorough cleaning, and let the toilet seat dry completely.

STEP 2: Remove your toilet seat (SIMPLE! just use a flat-head screw driver) and bring toilet seat to a well-ventilated place

STEP 3: Use your drop cloth or newspaper to cover areas of the toilet seat you don't want to get painted.

STEP 4: Follow the directions on the spray paint can and shake til its well mixed

STEP 5: Spray a light coating 6-10 inches away on the toilet seat and let it dry. Don't spray too close or over spray or you'll get drips and bubbles. I waited about 30 or so minutes in-between each coating.

STEP 6: Repeat step 5 as many times as you need to for desired results. (*previous website warned not to over-spray or it won't look good)

STEP 7: Once completely dry (which according to the can, and by can I mean paint (pun fully intended), it should be "dry enough to handle in 1 hour/ fully dry in 24 hours"), & return your *LIKE NEW* toilet seat to your throne.

It really is a great transformation because this re-painted toilet seat now looks as clean as it is! It will sparkle and shine so much they may give us a bonus in addition to our deposit! Ha! Not likely. But the new tenants will be happy with their toilets, and what's not to love about that?

Now if you'll excuse me, I've got to go pack! ;)

*This post contains product links, added for your convenience. As an Amazon Associate I earn from qualifying purchases.


Where you'll find me:
SHOPS: Etsy: Shannon Sorensen Designs + Fairface Washcloths AND FairfaceWashcloths.com
FACEBOOK: SSorensenDesigns AND FairfaceWashcloths
TWITTER: @ShannonSews1
INSTAGRAM: ShannonSorensenDesigns AND FairfaceWashcloths
YOUTUBE: youtube.com/ShannonSews
SUBSCRIBE (never miss a post!): Subscribe to ShannonSews
BLOGLOVIN: ShannonSews on Bloglovin

Tuesday, May 13, 2014

How to Sew a Maxi Skirt for Summer

sewing tutorial maxi skirt jersey knit waistband
I first pulled out this cute striped jersey knit fabric about a year ago, when I made my striped summer t-shirt. I still love it and continue to get compliments on it!

I've been itching to sew my own maxi skirt out of the rest of the fabric and I finally got up the courage to do it! It's so funny that after all the projects I've made successfully, I still get nervous that I'll ruin it.

How to Sew a Maxi Skirt

Making your own maxi skirt might just be one of the easiest skirts you can make, especially if you make it with a knit or yoga waistband or elastic. No zipper or darts, as with my straight skirt, although another straight skirt is on my list!

Step 1: Take your measurements: Length & Waist & Hips around widest point (including backside). From those measurements, decide how flowy or clingy you want your skirt and add extra inches to the width of your fabric to compensate for seam allowance + extra fabric. You will cut a separate waistband. Note that your waistband will be stretched to fit snug.

Step 2: Cut out your fabric. I opted for 2 side seams instead of one in the back for my skirt & a 6 inch waistband (12 inches folded over to 6).
sew a maxi skirt with knit fabric and knit waistband

Step 3: Pin, pin, pin! Jersey knit can roll and stretch.
Step 4: Sew your seams. Using a ballpoint needle (to prevent making holes in your fabric) zig-zag stitch up the sides of your skirt and across the 2 short sides of your waistband folded over. A zig-zag stitch allows your jersey knit fabric to move & stretch with you instead of putting pressure on a straight seam.
sewing a jersey knit maxi skirt for summer, tips for sewing with jersey knit

Step 5: Attach your waistband. Mark the back and front middle, along with each side of the skirt and waistband with pins. Line up the points and pin at those points, right sides together. You will have excess fabric from the body. Stretch the waistband and body fabric together as you stitch and it will all come together. (Sorry no photo!) It's a bit of a tug-of-war with the sewing machine, but just be patient. I stretched the fabric while pulling lightly from the back, to ease it through.
how to add a knit waistband to maxi skirt

Step 6: Secure wasitband and tag the back. To keep the waistband sitting flat, from the inside, fold the waistband hem up against the waistband and zig-zag stitch. I finished it off with by stitching a small piece of white jersey on the back inside of the skirt so I can tell which side is which.
how to tell which is the front and back jersey knit maxi skirt

And then you're done! You can hem the bottom if you want to, but I liked the look of it unhemmed. Plus, I was tired and wanted to be finished already! Ha!
how to sew a summer maxi skirt tutorial simple comfy cute

sew a long skirt flowy for summer, jersey knit

I have a feeling this blue and white striped maxi skirt is going to get a lot of wear this summer!


In case you missed it:
DIY striped summer t-shirt
All Tops & Shirt Refashions
Skirt sewing projects and/or refashions

SUBSCRIBE (never miss a post!): Subscribe to ShannonSews
BLOGLOVIN: ShannonSews on Bloglovin
FACEBOOK: facebook.com/SSorensenDesigns AND facebook.com/FairfaceWashcloths
TWITTER: @ShannonSews1
INSTAGRAM: ShannonSorensenDesigns on Instagram
SHOP: Shannon Sorensen Designs + Fairface Washcloths
YOUTUBE: youtube.com/ShannonSews

Monday, April 28, 2014

How to fix a hole in your t-shirt: tutorial

fix a hole in your t-shirt tutorial
It's been a while since I've shared a tutorial, and since my how to fix a hole in gauze or light-weight fabric post has been so popular, I thought I'd share how to fix a hole in t-shirts that might also be of help.

You know those holes. The little ones that suddenly pop up on your t-shirts. Where did you come from?? Let them sit...and slowly they start to get bigger.

Well have no fear! There's a quick and easy way to stop those little t-shirt holes in their tracks and make them look like they were never there at all.

[*Disclosure: This post contains Amazon links. As an Amazon Associate I earn from qualifying purchases.]


How to fix a hole in your t-shirt

fix a small hole in your t-shirt: quick fix instructions
Supplies Needed
(*product links included)
Stitch Witchery
Light-weight Stabilizer
Parchment Paper
Iron
Ironing Board
Damp, clean, non-terry cloth
Straight Pin or safety pin
Scissors


Step 1: Put a medium-sized piece of parchment paper down on your ironing board. Turn your t-shirt inside out and place it on your ironing board on top of your parchment paper and locate the hole you want to fix. *The parchment paper under your t-shirt will prevent the stitch witchery from accidentally adhering to your ironing board.

tutorial how to fix a hole in t-shirt quick, easy

Step 2: Using your pin, gently pull and tuck the fibers around the hole to come together as closely as possible.


fix t-shirt rip, hole with stitch witchery

Step 3: Cut a small piece of stitch witchery and a bigger piece of light-weight stabilizer. Place stitch witchery directly over t-shirt hole and place stabilizer over the top of that. Turn on your iron according to the stitch witchery instructions and grab your damp towel cover.


DIY fix t-shirt hole with stitch witchery and stabilizer


Step 4: [Your layers should be as follows: Ironing board + Parchment Paper + T-shirt + Stitch Witchery + Stabilizer + Damp Cover Towel + Iron]. Following the instructions on the stitch witchery package, "glue" stitch witchery in place.


using stitch witchery mend t-shirt hole

Step 5: Once completed, carefully remove your hot towel and check your results. Check to make sure the hole completely fused closed from the front and the stabilizer is secure inside. Repeat if necessary.

The outside results should appear as if the hole was never there. The inside of the t-shirt will have a small piece of stabilizer attached to secure the fixed hole. You can cut the stabilizer down to be smaller inside if needed.

how to mend a hole in your t-shirt a DIY tutorial


This method also works well on slightly bigger rips by using bigger pieces of stitch witchery and stabilizer.

Remember to check out the post on how to fix holes in light-weight fabric such as a shirt or skirt with this same method, with great results!

*This post contains product links, added for your convenience. As an Amazon Associate I earn from qualifying purchases.


SUBSCRIBE (never miss a post!): Subscribe to ShannonSews
BLOGLOVIN: ShannonSews on Bloglovin
FACEBOOK: facebook.com/SSorensenDesigns AND facebook.com/FairfaceWashcloths
TWITTER: @ShannonSews1
INSTAGRAM: ShannonSorensenDesigns on Instagram
SHOP: Shannon Sorensen Designs + Fairface Washcloths
YOUTUBE: youtube.com/ShannonSews

Friday, February 7, 2014

DIY Bath & Body Works Foaming Hand Soap

copy cat bath and body works make your own foaming hand soap refill peppermint
My sister gave me Twisted Peppermint Foaming Hand Soap from Bath and Body Works for Christmas. Mmmmm! It smells SO good and lifts my spirits every time I use it!

Did you know that Peppermint oil has been shown to increase energy and mental clarity? Um, yes to both please!

So as the bottle began to run low, you can imagine my feelings of woe, never wanting this magic bottle of foaming hand soap to end....so when I stumbled upon this great DIY recipe for foaming hand soap, from Wellness Mama, I knew I'd hit the jackpot!

Bath & Body Works Peppermint Foaming Hand Soap DIY


By combining simple ingredients like distilled water, Peppermint Castille Soap (liquid)  & a dash of oil (I used jojoba oil since it's what I had on hand), the perfect copy cat version of Bath and Body Works Twisted Peppermint foaming hand soap was born! No more crying, now I have a lifetime of refills! And energy to boot!

Be sure to check out the recipe - it's so easy to make! Other DIY foaming hand soap recipes use vegetable glycerin instead of a colored oil and I think I'll do that next time, since it does leave a little yellow jojoba oil floating on top. But nothing a little shake-shake can't help.

I love using DIY skin care products and household cleaning products when I can, because I know exactly what I put in them and always look for gentle ingredients that won't irritate my sensitive skin. My next batch will be using Lavender Castille Soap to make my own foaming shower soap! It only seems to work in a foaming soap container, so don't throw them out when you're done with the bottle!

SUBSCRIBE (never miss a post!): Subscribe to ShannonSews
BLOGLOVIN: ShannonSews on Bloglovin
FACEBOOK: facebook.com/SSorensenDesigns AND facebook.com/FairfaceWashcloths
TWITTER: @ShannonSews1
INSTAGRAM: ShannonSorensenDesigns on Instagram
SHOP: Shannon Sorensen Designs + Fairface Washcloths
YOUTUBE: youtube.com/ShannonSews

Sunday, November 10, 2013

Stop your ruler from slipping while cutting fabric: Great Sewing Tip!

how to stop your acrylic ruler from sliding when cutting fabric
{Cutting fabric straight© ShannonSorensen}
I can't be the only one this happens to: Trying to cut fabric using an acrylic ruler, while carefully spider walking my fingers across the ruler to keep it straight, while cutting with my rotary cutter in the other hand...only to have the acrylic ruler slowly begin to slide out of place so the edge is anything but straight. Aaaaakkk!

[*Disclosure: This post contains Amazon links. As an Amazon Associate I earn from qualifying purchases.]


How do I cut a straight fabric edge?
How do I keep the ruler from slipping 
while cutting fabric?

 Stop an acrylic ruler from sliding while cutting fabric

...and it all begins with a shower tool. 


By attaching a Bathroom Grip Bar (shower handle) with detachable suction cups, to your acrylic ruler, it evenly distributes the weight across the ruler and holds it in place. It's like you have two hands down on the ruler and a 3rd to cut. Go team! I wish I'd found this a long time ago. It's like magic.

how to cut fabric straight without ruler slipping
{Stop your acrylic ruler from slipping while cutting fabric © ShannonSorensen}
how to cut fabric straight without ruler slipping
{Perfect straight edge for cutting fabric: acrylic ruler + shower handle © ShannonSorensen}

Here's a short video demo showing just how effective this new fabric cutting tool can be.
No more slipping = straight edges! Hooray! And it only cost me about $5.00 with a coupon at Harbor Freight. Even better!
Happy cutting 


SUBSCRIBE (never miss a post!): Subscribe to ShannonSews
BLOGLOVIN: ShannonSews on Bloglovin
FACEBOOK: facebook.com/SSorensenDesigns
TWITTER: @ShannonSews1
INSTAGRAM: ShannonSorensenDesigns on Instagram
SHOP: Shannon Sorensen Designs + Fairface Washcloths
YOUTUBE: youtube.com/ShannonSews

Linked to: http://sewmanyways.blogspot.com/http://www.flamingotoes.comhttp://www.thegirlcreative.com/, http://www.crumbsandchaos.net/, http://www.craftionary.net/, http://www.reasonstoskipthehousework.com/, http://www.sugaranddots.com/, http://www.fingerprintsonthefridge.com/, http://www.niftythriftythings.com/http://www.scatteredthoughtsofacraftymom.com/, http://www.sewcando.com/, http://makingtheworldcuter.com/, http://threemangoseeds.blogspot.com/http://www.madincrafts.com/, http://www.craft-o-maniac.com/, http://www.creatingreallyawesomefreethings.com/, http://www.linesacross.com/, http://www.sugarbeecrafts.com/, http://www.hopestudios.blogspot.com/  http://bebetsy.com

Saturday, November 2, 2013

Men's Shirt to Women's Cardigan Refashion

As promised, I jumped on my next refashion project shortly after my successful sweater to cardigan refashion. My sister-in-law said this men's-shirt-to-women's-cardigan refashion, had Anthroplogie appeal...very nice compliment indeed!

refashion men's shirt to women's cardigan
{Refashion: men's shirt to women's cardigan © ShannonSorensen}

When my husband came home and saw my newly refashioned cardigan, he jokingly asked if he needed to lock up his clothes when he left the house, for fear they'd end up women's clothing by the time he came back. I laughed, but secretly my mind started scanning his side of the closet to see if there was anything with potential.

Turn a Men's Shirt into a Women's Cardigan
(husbands beware)


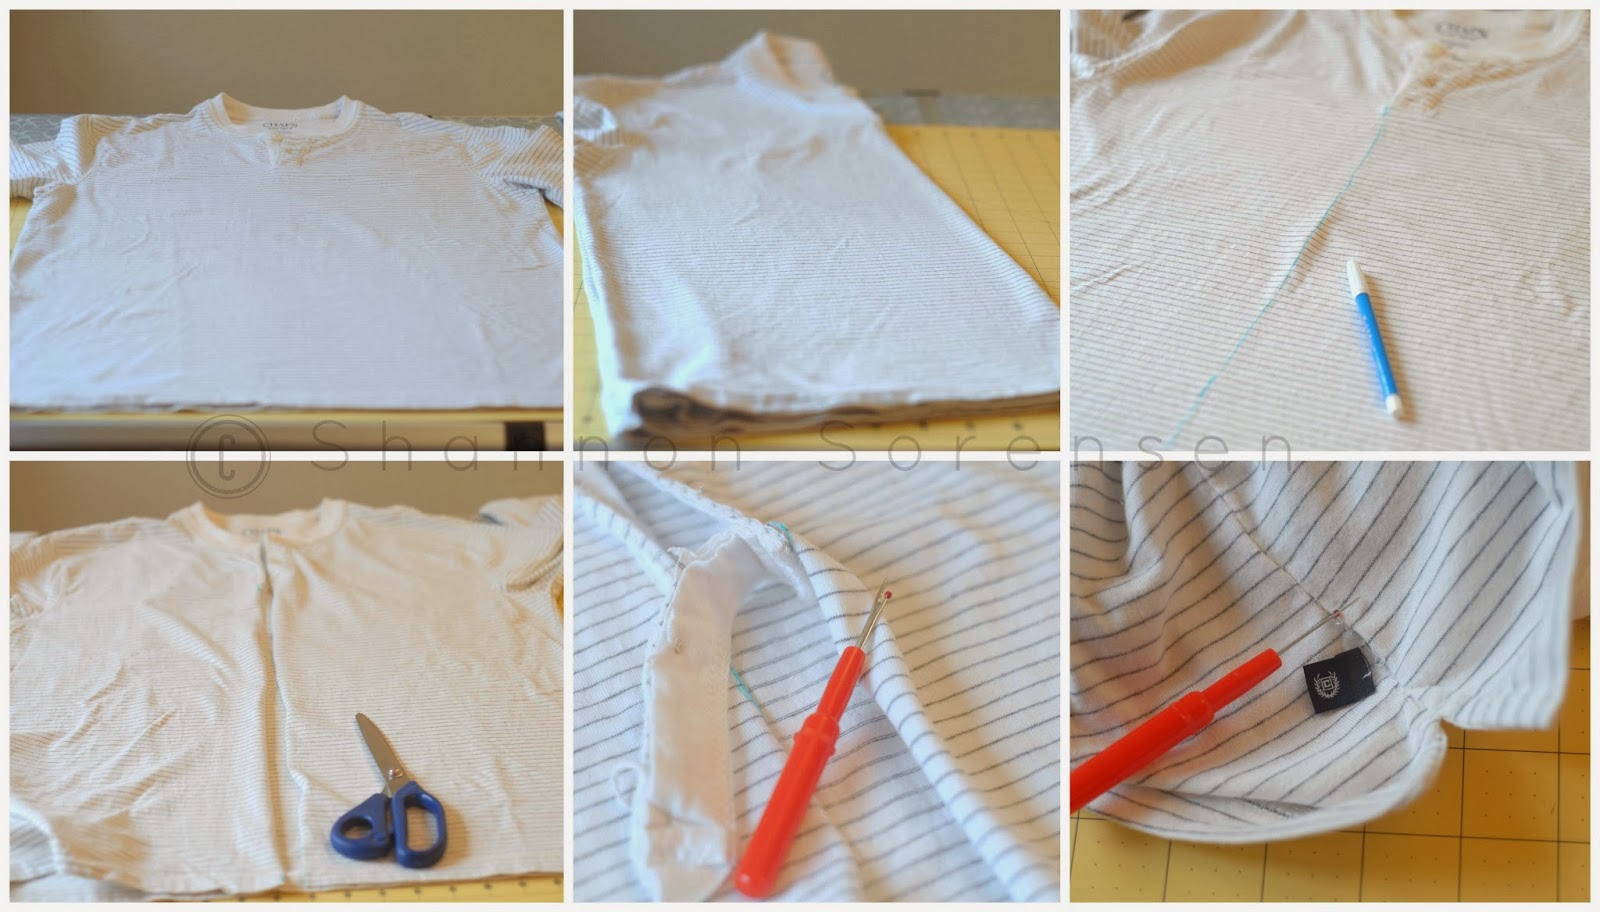
  • Lay out your shirt.
  • Fold shirt in half to find the center.
  • Mark the center with a washable pen.
  • Cut up the center line of your shirt.
  • Unpick any necessary seams.
  • Remove any unwanted tags.

turn a mans shirt to womens cardigan refashion
{Refashion tutorial: shirt to cardigan © ShannonSorensen}


  • Decide on coordinating binding. I cut up a soft xl clearance men's gray turtle neck.
  • Measure how long your binding needs to be.
  • Cut two strips for each side of your cardigan opening. Mine were 2" wide.
  • Trim off any excess or unwanted fabric from the cardigan before you add your binding.
  • Lay the binding right sides together, edge to edge and pin.
  • Using a ball point needle, pressure (1) and slightly wider stitch for stretchy jersey, stitch binding to cardigan. 


DIY sewing project shirt to cardigan
{DIY cardigan from a man's shirt © ShannonSorensen}


  • Your binding should now be sewn to your cardigan.
  • Roll it over to the inside opening of the cardigan, measuring evenly. Mine was rolled over 1".
  • Pin into place. *For the top and bottom edges, see the pictures in the next segment.
  • Check front to make sure the binding looks even.

shirt to cardigan refashion how to add binding
{Add binding to create your cardigan: shirt refashion © ShannonSorensen}


  • *To finish binding at the bottom and top, fold under the stitched edge so it's lined up.
  • Next fold the excess binding up over the edge of the cardigan.
  • Now roll the whole binding over and pin.
  • Again, check that binding is even.
  • Stitch on the front side of the binding, avoiding pins, as close to the inner edge as possible. Your stitches will catch the binding inside and secure it.


alter a shirt to a cardigan tutorial
{Refashioned shirt to cardigan: adding binding © ShannonSorensen}

  • To add faux pockets, cut a strips of coordinating bias tape. I wanted to use more of the gray jersey, but it ended up too bulky.
  • Put the cardigan on and determine where you want your pockets, then pin the bias strips evenly on either side of the cardigan, folding under the raw edges on either side. 
  • Stitch as close the the side and bottom edges as you can, leaving the top open.
  • Add lace embellishment if you choose.

how to add / sew faux pockets to a top or cardigan
{How to add faux pockets to a cardigan: refashion © ShannonSorensen}


  • After finishing this much of the cardigan, the front dark gray binding by itself, still felt a little too masculine, so I added a strip of lace to either side of the cardigan opening.
  • To give the back a little detail, I cut a 2" wide strip of the dark grey jersey, folded it over and sewed it closed. After turning it right side out, I pinned the piece down to the middle lower back and embellished it with matching lace.
  • To finish the sleeves, I cut off the binding and simply folded the edges under and sewed.


add lace and hem sleeves to a cardigan refashion

And voila! One man's shirt is another women's treasure.
From shirt to cardigan just like that.

before and after refashioned shirt to cardigan
{Men's Shirt to Women's Cardigan: before & after © ShannonSorensen}

I love the details, especially the back. It gives it just that little something.
turn a shirt into a cardigan tutorial

Not sure what's next on the horizon, but with my to-be-refashioned-pile a mile high, I'm sure there will be something! :)


SUBSCRIBE (never miss a post!): Subscribe to ShannonSews
BLOGLOVIN: ShannonSews on Bloglovin
FACEBOOK: facebook.com/SSorensenDesigns
TWITTER: @ShannonSews1
INSTAGRAM: ShannonSorensenDesigns on Instagram
SHOP: Shannon Sorensen Designs + Fairface Washcloths
YOUTUBE: youtube.com/ShannonSews

Linked to: http://sewmanyways.blogspot.com/http://www.flamingotoes.comhttp://www.thegirlcreative.com/, http://www.crumbsandchaos.net/, http://www.craftionary.net/, http://www.reasonstoskipthehousework.com/, http://www.sugaranddots.com/, http://www.fingerprintsonthefridge.com/, http://www.niftythriftythings.com/,  http://www.scatteredthoughtsofacraftymom.com/,  http://www.sewcando.com/,  http://threemangoseeds.blogspot.com/, , http://www.madincrafts.com/, http://www.craft-o-maniac.com/, http://www.creatingreallyawesomefreethings.com/, http://www.linesacross.com/, http://www.sugarbeecrafts.com/, http://www.hopestudios.blogspot.com / , http://bebetsy.com

Thursday, October 17, 2013

Sweater to Cardigan Refashion Tutorial

How to turn a sweater into a cardigan
{image Sweater to Cardigan Refashion © ShannonSorensen}
It's sweater season again and I've been rummaging through my bags of forgotten sweaters. The ones that don't fit, yet I can't seem to part with.

This v-neck pink argyle sweater has always been one of my favorites, but one day it started fitting tighter and haven't worn it since. Until now.

Give any old sweater new life, by turning it into a cardigan, with this easy refashion tutorial!

[*This post contains Amazon links. As an Amazon associate I earn a small commission on purchases made through my links]


How to Turn your Sweater into a Cardigan

1. Choose a coordinating bias tape (Amazon) OR you can make your own or use bias tape with fabric and these bias tape maker tools (Amazon).

2. Measure the front of your sweater and cut that much bias tape + extra to tuck under on the top and bottom edge. Measure and draw a straight line down the front of your sweater.

3. Cut the front of your sweater using the line as your guide (no turning back now!).


refashion your old sweater into a cardigan with this tutorial
{Sweater to Cardigan Refashion © ShannonSorensen}

This binding will be turned to the inside of your sweater. If you want the binding to show on the outside, follow these steps with the sweater inside out. I'll have a tutorial for this method soon.

4. Pin the binding down with the shorter side flush with the edge of your sweater cut.

5. Fold the top and bottom edge of your binding over and pin.

6. Using a ball point needle (Amazon) (best for sewing with knits), and low pressure (I set my dial to 1) stitch down the creased fold all the way from the top to the bottom edge.
Refashion tutorial turn your sweater into a cardigan
{Refashion: Sweater to Cardigan © ShannonSorensen}

7. Fold the stitched binding over to the inside, covering up the raw edges.

8. Pin the folded binding from top to bottom. Be sure to tuck under the top and bottom edges.

9. Stitch as close the the edge of the binding as you can (the inside edge). My machine has a setting that moves the needle to the left hand side, so that is what I used.

10. Admire your handy work. You're all done!

Sew your own cardigan from an old sweater
{Transform your old sweater into a cardigan step-by-step © ShannonSorensen}

I'm so happy I'll be able to wear this sweater again, transformed into a new cardigan.

turn your old sweater into a cardigan refashion
{Sweater to Cardigan Refashion © ShannonSorensen}

I love the peekabo turquoise accent inside. You would never know it wasn't made this way in the first place.

How to turn a sweater into a cardigan
{Turn a old sweater into a cardigan: tutorial © ShannonSorensen}


refashion project, turn a shirt into a cardigan
{image © ShannonSorensen}
My next project: refashioning this men's long sleeved striped shirt into a cardigan...the wheels are turning!

SUBSCRIBE (never miss a post!): Subscribe to ShannonSews
BLOGLOVIN: ShannonSews on Bloglovin
FACEBOOK: facebook.com/SSorensenDesigns
INSTAGRAM: ShannonSorensenDesigns on Instagram
SHOP: Shannon Sorensen Designs + Fairface Washcloths
YOUTUBE: youtube.com/ShannonSews


Linked to: http://www.diybydesign.blogspot.com/http://www.mygirlishwhims.com/http://www.creationsbykara.com/,  http://ivyandelephants.blogspot.com/http://www.gingersnapcrafts.com, http://www.firefliesandjellybeans.com, http://www.theshabbycreekcottage.com, http://www.aglimpseinsideblog.com/, http://www.the36thavenue.com/ http://www.thecraftyblogstalker.com, http://www.livelaughrowe.com/ http://www.allthingswithpurpose.com, http://becomingmartha.com, http://www.thirtyhandmadedays.com, http://shabbynest.blogspot.com, http://www.uncommondesignsonline.com/
All Things with Purpose

Saturday, October 5, 2013

Arrows T-shirt DIY with stencil and fabric paint

arrow t-shirt with stencil and paint diy
{DIY Arrow T-shirt © ShannonSorensen}
I just realized I haven't posted since September. Time has whirled by since school started!

We had such a beautiful Seattle summer, but last weekend it started raining again. I mean a lot of rain. Buckets.

During our torrential downpour, I decided to put my craft on. Time to give some life to this plain blue t-shirt.

I love all the arrow designs I'm seeing lately, so I decided to create my own.


How to Make a Stenciled Arrow T-shirt:

(*This post contains product links, added for your convenience. As an Amazon Associate I earn from qualifying purchases)

PRINT & CUT STENCIL: Find a clip art image online, print it on heavy card stock & cut it out with a craft knife tool

OR Use a this cute pre-made arrows stencil


how to create a stencil for arrow t-shirt design
{Make an Arrow Stencil © ShannonSorensen}

1. PROTECT YOUR FABRIC: I ironed a piece of freezer paper to the inside of my t-shirt so the paint wouldn't go through. You can also use a piece of cardboard.

2. FABRIC PAINT: I like SoSoft fabric paint because it leaves a flexible, soft finish. Put a piece of saran wrap on a plate or surface for easy use and clean up.

3. APPLY PAINT: Hold down stencil and use a foam brush or other applicator and gently blot paint through the stencil on the shirt. Move stencil as needed and repeat.

4. FINISHED DESIGN: Let your painted design dry. SoSoft Paint doesn't require ironing to set the color, but once dried, you can heat set paint with a dry hot iron (using a cover cloth) for 2-3 minutes.
Instructions for making a stenciled painted t-shirt design with arrows
{Instructions for making an arrow painted / stenciled t-shirt © ShannonSorensen}

I love the way it turned out! It's fun by itself and a pair of jeans, with a black long-sleeve t-shirt under it, or paired with a jacket or cardigan.
DIY Painted Arrows T-shirt finished
{DIY Arrow Stenciled T-shirt © ShannonSorensen}

Arrow t-shirt, how to make your own with paint and stencil
{Painted Arrows T-shirt DIY © ShannonSorensen}

The wheels are still turning as I try to come up with a design for my other plain t-shirt...and speaking of turning wheels, it's time to go for a bike ride. It's been a week or so since I've been able to go because of the rain, but we're getting a break today!


Have you ever tried making your own Ink Blot T-shirt? They are addicting! 


SUBSCRIBE (never miss a post!): Subscribe to ShannonSews
BLOGLOVIN: ShannonSews on Bloglovin
FACEBOOK: facebook.com/SSorensenDesigns
TWITTER: @ShannonSews1
INSTAGRAM: ShannonSorensenDesigns on Instagram
SHOP: Shannon Sorensen Designs + Fairface Washcloths
YOUTUBE: youtube.com/ShannonSews

Linked to: http://www.uncommondesignsonline.comhttp://sewmanyways.blogspot.com/http://www.flamingotoes.comhttp://www.niftythriftythings.com/http://diyshowoff.comhttp://www.keepingitsimplecrafts.com/http://www.ishouldbemoppingthefloor.comhttp://sewcando.blogspot.comhttp://craftomaniac.blogspot.com,   http://www.madincrafts.com,  http://www.sugarbeecrafts.com/,  http://www.hopestudios.blogspot.com/http://www.skiptomylou.org, http://becomingmartha.com/, http://www.504main.com, http://www.thirtyhandmadedays.com

Tuesday, September 3, 2013

Protect your Online Photos: 4 Easy Steps

How to make a copyright on your photos to protect them
{image: Protect your online photos}
I had the unfortunate reminder a couple weeks ago, that images floating around the blogosphere can be stolen and claimed as someone else's if you're not careful. Not only had someone stolen my images, but was also claiming she had made what was in the photo. Double slap.

When confronted, the thief said she found my photo on Google and used it since my "name wasn't on it". The image clearly referenced my blog, but didn't have my name on the image. It still obviously wasn't her picture or her work, but I will be smarter from now on and leave a digital fingerprint so thick not even an experienced thief will want to mess with my photos! Take that!

There are several ways to protect your online photos by leaving your own digital fingerprint all over them.

Here's how:

How to Protect your Blog & Online Images

1. Put a copyright watermark on your photos.

The first, most visible way to protect your online images is to put a copyright notice directly on your image. You can do this by popping your photo into Photoshop or an online photo editing site and slapping a copyright directly on your photo.

You can add a watermark across your image or add text to the bottom. Being an avid user of Photoshop, I happen to know that text can easily be erased if it's at the bottom. It's harder to erase when it's written over at least part of the image and even harder to erase when it's across your entire image. It comes down to what you're comfortable with, since it does impact your image to some degree.

how to protect your blog images with a watermark
{Put a watermark on your photos © ShannonSorensen}


2. Add your Copyright to the Title of your Blog Photo

Have you ever hovered your mouse over an online image, and a text box pops up with a little description of the photo? This is an easy way to incorporate your copyright onto your photo without impacting the image itself.

While editing your post in blogger, click the image and a bar will pop up.
Then click Properties.

Protect your online pictures by adding titles with copyright
{Add titles to your photos to protect your pictures © ShannonSorensen}


An Image Properties box will pop up, giving you the option of adding Title Text to your image (alt text is something different.). Add a short description + your copyright.

Add digital fingerprint to your images with title tags
{Add extra protection to your online photos with Title tags © ShannonSorensen} 


Now when anyone hovers over your image, the text box will pop up, giving more information about your photo, along with your copyright. When your mouse is not on the image, the text box goes away (same for my pinterest pin button).

How to prevent your online pictures from being stolen
{Prevent online images from being stolen by adding a title tag with your copyright © ShannonSorensen}

3. Add your Copyright to the Caption under your Blog Image

A caption is the text that shows up below your image. It's a chance to give readers a little more information about your photo, and another place to add your copyright.

Simply click on your image in blogger edit mode, and the bar will pop up (below).
Click on Add Caption.


Show ownership of your online pictures by adding a caption with copyright
{Add a caption like this to identify your copyright © ShannonSorensen}


Add a description of your image and include your copyright.

How to prevent having your online photos stolen
{Take ownership of your photos with copyright protection © ShannonSorensen}


4. Add your Copyright to your Image File Name

This may be the least effective way, but it still leaves your digital print on your image. When you save your photo to your computer, before adding it to blogger, add a short copyright to the end of your file name: chevron-pillow-ssorensendesigns.jpg. You want it at the end so it won't interfere with seo.

Although image file names can easily be altered once you've uploaded your picture to the internet, and sometimes sites encrypt the title anyway, it doesn't hurt to slap your copyright on the file name.


You've worked hard to take great photos and make quality products. Don't let someone rip off your talents and hard work without a fight! Protect your images online by adding your copyright in these 4 easy steps, giving thieves a reason to look for stolen images elsewhere.


SUBSCRIBE (never miss a post!): Subscribe to ShannonSews
BLOGLOVIN: ShannonSews on Bloglovin
FACEBOOK: facebook.com/SSorensenDesigns
TWITTER: @ShannonSews1
INSTAGRAM: ShannonSorensenDesigns on Instagram
SHOP: Shannon Sorensen Designs + Fairface Washcloths
YOUTUBE: youtube.com/ShannonSews
Blogging tips