Wednesday, January 21, 2026

How to Cut Multiple Layers of Fabric Faster: The Electric Fabric Cutter I Use

Electric fabric cutter cutting through multiple layers of fabric

If you regularly cut multiple layers of fabric, you already know how much time the cutting process can take.

When I first started making Fairface Washcloths, I stacked about four layers of flannel together and cut each square with a handheld rotary cutter. It worked — but as my sewing business grew and I needed to cut more and more fabric, cutting just a few layers at a time became painfully slow.

I needed a faster way to cut fabric in bulk.

That’s when I switched to an electric fabric cutting machine — and it completely changed my cutting process.

Disclosure: This post contains Amazon affiliate links. As an Amazon Associate I earn from qualifying purchases.


The Problem: Cutting Multiple Layers of Fabric Took Too Long

A rotary cutter is great when you’re cutting a few pieces of fabric.

But when you need dozens — or hundreds — of identical pieces, repeatedly cutting a few layers at a time becomes a major bottleneck.

That was exactly what happened to me.

As orders for my Fairface Washcloths increased, I needed to prepare much larger quantities of fabric for sewing. I could sew faster than I could keep up with the cutting.

My little handheld rotary cutter just couldn’t cut it anymore. Pun intended. :)

What I needed was a way to cut thicker stacks of fabric at one time.


Electric fabric cutter beside a tall stack of cut fabric pieces
The Fabric Cutter That Changed My Cutting Process

The solution for me was an electric fabric cutting machine like this one.

[SEE THE FABRIC CUTTER ON AMAZON]

Instead of manually rolling a rotary cutter through a few layers of fabric over and over again, an electric fabric cutter allows you to guide the machine through a much thicker stack.

That meant I could prepare dramatically more pieces of fabric in the same amount of cutting time.

If you sew the same item repeatedly, make products to sell, batch-sew gifts, or simply have a project that requires cutting lots of identical pieces, this is where an electric fabric cutter can be incredibly useful.


Before: Cutting Fabric With a Handheld Rotary Cutter

When I started my business, I would lay approximately four pieces of flannel on top of each other and cut my washcloth squares with a handheld rotary cutter.

There was nothing wrong with that method when I was making smaller quantities.

The problem came when I needed more.

And more.

And more.

Four layers at a time suddenly meant a LOT of repeated cutting.

On a productive day, I might cut around 50 fabric squares by hand.

Thick stack of fabric pieces cut with an electric fabric cutter
That was fine in the beginning, but it simply wasn't efficient enough once I began producing my washcloths in larger quantities.


After: Cutting Thick Stacks With an Electric Fabric Cutter


Switching to an electric fabric cutter was a game changer for me.

Instead of cutting just a few pieces at a time, I could work with much thicker stacks of fabric and prepare hundreds and hundreds of pieces for sewing.

That was the difference that mattered.

I wasn't spending nearly as much of my production time doing the same cutting motion over and over again.

I could batch my cutting, prepare a large quantity of pieces, and then move on to sewing.

For someone who was producing the same sewn product repeatedly, that was HUGE.

Why I Think an Electric Fabric Cutter Is Worth It

If you only occasionally cut one or two pieces of fabric, you probably don't need one.

But if you regularly find yourself standing at your cutting table thinking:

“There has to be a faster way to do this…”

this may be the tool you're looking for.

An electric fabric cutter can be especially useful if you:

  • Cut multiple layers of fabric at once
  • Make the same sewn item repeatedly
  • Sew products to sell
  • Batch-sew gifts or craft-show inventory
  • Spend a significant amount of time cutting fabric
  • Have outgrown cutting everything with scissors or a handheld rotary cutter

For me, the biggest benefit was simple:

I could cut much more fabric in much less time.

And once you've experienced cutting thick stacks at once, going back to cutting four layers at a time feels VERY slow.

Is an Electric Fabric Cutter Worth Buying for a Sewing Business?

For my sewing business, absolutely.

One of the biggest lessons I learned while producing Fairface Washcloths was that sewing faster wasn't always the answer.

Sometimes the bigger opportunity was finding the step in my process that was slowing everything else down.

For me, that step was cutting.

The electric fabric cutter helped remove that bottleneck.

It allowed me to prepare large batches of fabric much faster so I could spend more of my time actually sewing and completing products.

And although I originally bought mine because I was producing products to sell, you certainly don't need to own a sewing business to benefit from one.

If your projects regularly require lots of repeated fabric cutting, the time savings alone may make it worthwhile.

The Electric Fabric Cutter I Recommend

If you're ready to stop cutting a few layers at a time, you can see the electric fabric cutter here on Amazon:

[CHECK THE CURRENT PRICE ON AMAZON]

This is the type of cutter I used when I needed to dramatically increase the amount of fabric I could prepare at one time.

Of all the tools I added as my sewing production increased, a powered fabric cutter was one of the tools that made the biggest difference in how efficiently I could work.

If bulk fabric cutting is the part of your sewing process you dread because it takes forever, this is one tool I'd seriously consider.

You may find yourself wondering why you didn't start using one sooner.

Happy cutting and sewing!

Tuesday, May 13, 2014

How to Sew a Maxi Skirt for Summer

sewing tutorial maxi skirt jersey knit waistband
I first pulled out this cute striped jersey knit fabric about a year ago, when I made my striped summer t-shirt. I still love it and continue to get compliments on it!

I've been itching to sew my own maxi skirt out of the rest of the fabric and I finally got up the courage to do it! It's so funny that after all the projects I've made successfully, I still get nervous that I'll ruin it.

How to Sew a Maxi Skirt

Making your own maxi skirt might just be one of the easiest skirts you can make, especially if you make it with a knit or yoga waistband or elastic. No zipper or darts, as with my straight skirt, although another straight skirt is on my list!

Step 1: Take your measurements: Length & Waist & Hips around widest point (including backside). From those measurements, decide how flowy or clingy you want your skirt and add extra inches to the width of your fabric to compensate for seam allowance + extra fabric. You will cut a separate waistband. Note that your waistband will be stretched to fit snug.

Step 2: Cut out your fabric. I opted for 2 side seams instead of one in the back for my skirt & a 6 inch waistband (12 inches folded over to 6).
sew a maxi skirt with knit fabric and knit waistband

Step 3: Pin, pin, pin! Jersey knit can roll and stretch.
Step 4: Sew your seams. Using a ballpoint needle (to prevent making holes in your fabric) zig-zag stitch up the sides of your skirt and across the 2 short sides of your waistband folded over. A zig-zag stitch allows your jersey knit fabric to move & stretch with you instead of putting pressure on a straight seam.
sewing a jersey knit maxi skirt for summer, tips for sewing with jersey knit

Step 5: Attach your waistband. Mark the back and front middle, along with each side of the skirt and waistband with pins. Line up the points and pin at those points, right sides together. You will have excess fabric from the body. Stretch the waistband and body fabric together as you stitch and it will all come together. (Sorry no photo!) It's a bit of a tug-of-war with the sewing machine, but just be patient. I stretched the fabric while pulling lightly from the back, to ease it through.
how to add a knit waistband to maxi skirt

Step 6: Secure wasitband and tag the back. To keep the waistband sitting flat, from the inside, fold the waistband hem up against the waistband and zig-zag stitch. I finished it off with by stitching a small piece of white jersey on the back inside of the skirt so I can tell which side is which.
how to tell which is the front and back jersey knit maxi skirt

And then you're done! You can hem the bottom if you want to, but I liked the look of it unhemmed. Plus, I was tired and wanted to be finished already! Ha!
how to sew a summer maxi skirt tutorial simple comfy cute

sew a long skirt flowy for summer, jersey knit

I have a feeling this blue and white striped maxi skirt is going to get a lot of wear this summer!


In case you missed it:
DIY striped summer t-shirt
All Tops & Shirt Refashions
Skirt sewing projects and/or refashions

SUBSCRIBE (never miss a post!): Subscribe to ShannonSews
BLOGLOVIN: ShannonSews on Bloglovin
FACEBOOK: facebook.com/SSorensenDesigns AND facebook.com/FairfaceWashcloths
TWITTER: @ShannonSews1
INSTAGRAM: ShannonSorensenDesigns on Instagram
SHOP: Shannon Sorensen Designs + Fairface Washcloths
YOUTUBE: youtube.com/ShannonSews

Monday, April 28, 2014

How to fix a hole in your t-shirt: tutorial

fix a hole in your t-shirt tutorial
It's been a while since I've shared a tutorial, and since my how to fix a hole in gauze or light-weight fabric post has been so popular, I thought I'd share how to fix a hole in t-shirts that might also be of help.

You know those holes. The little ones that suddenly pop up on your t-shirts. Where did you come from?? Let them sit...and slowly they start to get bigger.

Well have no fear! There's a quick and easy way to stop those little t-shirt holes in their tracks and make them look like they were never there at all.

[*Disclosure: This post contains Amazon links. As an Amazon Associate I earn from qualifying purchases.]


How to fix a hole in your t-shirt

fix a small hole in your t-shirt: quick fix instructions
Supplies Needed
(*product links included)
Stitch Witchery
Light-weight Stabilizer
Parchment Paper
Iron
Ironing Board
Damp, clean, non-terry cloth
Straight Pin or safety pin
Scissors


Step 1: Put a medium-sized piece of parchment paper down on your ironing board. Turn your t-shirt inside out and place it on your ironing board on top of your parchment paper and locate the hole you want to fix. *The parchment paper under your t-shirt will prevent the stitch witchery from accidentally adhering to your ironing board.

tutorial how to fix a hole in t-shirt quick, easy

Step 2: Using your pin, gently pull and tuck the fibers around the hole to come together as closely as possible.


fix t-shirt rip, hole with stitch witchery

Step 3: Cut a small piece of stitch witchery and a bigger piece of light-weight stabilizer. Place stitch witchery directly over t-shirt hole and place stabilizer over the top of that. Turn on your iron according to the stitch witchery instructions and grab your damp towel cover.


DIY fix t-shirt hole with stitch witchery and stabilizer


Step 4: [Your layers should be as follows: Ironing board + Parchment Paper + T-shirt + Stitch Witchery + Stabilizer + Damp Cover Towel + Iron]. Following the instructions on the stitch witchery package, "glue" stitch witchery in place.


using stitch witchery mend t-shirt hole

Step 5: Once completed, carefully remove your hot towel and check your results. Check to make sure the hole completely fused closed from the front and the stabilizer is secure inside. Repeat if necessary.

The outside results should appear as if the hole was never there. The inside of the t-shirt will have a small piece of stabilizer attached to secure the fixed hole. You can cut the stabilizer down to be smaller inside if needed.

how to mend a hole in your t-shirt a DIY tutorial


This method also works well on slightly bigger rips by using bigger pieces of stitch witchery and stabilizer.

Have a hole in gauze or lightweight fabric?

If you're dealing with a more delicate fabric, check out my tutorial on how I repaired a hole in a gauze skirt without sewing. I'll show you the before-and-after results and the method I used to fix it.

See my gauze fabric repair tutorial →


*This post contains product links, added for your convenience. As an Amazon Associate I earn from qualifying purchases.


SUBSCRIBE (never miss a post!): Subscribe to ShannonSews
BLOGLOVIN: ShannonSews on Bloglovin
FACEBOOK: facebook.com/SSorensenDesigns AND facebook.com/FairfaceWashcloths
TWITTER: @ShannonSews1
INSTAGRAM: ShannonSorensenDesigns on Instagram
SHOP: Shannon Sorensen Designs + Fairface Washcloths
YOUTUBE: youtube.com/ShannonSews

Tuesday, December 31, 2013

Oh Baby! Just Stay Little Minky Blanket for Baby Girl or Lovie

I can't believe it's already the last day of the old year...and mere hours to the new! Hope you are enjoying this holiday season while it's still here!

Just wanted to give you a quick peek at the newest item in my shop. The fabrics from Sarah Jane Studios are so sweet, aren't they? I couldn't resist making a minky blanket with her "Just Stay Little" fabric from her Children at Play Collection.

Makes the perfect lovie or child's blanket to cuddle up with or the ideal baby shower gift for a new mom. Snuggly soft and oozes sweetness.

Available here
It also goes with this matching sweet little pillow
girl lovie, blanket, bedroom decor or nursery baby girl from handmade blanket I'm looking forward to sharing a few of my favorite things I've been learning about lately and DIY projects for 2014!

Stay tuned and try to stay awake to ring in the new year (as for me, I'll be upstairs asleep) ha!
HAPPY NEW YEAR! ♥

Sunday, November 10, 2013

Stop your ruler from slipping while cutting fabric: Great Sewing Tip!

how to stop your acrylic ruler from sliding when cutting fabric
{Cutting fabric straight© ShannonSorensen}
I can't be the only one this happens to: Trying to cut fabric using an acrylic ruler, while carefully spider walking my fingers across the ruler to keep it straight, while cutting with my rotary cutter in the other hand...only to have the acrylic ruler slowly begin to slide out of place so the edge is anything but straight. Aaaaakkk!

[*Disclosure: This post contains Amazon links. As an Amazon Associate I earn from qualifying purchases.]


How do I cut a straight fabric edge?
How do I keep the ruler from slipping 
while cutting fabric?

 Stop an acrylic ruler from sliding while cutting fabric

...and it all begins with a shower tool. 


By attaching a Bathroom Grip Bar (shower handle) with detachable suction cups, to your acrylic ruler, it evenly distributes the weight across the ruler and holds it in place. It's like you have two hands down on the ruler and a 3rd to cut. Go team! I wish I'd found this a long time ago. It's like magic.

how to cut fabric straight without ruler slipping
{Stop your acrylic ruler from slipping while cutting fabric © ShannonSorensen}
how to cut fabric straight without ruler slipping
{Perfect straight edge for cutting fabric: acrylic ruler + shower handle © ShannonSorensen}

Here's a short video demo showing just how effective this new fabric cutting tool can be.
No more slipping = straight edges! Hooray! And it only cost me about $5.00 with a coupon at Harbor Freight. Even better!
Happy cutting 


SUBSCRIBE (never miss a post!): Subscribe to ShannonSews
BLOGLOVIN: ShannonSews on Bloglovin
FACEBOOK: facebook.com/SSorensenDesigns
TWITTER: @ShannonSews1
INSTAGRAM: ShannonSorensenDesigns on Instagram
SHOP: Shannon Sorensen Designs + Fairface Washcloths
YOUTUBE: youtube.com/ShannonSews

Linked to: http://sewmanyways.blogspot.com/http://www.flamingotoes.comhttp://www.thegirlcreative.com/, http://www.crumbsandchaos.net/, http://www.craftionary.net/, http://www.reasonstoskipthehousework.com/, http://www.sugaranddots.com/, http://www.fingerprintsonthefridge.com/, http://www.niftythriftythings.com/http://www.scatteredthoughtsofacraftymom.com/, http://www.sewcando.com/, http://makingtheworldcuter.com/, http://threemangoseeds.blogspot.com/http://www.madincrafts.com/, http://www.craft-o-maniac.com/, http://www.creatingreallyawesomefreethings.com/, http://www.linesacross.com/, http://www.sugarbeecrafts.com/, http://www.hopestudios.blogspot.com/  http://bebetsy.com

Saturday, November 2, 2013

Men's Shirt to Women's Cardigan Refashion

As promised, I jumped on my next refashion project shortly after my successful sweater to cardigan refashion. My sister-in-law said this men's-shirt-to-women's-cardigan refashion, had Anthroplogie appeal...very nice compliment indeed!

refashion men's shirt to women's cardigan
{Refashion: men's shirt to women's cardigan © ShannonSorensen}

When my husband came home and saw my newly refashioned cardigan, he jokingly asked if he needed to lock up his clothes when he left the house, for fear they'd end up women's clothing by the time he came back. I laughed, but secretly my mind started scanning his side of the closet to see if there was anything with potential.

Turn a Men's Shirt into a Women's Cardigan
(husbands beware)


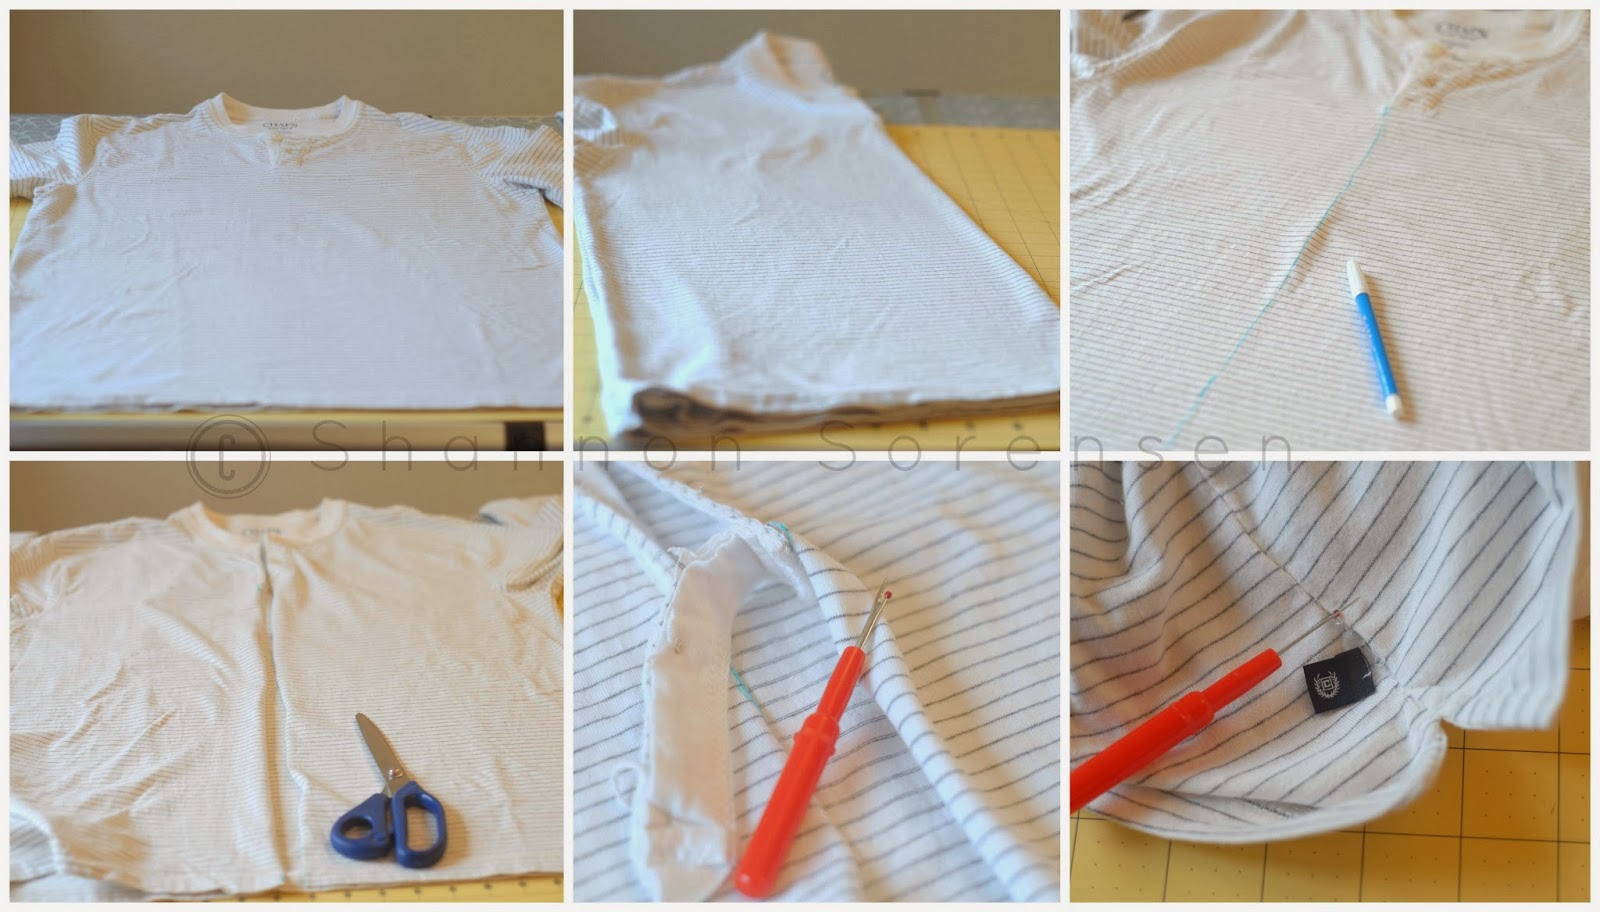
  • Lay out your shirt.
  • Fold shirt in half to find the center.
  • Mark the center with a washable pen.
  • Cut up the center line of your shirt.
  • Unpick any necessary seams.
  • Remove any unwanted tags.

turn a mans shirt to womens cardigan refashion
{Refashion tutorial: shirt to cardigan © ShannonSorensen}


  • Decide on coordinating binding. I cut up a soft xl clearance men's gray turtle neck.
  • Measure how long your binding needs to be.
  • Cut two strips for each side of your cardigan opening. Mine were 2" wide.
  • Trim off any excess or unwanted fabric from the cardigan before you add your binding.
  • Lay the binding right sides together, edge to edge and pin.
  • Using a ball point needle, pressure (1) and slightly wider stitch for stretchy jersey, stitch binding to cardigan. 


DIY sewing project shirt to cardigan
{DIY cardigan from a man's shirt © ShannonSorensen}


  • Your binding should now be sewn to your cardigan.
  • Roll it over to the inside opening of the cardigan, measuring evenly. Mine was rolled over 1".
  • Pin into place. *For the top and bottom edges, see the pictures in the next segment.
  • Check front to make sure the binding looks even.

shirt to cardigan refashion how to add binding
{Add binding to create your cardigan: shirt refashion © ShannonSorensen}


  • *To finish binding at the bottom and top, fold under the stitched edge so it's lined up.
  • Next fold the excess binding up over the edge of the cardigan.
  • Now roll the whole binding over and pin.
  • Again, check that binding is even.
  • Stitch on the front side of the binding, avoiding pins, as close to the inner edge as possible. Your stitches will catch the binding inside and secure it.


alter a shirt to a cardigan tutorial
{Refashioned shirt to cardigan: adding binding © ShannonSorensen}

  • To add faux pockets, cut a strips of coordinating bias tape. I wanted to use more of the gray jersey, but it ended up too bulky.
  • Put the cardigan on and determine where you want your pockets, then pin the bias strips evenly on either side of the cardigan, folding under the raw edges on either side. 
  • Stitch as close the the side and bottom edges as you can, leaving the top open.
  • Add lace embellishment if you choose.

how to add / sew faux pockets to a top or cardigan
{How to add faux pockets to a cardigan: refashion © ShannonSorensen}


  • After finishing this much of the cardigan, the front dark gray binding by itself, still felt a little too masculine, so I added a strip of lace to either side of the cardigan opening.
  • To give the back a little detail, I cut a 2" wide strip of the dark grey jersey, folded it over and sewed it closed. After turning it right side out, I pinned the piece down to the middle lower back and embellished it with matching lace.
  • To finish the sleeves, I cut off the binding and simply folded the edges under and sewed.


add lace and hem sleeves to a cardigan refashion

And voila! One man's shirt is another women's treasure.
From shirt to cardigan just like that.

before and after refashioned shirt to cardigan
{Men's Shirt to Women's Cardigan: before & after © ShannonSorensen}

I love the details, especially the back. It gives it just that little something.
turn a shirt into a cardigan tutorial

Not sure what's next on the horizon, but with my to-be-refashioned-pile a mile high, I'm sure there will be something! :)


SUBSCRIBE (never miss a post!): Subscribe to ShannonSews
BLOGLOVIN: ShannonSews on Bloglovin
FACEBOOK: facebook.com/SSorensenDesigns
TWITTER: @ShannonSews1
INSTAGRAM: ShannonSorensenDesigns on Instagram
SHOP: Shannon Sorensen Designs + Fairface Washcloths
YOUTUBE: youtube.com/ShannonSews

Linked to: http://sewmanyways.blogspot.com/http://www.flamingotoes.comhttp://www.thegirlcreative.com/, http://www.crumbsandchaos.net/, http://www.craftionary.net/, http://www.reasonstoskipthehousework.com/, http://www.sugaranddots.com/, http://www.fingerprintsonthefridge.com/, http://www.niftythriftythings.com/,  http://www.scatteredthoughtsofacraftymom.com/,  http://www.sewcando.com/,  http://threemangoseeds.blogspot.com/, , http://www.madincrafts.com/, http://www.craft-o-maniac.com/, http://www.creatingreallyawesomefreethings.com/, http://www.linesacross.com/, http://www.sugarbeecrafts.com/, http://www.hopestudios.blogspot.com / , http://bebetsy.com

Thursday, October 17, 2013

Sweater to Cardigan Refashion Tutorial

How to turn a sweater into a cardigan
{image Sweater to Cardigan Refashion © ShannonSorensen}
It's sweater season again and I've been rummaging through my bags of forgotten sweaters. The ones that don't fit, yet I can't seem to part with.

This v-neck pink argyle sweater has always been one of my favorites, but one day it started fitting tighter and haven't worn it since. Until now.

Give any old sweater new life, by turning it into a cardigan, with this easy refashion tutorial!

[*This post contains Amazon links. As an Amazon associate I earn a small commission on purchases made through my links]


How to Turn your Sweater into a Cardigan

1. Choose a coordinating bias tape (Amazon) OR you can make your own or use bias tape with fabric and these bias tape maker tools (Amazon).

2. Measure the front of your sweater and cut that much bias tape + extra to tuck under on the top and bottom edge. Measure and draw a straight line down the front of your sweater.

3. Cut the front of your sweater using the line as your guide (no turning back now!).


refashion your old sweater into a cardigan with this tutorial
{Sweater to Cardigan Refashion © ShannonSorensen}

This binding will be turned to the inside of your sweater. If you want the binding to show on the outside, follow these steps with the sweater inside out. I'll have a tutorial for this method soon.

4. Pin the binding down with the shorter side flush with the edge of your sweater cut.

5. Fold the top and bottom edge of your binding over and pin.

6. Using a ball point needle (Amazon) (best for sewing with knits), and low pressure (I set my dial to 1) stitch down the creased fold all the way from the top to the bottom edge.
Refashion tutorial turn your sweater into a cardigan
{Refashion: Sweater to Cardigan © ShannonSorensen}

7. Fold the stitched binding over to the inside, covering up the raw edges.

8. Pin the folded binding from top to bottom. Be sure to tuck under the top and bottom edges.

9. Stitch as close the the edge of the binding as you can (the inside edge). My machine has a setting that moves the needle to the left hand side, so that is what I used.

10. Admire your handy work. You're all done!

Sew your own cardigan from an old sweater
{Transform your old sweater into a cardigan step-by-step © ShannonSorensen}

I'm so happy I'll be able to wear this sweater again, transformed into a new cardigan.

turn your old sweater into a cardigan refashion
{Sweater to Cardigan Refashion © ShannonSorensen}

I love the peekabo turquoise accent inside. You would never know it wasn't made this way in the first place.

How to turn a sweater into a cardigan
{Turn a old sweater into a cardigan: tutorial © ShannonSorensen}


refashion project, turn a shirt into a cardigan
{image © ShannonSorensen}
My next project: refashioning this men's long sleeved striped shirt into a cardigan...the wheels are turning!

SUBSCRIBE (never miss a post!): Subscribe to ShannonSews
BLOGLOVIN: ShannonSews on Bloglovin
FACEBOOK: facebook.com/SSorensenDesigns
INSTAGRAM: ShannonSorensenDesigns on Instagram
SHOP: Shannon Sorensen Designs + Fairface Washcloths
YOUTUBE: youtube.com/ShannonSews


Linked to: http://www.diybydesign.blogspot.com/http://www.mygirlishwhims.com/http://www.creationsbykara.com/,  http://ivyandelephants.blogspot.com/http://www.gingersnapcrafts.com, http://www.firefliesandjellybeans.com, http://www.theshabbycreekcottage.com, http://www.aglimpseinsideblog.com/, http://www.the36thavenue.com/ http://www.thecraftyblogstalker.com, http://www.livelaughrowe.com/ http://www.allthingswithpurpose.com, http://becomingmartha.com, http://www.thirtyhandmadedays.com, http://shabbynest.blogspot.com, http://www.uncommondesignsonline.com/
All Things with Purpose

Saturday, October 12, 2013

Add water bottle holders to a fanny pack

how to add water bottle holders to a fanny pack
{photo: Add water bottle holders to a fanny pack © ShannonSorensen}
Sometimes I embarrass myself. Sometimes the thrifty-crafty-I-can-make-it-myself side takes over and I should hide my head in shame, but instead I share my faux-pas on the internet.

Since taking up biking, I've needed a fanny pack with water bottle holders for long rides. Many of the good ones are a little pricey and don't have 2 water bottle carriers, so I've been left toting a heavy backpack. Ugh.

In a *frenzied moment* when I was due to go out on the bike in 15 minutes and couldn't bare the thoughts of lugging a heavy backpack again, I grabbed whatever I had on hand (enter: thrifted shower curtain loops + elastic) and slapped this baby together. And I do mean slapped.

It wasn't my best work by any means (mismatched fabric, thread and elastic) and I'm a little embarrassed when "real bikers" pass me and pray they don't laugh at my DIY fanny pack bottle holders, but it did the job. Who needs dignity anyway, when you're wearing biking shorts that feel like a big adult diaper? At least I'd be hydrated.

Here are some quick how-to's:

Add water bottle holders to a fanny pack

easy way to add water bottle slings to fanny pack
{photo:  © ShannonSorensen}
What I did, in the hurried / thrifty version was to cut loops off the top of a thrifted fabric shower curtain to use as the bottle slings, and elastic to secure the water bottles. In my perfect version, I would have used coordinating fabric or nylon webbing (like backpack straps) + matching elastic.

1. Determine the length of your slings.
If there are water bottles you use most often, measure their length to determine how long you need your slings to be. The elastic will help make up for differences in width, but if your bottles are longer, you'll need longer strips for your slings.

2. Cut strips of coordinating fabric for your sling strips. Choose fabric or material that coordinates with your fanny pack or use nylon webbing (like backpack straps). The sling length should be a little over 1/2 to 3/4 the length of your water bottle. The width should be about 1-1/2 inches or more.

3. Sew one end of your sling strip to the waist belt of your fanny pack.

4. Cut 4 pieces of coordinating elastic. Two for each side. Measure the length of elastic by wrapping it around your water bottles and cut it so it fits snug.
make a fanny pack with water bottle carriers
{photo © ShannonSorensen}

5. Sew the elastic to the sling strips - 1 about 1/3 of the way up from the bottom and the 2nd at the top of the sling strip which you will also attach to the waist band of the fanny pack.

And that's about it. It really doesn't take a lot of time and has been a life saver on longer bike rides.

Every time I use this water-bottle-toting-fanny-pack the gunslinger song from old westerns goes through my head and I feel like spinning my water bottles and tossing them back in the holsters.

Tuesday, July 30, 2013

Cotton Duck 101: Chevron Pillow Cases

Throw pillows in chevron print, made from cotton duck fabric
{Image: Cotton Duck Chevron Pillows: Chartreuse/White}
I've been a sewing maniac lately! So many new things in my shop, & a few snapped up so quickly, the fabric had barely left the sewing machine. I'm on fire people!

The tricky thing about making decorative pillow cases for other people, is that I secretly want all of them for myself.

As you know, Chevron Prints, in all their bold colors, are really popular right now and can update & bring life to any room in the house.

I decided to make a couple sets for my shop, out of screen printed cotton duck fabric, and yes, I fell in love with them immediately.

Chevron Pillow Cases ~ Chartreuse & White
18" x 18" 
Envelope Back
100% Screen Printed Cotton Duck

Cotton Duck Fabric: Chevron throw pillows, from shannon sorensen designs
{Image: Decorative Pillows- Chevron Chartreuse & White}

Chevron Pillow Cases ~ Black & White
20" x 20" 
Zipper Closure
100% Screen Printed Cotton Duck
Medium Weight Black 100% Cotton Back
What is cotton duck fabric? Chevron throw pillows made from canvas
{Decorative Pillows: Chevron Black & White}

Sigh.
I love these bold colors!!

I've found colorful chevron prints in light-weight cotton, twill and cotton duck. Light-weight cotton would work for bedroom throw pillows, but twill and cotton duck are a more durable, heavier-weight fabric, perfect for couch pillows or throw pillows for family room chairs.  I considered twill, but the colors were a little muted, so when I ran across this bold screen printed cotton duck, I knew I'd found exactly what I was looking for!

So what is 100% Cotton Duck Fabric?

Cotton Duck is a strong, durable fabric, resistant to tearing and snagging, and is often better known by its more common name, Canvas (doesn't sound nearly as fancy, does it?). Not all cotton duck is created equal, however, since it comes in a variety of weights. The cotton duck that I used for my chevron pillow covers, was medium weight (~6.5 oz); great for curtains, accent pillows, bed skirts, slipcovers, upholstery, purses & totes.

At its heaviest weight, you've probably seen cotton duck and didn't even know it - on tennis shoes, hammocks, cots, tents or sandbags. Now that's some durability!

Where does Duck Fabric Come From?

Duck fabric comes from the Dutch word, "doek", meaning “linen canvas.” In order to distinguish it from traditional duck (linen), its termed "cotton duck".

Duck Fabric + Duct Tape 

You know our old friend, Duct Tape? It's related to Duck Fabric. What? Who knew? Some people even call duct tape, duck tape, but don't do it around me. hahahaha Turns out, the original duct tape was made from duck fabric, with an added adhesive.

Now you have a little conversation starter for the dinner table!

Thursday, June 13, 2013

Sew your own Bowl Covers

How to sew your own bowl cover tutorial
The school year hasn't even ended yet and I'm already checking off some of my summer to-do's! How's that for ambitious?

I've been meaning to sew myself a bowl cover for my Kitchen Aid for eons. Every time I looked at that shiny silver bowl on the counter I felt guilty. Must. Do. That. Later.

Lets just say "later" never came, and I got really tired of washing the dust out of the bowl every time I used it.


Making your own bowl covers comes in handy, not only for covering your Kitchen Aid bowl, but they are great for covering all sorts of things - storing food in the fridge, taking a large salad for a potluck and oh, one more - you'll never guess. You can also use it to cover your head.

Yes, this simple bowl cover pattern is basically the same as a shower cap. How's that for a two-for-one?!

Okay, lets get started.

How to Make your own Bowl Covers

MEASURE

Trace around your bowl so you have the circumference. *You will be adding 1-2 inches around your circle for your pattern or you can choose to trace a bigger bowl than the one you're covering.

To sew your own bowl cover, measure around the circumference of the bowl and add 1 to 2 inches


CREATE YOUR PATTERN & CUT YOUR FABRIC

For your cover to fit, you'll need to add 1-2 inches to the diameter of your bowl. *You can either trace a larger bowl than the one you're making the cover for, draw in the extra room to your pattern, or add it when you cut out your fabric.

Make a bowl cover pattern by tracing a bowl and adding 1 to 2 inches extra on your pattern or fabric


HEM THE CIRCLE

Hemming a curve or circle can be a bit tricky. I chose to use my rolled hem foot. Even with this tool it was a bit of a challenge. I found this great tutorial on How to Hem A Curve by adding some gathering stitches. I'll have to try it on my next bowl cover.

How to hem a circle or curve using a rolled foot or gathering method

STRETCH-SEW YOUR ELASTIC

Instead of creating a band or casing to thread elastic through, I decided to stretch-sew it to the fabric circle.
1st: Measure and cut the elastic to the size you want (how tightly you want the bowl cover to fit). 
2nd: Pin elastic in 4ths around the circle to get it evenly distributed.
3rd: Stretch only the elastic (not the fabric) in front and behind the presser foot, as you sew it in place with a zig zag stitch. 

*The best tip is to stretch and sew little sections as a time to make sure you get the best elastic stretch.

How to stretch stitch elastic to your bowl cover

ADMIRE YOUR HANDY WORK

Just about ready to add it to my bowl. I love the dainty ruffled edge!

Create a ruffled edge to your bowl cover by sewing elastic while stretching

USE YOUR NEW BOWL COVER

Sigh. Now every time I catch a glimpse at my Kitchen Aid, I smile. My new bowl cover fits perfectly. I can hide away my Kitchen Aid tools and won't have a dusty bowl to wash. Hip hip hooray!

Easy bowl cover tutorial for Kitchen Aid bowls, pot luck dishes or left-overs


Now it's time to sew a few more bowl covers...pot lucks, family dinners...left-overs...and maybe even a shower cap ;)


Never miss a post! Subscribe to ShannonSews
Like on facebook.com/SSorensenDesigns
Follow @ShannonSews1 on Twitter
Subscribe to youtube.com/ShannonSews
Blogging tips