 Give a crafter 5 minutes and she'll find a new use for something.
Did you know Freezer Paper can be crafty? Oh yes, it's not just for meat, my friends.
It can be used as a fabric stabilizer when painting on fabric, and it can also be used to make your own stencil designs. I'm sure there are many other things its good for that have nothing whatsoever to do with meat.
I've been wanting to try making my own stencil using Freezer Paper for a long time. When I made my niece's Domestic Diva Tool Pouch, I finally found a good excuse to try it.
Freezer paper is like magic! Try it once and you'll be hooked. You'll want to stencil everything in the house.
How to create your own stencil with freezer paper
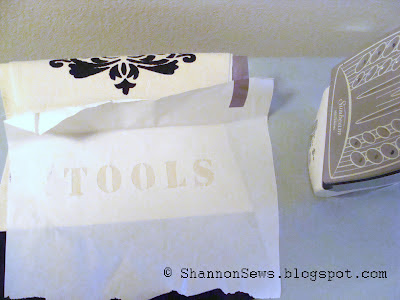
First step: (shown in the photo above) Print out the words or image you want to stencil and tape it to the freezer paper's non-waxy side. (You may be able to print directly on your freezer paper, if your printer doesn't use heat.)
With something underneath to protect your cutting area (self-healing mat, cardboard, magazine) carefully cut out each letter through the paper and freezer paper.
Carefully peel off your taped paper. If you have cut out letters that have a center to them, be sure to keep those little pieces. You'll need to iron them on.
Iron the shiny (waxy) side down to the fabric. Make sure to adhere especially around each letter.
Apply your fabric paint with a sponge directly over the stencil and allow time to dry.
I was a little pressed for time, so I whipped out the hair dryer to cut the drying time.
I added a pre-made stencil design before the front was complete. I used spray adhesive on the back of this plastic stencil and adhered it to the fabric. Both the freezer paper and bonded plastic stencil peeled off easily when dried.
And here is the finished stencil. I really love the way it turned out.
Cutting small details with an exacto knife also takes patience and practice. Since making this pouch, I purchased a knife with a skinnier blade and will see if it makes cutting with precision a little easier.
For the back of the pouch, I used a pre-made plastic stencil and adhered it with Craft Bond spray adhesive.
Here's the back. The paint bled a little through the stencil, but still looks nice. I guess I'll just need to spend more time stenciling. Practice makes perfect, you know.
Here is one last look at the tool pouch, in case you haven't seen the finished product. Read about how I made this Domestic Diva Tool Pouch and what gems are tucked inside.
Never miss a post! Subscribe to ShannonSews
Like on facebook.com/SSorensenDesigns
Follow @ShannonSews1 on Twitter
Subscribe to youtube.com/ShannonSews


i love freezer paper, that's what i use for clothes patterns.
ReplyDeleteI never thought of using it for patterns. So many uses! :)
Delete