Saturday, June 29, 2013

Quick Easy Dinner Idea: No cooking required!

quick easy dinner idea meals for summer
Want a quick, easy and delicious summer meal idea? This is a great one I just had to share. And there is no cooking required. Say, what??

{Enter: King's Hawaiian Sweet Rolls} As I was looking through my coupons and stumbled upon one for King's Hawaiian Sweet Rolls, (6/30 Red Plum for you couponers), I had a dinner epiphany! Why not make an old favorite with a new twist? Forget regular old hamburger buns, bring on BBQ Chicken Sliders with the goodness of sweet Hawaiian rolls!

And oh, they were heavenly. Soft, sweet bread stuffed with moist rotisserie chicken, bbq sauce and crunchy cabbage (although you could top it with coleslaw if you prefer.) Mmmm mmmm good!

Okay, stop drooling. I'll show you how easy it is to throw these together (like I said, you literally don't have to cook a thing. Score!)


BBQ Chicken Sliders
on Sweet Hawaiian Rolls ❀


1 Rotisserie Chicken
1 package Kings Hawaiian Dinner Rolls
BBQ sauce
Ranch dressing (optional)
1 Bag coleslaw mix

Cut Hawaiian rolls in half and place them open on a plate. Break up the rotisserie chicken into bite sized pieces and place on Hawaiian rolls. Drizzle chicken with bbq sauce and ranch; top with a handful of crispy cabbage mix (or make coleslaw and add on top).
Put them all together and you're ready to eat. 
Oh. Yes. Please.
*Serve with corn on the cob and a fruit salad

easy summer meal with no cooking

I must say, this is now one of my favorite meals, especially for summer. It's so quick and easy, plus, you don't have to heat up the house. And for the first time this summer here in Seattle, we don't need to add any more heat to our kitchens. It's in the upper 80's here people! Shocker!


Never miss a post! Subscribe to ShannonSews
Follow ShannonSews on Bloglovin
Like facebook.com/SSorensenDesigns
Tweet @ShannonSews1 on Twitter
Subscribe to youtube.com/ShannonSews

Tuesday, June 18, 2013

Funny things kids say: school's end

funny kids quotes
As this school year is coming to a close, I just had to share some final funny words out the mouths of the adorable kids I work with.

The end of the year is always bitter-sweet, but I am THRILLED I get to come back next year and work with them again! Quite a relief after all the ups and downs of being told I had to transfer schools. I'm still amazed and grateful for that gracious miracle!


While checking in for the afternoon, a 3rd grade girl hollered from line (about 5 kids away from me), "Ms. Shannon, your sunscreen smells like rotten egg salad sandwiches. Sorry. No offense."
Me: [laugh] Um, totally offended?
Her: [a little while later] "Ms. Shannon, your sunscreen doesn't smell anymore. I found out Tommy farted in line."


3rd grade girl:
"Ms. Shannon, did your hair used to be brown? Because I can see it up there." [points to my roots that clearly need a touch up]


3rd grade girl:
Her: I'm from Hawaii.
Me: Wow - that's neat. How long did you live there?
Her: Well, my mom and dad lived there but I never lived there cuz I wasn't invented yet.


1st grade boy [while on the computer looking on Google Earth]
Him: I love L.A.
Me: When did you go to L.A.?
Him: Well, I've never been there, but I love it on Google Earth.


One of the moms and I were talking about our food weaknesses, before she left with her 3rd grade daughter.
3rd grade girl's mom: My weakness is ice cream
3rd grade girl: My weaness is...wait, what's it called?
[Mom starts laughing]
Me: Weakness
Her mom: [still laughing] I hope you don't have a weaness


A 3rd grade girl was very excited about something she brought to show me & as she was jumping up and down says:
Her: OMG! I TOTES have RCS!
Me: What is RCS?
Her: Roller Coaster Syndrome!


Our room is getting a make-over this summer and I was talking to one of the 3rd grade girls about paint colors.
Me: I think pale yellow would be nice. It's light and cheerful.
Her: Pale yellow would totally kill the vibe in here. My room at home is pale yellow and it's a total snooze fest.


While sitting with a small group of kids, I asked, "Would you rather be a teenager or an adult?"
One shouts: Teenager!
Another shouts: Teenager!
Another shouts: Adult! I mean teenager!
1st grade girl shrugs and says: I'd rather be a dog.


It was in the upper 70's in Seattle and we were playing with water balloons outside. I asked a 1st grade boy if he wanted to go outside and play with the water balloons. His response to me: "I'm not in the mood for water balloons. I'm not wearing my heat wave underwear."

Love those kids! ♥
Here's to a great summer!


Never miss a post! Subscribe to ShannonSews
Like on facebook.com/SSorensenDesigns
Follow @ShannonSews1 on Twitter
Subscribe to youtube.com/ShannonSews

Thursday, June 13, 2013

Sew your own Bowl Covers

How to sew your own bowl cover tutorial
The school year hasn't even ended yet and I'm already checking off some of my summer to-do's! How's that for ambitious?

I've been meaning to sew myself a bowl cover for my Kitchen Aid for eons. Every time I looked at that shiny silver bowl on the counter I felt guilty. Must. Do. That. Later.

Lets just say "later" never came, and I got really tired of washing the dust out of the bowl every time I used it.


Making your own bowl covers comes in handy, not only for covering your Kitchen Aid bowl, but they are great for covering all sorts of things - storing food in the fridge, taking a large salad for a potluck and oh, one more - you'll never guess. You can also use it to cover your head.

Yes, this simple bowl cover pattern is basically the same as a shower cap. How's that for a two-for-one?!

Okay, lets get started.

How to Make your own Bowl Covers

MEASURE

Trace around your bowl so you have the circumference. *You will be adding 1-2 inches around your circle for your pattern or you can choose to trace a bigger bowl than the one you're covering.

To sew your own bowl cover, measure around the circumference of the bowl and add 1 to 2 inches


CREATE YOUR PATTERN & CUT YOUR FABRIC

For your cover to fit, you'll need to add 1-2 inches to the diameter of your bowl. *You can either trace a larger bowl than the one you're making the cover for, draw in the extra room to your pattern, or add it when you cut out your fabric.

Make a bowl cover pattern by tracing a bowl and adding 1 to 2 inches extra on your pattern or fabric


HEM THE CIRCLE

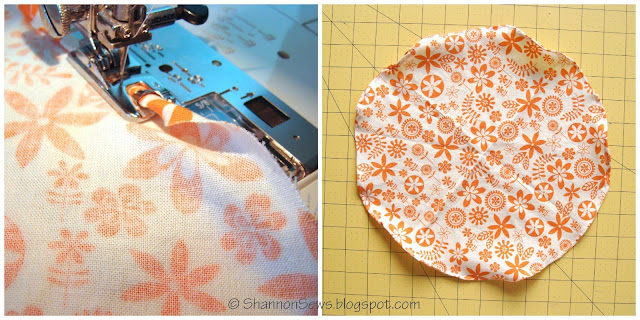
Hemming a curve or circle can be a bit tricky. I chose to use my rolled hem foot. Even with this tool it was a bit of a challenge. I found this great tutorial on How to Hem A Curve by adding some gathering stitches. I'll have to try it on my next bowl cover.

How to hem a circle or curve using a rolled foot or gathering method

STRETCH-SEW YOUR ELASTIC

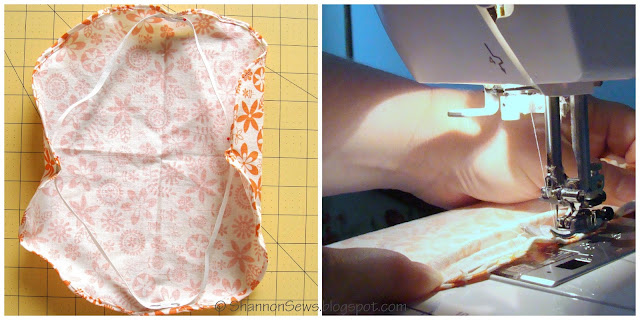
Instead of creating a band or casing to thread elastic through, I decided to stretch-sew it to the fabric circle.
1st: Measure and cut the elastic to the size you want (how tightly you want the bowl cover to fit). 
2nd: Pin elastic in 4ths around the circle to get it evenly distributed.
3rd: Stretch only the elastic (not the fabric) in front and behind the presser foot, as you sew it in place with a zig zag stitch. 

*The best tip is to stretch and sew little sections as a time to make sure you get the best elastic stretch.

How to stretch stitch elastic to your bowl cover

ADMIRE YOUR HANDY WORK

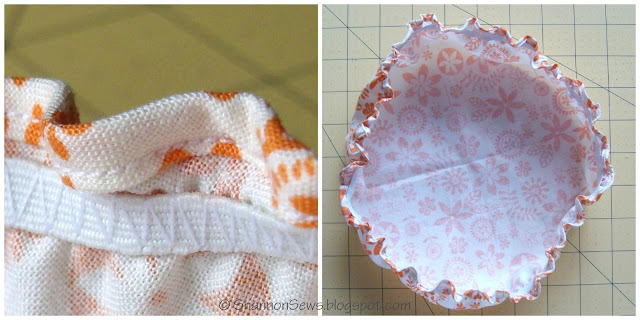
Just about ready to add it to my bowl. I love the dainty ruffled edge!

Create a ruffled edge to your bowl cover by sewing elastic while stretching

USE YOUR NEW BOWL COVER

Sigh. Now every time I catch a glimpse at my Kitchen Aid, I smile. My new bowl cover fits perfectly. I can hide away my Kitchen Aid tools and won't have a dusty bowl to wash. Hip hip hooray!

Easy bowl cover tutorial for Kitchen Aid bowls, pot luck dishes or left-overs


Now it's time to sew a few more bowl covers...pot lucks, family dinners...left-overs...and maybe even a shower cap ;)


Never miss a post! Subscribe to ShannonSews
Like on facebook.com/SSorensenDesigns
Follow @ShannonSews1 on Twitter
Subscribe to youtube.com/ShannonSews

Monday, June 10, 2013

Summer Meal Idea: Tortellini Salad

Easy summer recipe: tortellini salad
Quick, easy & delicious summer meal: Tortellini Salad 
We actually had some hot weather in Seattle this past week! Woohoo! Summer's on the horizon.

I opted for a quick and easy dinner that wouldn't heat up the house. From stove top and fridge to dinner table in just 15 minutes. Not too shabby.

There are countless ways to make this salad. The base is cheese tortellini and you can add whatever veggies you have on hand.

Toss it all with your favorite salad dressing, serve it with a side of french bread, and you're good to go!


Tortellini Salad Recipe

Ingredients
Frozen Cheese Tortellini
*Any of the following can be substituted with your favorite veggies
Cucumber
Tomatoes
Fresh Spinach
Carrots
Zucchini
Olives
Parmesan Cheese
Vinaigrette / Italian / or favorite Dressing

Directions
Cook frozen cheese tortellini according to directions. While tortellini is boiling, dice cucumbers and tomatoes; shred carrots and zucchini; slice olives; rise spinach and blot dry. Once tortellini is cooked, drain and rinse in cold water. 

Combine all ingredients and toss with your choice of salad dressing (I prefer this dill vinaigrette or Italian). Top with a scattering of Parmesan cheese (optional). 
Serve immediately or chill before serving. Goes well with toasted french bread.

Makes a quick, cool summer meal!


Thursday, June 6, 2013

DIY Grippy Hangers: Stop shirts from sliding off hangers

stop shirts from sliding off hangers by adding hot glue to hangers
It drives me nuts when shirts slide off their hangers.

You slap that baby back on the hanger, give it a good stare down to show it who's boss, and then ever so carefully return it to the closet. 

But when your shirt's too wide for the span of the hanger? It will inevitably slide off again...and again...looking quite sad, slumped and crumpled. I don't know why it irritates me so much. Grrrr.


Since I don't have any fancy hangers with that fuzzy stuff on them that makes shirts stick like a charm, I decided I must have something crafty I could use to make my own. And in fact, I did. It pays to be a girl with a glue gun.

How to Make your own Grippy Hangers
{Stop shirts from sliding!}

Supplies:

*Hot Glue Gun with glue stick
*Hanger (works on plastic, wood and wire)
use hot glue to help clothes grip to their hangers

Instructions:

*Heat your hot glue gun
*Squirt a line of glue across the top arm of the hanger on both sides. If your hanger has divets, don't go in them.


apply hot glue to a hanger's arm to add grip

*Once your hot glue has been applied, it should look something like this (below).
*Wait for the hot glue to dry (usually only takes a few minutes)

stop clothes from sliding off hangers by applying hot glue to the hanger arm

*Once dry, the hot glue becomes more cloudy in appearance (below). Touch it to make sure it has completely dried. That rubbery substance is what will keep your shirts in place!

*Gently peel off any stray glue strands.

Dried hot glue on a hanger becomes rubbery to prevent shirts from sliding

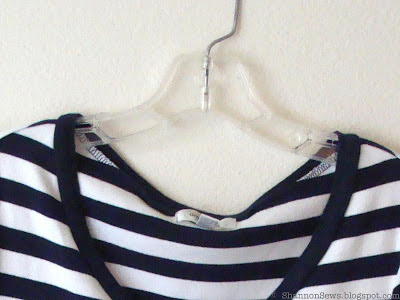
And voila! You now have a Grippy Hanger that will keep those sliding t-shirts in place!

use hot glue on hangers to prevent shirts from sliding

Not bad for a 5 minute project.

how to keep shirts on their hangers: DIY Grippy Hangers


Job Update:
For those of you following the saga of my job change, I'm still in limbo. What was once an "unalterable change", is now possibly changing again. What? I can only hope that means I'll get to stay at my school, but I'm not holding my breath. After a lot of prayers and talking things through, I feel more at peace about everything. Although my number one wish is to stay with my current kids, staff and school, I know I can make a difference wherever I go, and if I'm needed elsewhere, I will be sad, but I will accept that. I'll keep you posted. xo

EDIT (same day after work): You won't believe it. I'm still having a hard time believing it myself, but the big boss changed his mind and is allowing me to stay at my current school! I am so grateful and happy. This is truly a miracle and answer to many prayers. I'm walking on sunshine! Woohoo!


Never miss a post! Subscribe to ShannonSews
Like on facebook.com/SSorensenDesigns
Follow @ShannonSews1 on Twitter
Subscribe to youtube.com/ShannonSews

Linked to: http://www.bubblynaturecreations.comhttp://shabbynest.blogspot.com, http://www.504main.com
Blogging tips