Thursday, January 24, 2013

Dip Dye T-shirt Tutorial

Dip Dye a T-shirt InstructionsOn my day off Monday, I was feeling a little crafty and decided to try my hand at dip dyeing a t-shirt.

Honestly, I'd been putting it off because I was afraid of ruining a perfectly good aqua t-shirt!

I created a how-to video (see the end of this post) but I'll also include detailed directions here, should you want to try your hand at dip dying a t-shirt too! It's not as intimidating as it seems. And if I can do it, you can certainly do it!

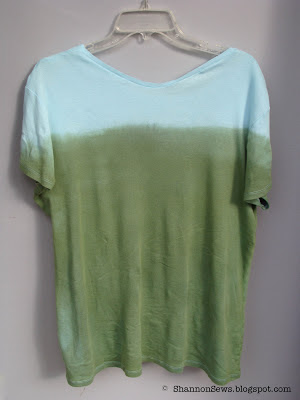
The color didn't turn out as I expected, but it's growing on me.  I was trying for more of an intense aqua or turquoise, but the green clearly took over. Mixing dyes can be tricky. Next time I may opt for just one color so there won't be any surprises. (wink)

How to Dip Dye a T-shirt


Dip Dye supplies

  • Rit Dye
  • Clothes to dye
  • Bucket or stainless steel sink
  • Rubber gloves
  • Stir stick or stainless steel spoon
  • Rags
  • Newspaper to protect surface
  • Hot water
  • Disposable container to mix dye
  • Salt
  • Detergent
  • Hanger
  • Water source

Dip Dye Instructions and Tips

  • Lay down newspaper to protect your working surface.
  • Use a stainless steel sink or large bucket. Dye will seep into anything else (porcelin sinks, bathtubs, counter tops, linoleum).
  • You will also need a water supply and place to rinse out your dyed shirt.
  • Make sure you read the instructions on the Rit Dye package.
  • I put 3 gallons of hot water in a stainless steel sink.
  • Added 1 Tbsp detergent (to evenly disperse the dye) & 1 cup salt (helps intensify dye color)
  • Put on rubber gloves!
  • Dissolved the dye (1 box blue with 1/2 box green) in 2 c hot water in a disposable container and added it to the water in the sink
  • Make sure you wet your shirt first and wring it out/smooth it out before putting in the dye
  • Immerse your shirt in the dye (I put pin markers in the shirt to show me where I wanted the line level to be.)
  • I swished my shirt in the dye a little so there wouldn't be a distinct line mark.
  • Make sure to keep dye off the top part of the shirt.
  • The longer you leave your shirt in, the darker it will be. *If you're opting for all-over color, leave it in for about 30 minutes and stir to evenly distribute color.
  • Remove shirt from dye and carefully ring out excess dye
  • Rinse the dyed shirt - 1st with hot water, then cold, until the water runs clear.
  • Next, either hang your shirt to dry (be sure to have something under it since it will still drip colored water) OR throw it in the washing machine with detergent, on cold (that's what I did).
  • Then hang or machine dry (I threw mine in the dryer).
And it's ready to wear!


How to dip dye your own t-shirt

Against the aqua, it's kind of a sea green...I call it "where the sea meets the sky"...if I'm waxing poetic.

Dip Dye using Rit Dye

If you have any questions, feel free to ask. I'm certainly not an expert at dip dying (yet!) but I'm happy to help!

{WATCH} how easy dip dyeing a t-shirt can be!


Never miss a post! Subscribe to ShannonSews
Like on facebook.com/SSorensenDesigns
Follow @ShannonSews1 on Twitter
Subscribe to youtube.com/ShannonSews


Linked to: http://sewmanyways.blogspot.com/, http://www.iheartnaptime.net, http://www.flamingotoes.com, http://sewchatty.blogspot.com, http://www.thegirlcreative.blogspot.comhttp://www.niftythriftythings.com/, http://www.ishouldbemoppingthefloor.co m, http://sewcando.blogspot.com, http://creatingreallyawesomefreethi ngs.com, http://makingtheworldcuter.blogspot.co m, http://craftomaniac.blogspot.com, http://www.skiptomylou.org, http://diyshowoff.comhttp://www.linesacross.com  http://www.keepingitsimplecrafts.com/ , http://sarahdawndesigns.blogspot.comhttp://www.madincrafts.comhttp://www.sweetlittlegals.com/http://www.sugarbeecrafts.com/http://www.hopestudios.blogspot.com/http://todayscreativeblog.net/http://carolynshomework.blogspot.com/http://www.craftyconfessions.com/http://www.diybydesign.blogspot.com/, http://www.733blog.com/, http://www.sew-much-ado.com/http://www.mygirlishwhims.com/, http://www.gingersnapcrafts.com/, http://www.rolleduppretty.com/http://raegunwear.blogspot.com/, http://ivyandelephants.blogspot.com/, http://www.adornedfromabove.com

Thursday, January 17, 2013

I'm finally tweeting

Shannon Sews on Twitter
It's official.
I'm FINALLY on Twitter. (Gasp!)
It only took me 6-1/2 years to join. I waited so long, someone already swiped my user name. I've been demoted to @ShannonSews1.

Can you believe tweets have been flying since 2006? I feel so old.

There was a time when I didn't even know what a tweet was. And honestly, between Facebook, Blogging, YouTube, Etsy and Pinterest, I don't know what there is possibly left to say. But we'll see if I can come up with something.

I'd love to have a few followers on Twitter, just so I don't feel awkward sitting there at my table for one.  Thanks guys xo


Never miss a post! Subscribe to ShannonSews
Like on facebook.com/SSorensenDesigns
Follow @ShannonSews1 on Twitter
Subscribe to youtube.com/ShannonSews

Tuesday, January 15, 2013

Fun Children's Birthday Party or Summer Camp Activity

Best children's birthday party idea and fun summer camp craft idea
It doesn't feel like summer yet, does it?
Not unless you live in South America or Southern Australia.

At this point, in the throws of icy cold January, I'm not opposed to relocating!

It's hard to believe summer camps are already planning for summer activities, but they are. The after-school program I work for is already gearing up for summer. We always have to be one step ahead of everyone else to get the best activities booked, most creative summer camp crafts announced and supplies purchased, before you can say, "Martin Luther King Day"!

My favorite children's birthday party idea or summer camp craft has to be Ink Blot T-shirt Making 


We had so much fun with our 50 Kids: 50 Ink Blot T-shirts project that I'm sharing it with summer camps and aging children everywhere!

But I can't take all the credit. A bunch of smart moms discovered that ink blot t-shirt making is a great children's birthday party idea! Brilliant, those moms. Keeps all those busy hands occupied and they get to leave with a fun party souvenir.

It only took me 7 months (ha!), but I finally put together this little video of our Ink Blot T-shirt making activity. It really was so much fun. The kids still proudly wear their t-shirts to school!

{WATCH} To see how much fun it is to make Ink Blot T-shirts with kids!


If you, or someone you know, is looking for a fun birthday party idea or summer camp craft, let me know! There's plenty of ink blots to go around! { ssorensendesigns [at] hotmail [dot] com }

Ink Blot T-shirt Design Kits are available here in packages of 10.
Larger quantities or custom order are available.


Never miss a post! Subscribe to ShannonSews
Like on facebook.com/SSorensenDesigns
Follow @ShannonSews1 on Twitter
Subscribe to youtube.com/ShannonSews

Sunday, January 6, 2013

Pin images from the web to Pinterest

How to add a pin it button from Pinterest to your computer
I'll admit it, I didn't jump on the Pinterest bandwagon right away. I wasn't even sure how to pronounce it (pine-terest? pint-erest). What did this even mean?

But once I did join the throngs of people pinning fashion, recipes, crafts and diy projects, I was hooked.

It occurred to me, the day after Pinterest Nutella cookies saved the potluck, that some people may not know how to pin things they see online to their Pinterest boards.

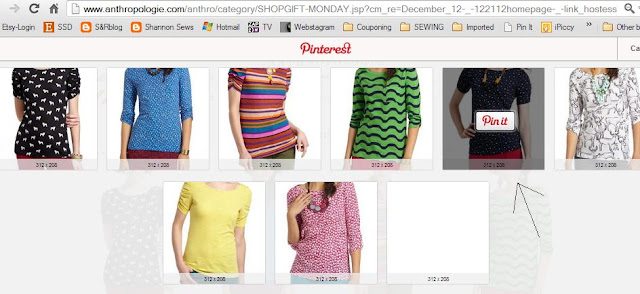
It's easy enough to look through Pinterest boards and "repin" something, but what if you're looking through new arrivals on Anthropologie and see something you'll be the 1st to pin? Let me show you. It's incredibly simple.


How to pin images from the web on your desktop computer to your Pinterest boards:


▶First, go to Pinterest and add a "Pin It" button right to your bookmarks bar.

Install a Pinterest button to your bookmarks bar to pin images from the web


▶Once you've installed your Pin It button, it will appear on your bookmarks bar.

Use a pin it button right from your computer's bookmarks bar


▶Stay logged into Pinterest as you surf the net

How to pin images to Pinterest from any website


▶When you find something you like, click the Pin It button from your bookmarks bar

Instantly save images from the web with a Pinterest Pin It button on your computer

▶Pinterest will swoop in and gather all the images on the page. Click on the image you want to Pin.

Pin images to Pinterest by clicking on the Pin It button


▶Next thing you know, up pops your Pinterest boards. Choose the board you want to save it to and click Pin It.

That's all there is to it!

Save images from the web directly to your Pinterest Boards by installing a Pin It button to your computer


*To add a "Pin It" button to your iphone, ipad and Android, you're cooler than me, so click here


Never miss a post! Subscribe to ShannonSews
Like on facebook.com/SSorensenDesigns
Follow @ShannonSews1 on Twitter
Subscribe to youtube.com/ShannonSews

Wednesday, January 2, 2013

Taper a Jean or Lightweight Jacket: DIY

alter your jean jacket or lightweight jacket in just 3 easy steps
Happy 2013!

I thought I'd start out the new year by sharing a quick how-to for tapering a light-weight jacket or fitted coat (without lining). Although with all the holiday food I ate I probably need to be taking it out!

If you have a light-weight coat or jean jacket that seems a little bulky, it's easy to alter the side-seams to give it a leaner, more feminine appearance.

This jean jacket was a little big for me, and although I wanted it a little roomy, it just felt too bulky.

To give it leaner lines, I decided to take in the sides just a touch. And believe me, at this point I'll take anything that makes me look leaner!

Here's the Jean jacket before the alterations, in all its bulky glory. And here it is after I tapered it.


Taper a bulky jacket - before photo

Much nicer, don't you think?

It really didn't take a lot to taper the jean jacket and give it a nice feminine waist line. 
Just 3 easy steps.

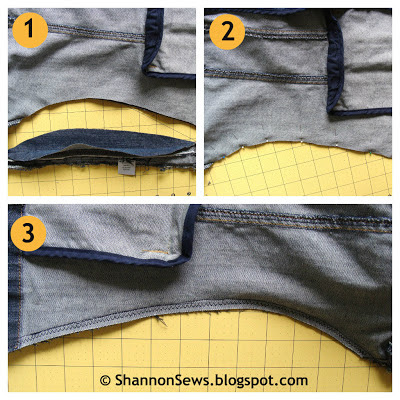
1 Turn your jacket inside out and line up all seams. On a flat cutting surface, cut one side from the bottom hem up to just under the armpit, tapering it to your liking. Take the excess fabric piece and lay it on the opposite side seam. Pin it down to copy the previous side's measurement and cut.

2 Pin the newly cut seams in place.

3 Sew a straight stitch the length of the newly tapered side seam. Finish with a serger or zig zag stitch.

Easy tapered jacket alteration instructions

All cinched up and ready to wear!


Never miss a post! Subscribe to ShannonSews
Like on facebook.com/SSorensenDesigns
Follow @ShannonSews1 on Twitter
Subscribe to youtube.com/ShannonSews
Blogging tips