 |
| {image: Protect your online photos} |
When confronted, the thief said she found my photo on Google and used it since my "name wasn't on it". The image clearly referenced my blog, but didn't have my name on the image. It still obviously wasn't her picture or her work, but I will be smarter from now on and leave a digital fingerprint so thick not even an experienced thief will want to mess with my photos! Take that!
There are several ways to protect your online photos by leaving your own digital fingerprint all over them.
Here's how:
How to Protect your Blog & Online Images
1. Put a copyright watermark on your photos.
The first, most visible way to protect your online images is to put a copyright notice directly on your image. You can do this by popping your photo into Photoshop or an online photo editing site and slapping a copyright directly on your photo.You can add a watermark across your image or add text to the bottom. Being an avid user of Photoshop, I happen to know that text can easily be erased if it's at the bottom. It's harder to erase when it's written over at least part of the image and even harder to erase when it's across your entire image. It comes down to what you're comfortable with, since it does impact your image to some degree.
 |
| {Put a watermark on your photos © ShannonSorensen} |
2. Add your Copyright to the Title of your Blog Photo
Have you ever hovered your mouse over an online image, and a text box pops up with a little description of the photo? This is an easy way to incorporate your copyright onto your photo without impacting the image itself.While editing your post in blogger, click the image and a bar will pop up.
Then click Properties.
 |
| {Add titles to your photos to protect your pictures © ShannonSorensen} |
An Image Properties box will pop up, giving you the option of adding Title Text to your image (alt text is something different.). Add a short description + your copyright.
 |
| {Add extra protection to your online photos with Title tags © ShannonSorensen} |
Now when anyone hovers over your image, the text box will pop up, giving more information about your photo, along with your copyright. When your mouse is not on the image, the text box goes away (same for my pinterest pin button).
 |
| {Prevent online images from being stolen by adding a title tag with your copyright © ShannonSorensen} |
3. Add your Copyright to the Caption under your Blog Image
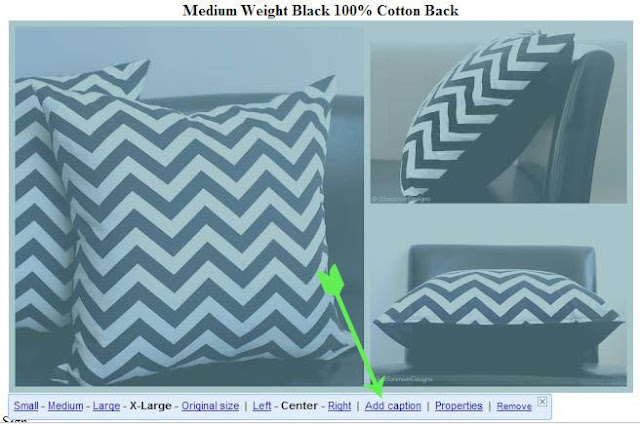
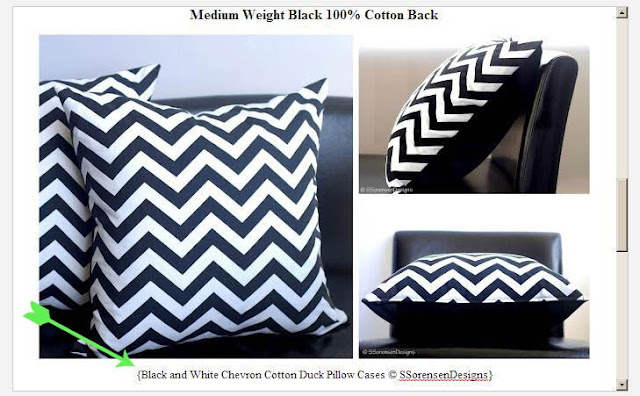
A caption is the text that shows up below your image. It's a chance to give readers a little more information about your photo, and another place to add your copyright.Simply click on your image in blogger edit mode, and the bar will pop up (below).
Click on Add Caption.
 |
| {Add a caption like this to identify your copyright © ShannonSorensen} |
Add a description of your image and include your copyright.
 |
| {Take ownership of your photos with copyright protection © ShannonSorensen} |
4. Add your Copyright to your Image File Name
This may be the least effective way, but it still leaves your digital print on your image. When you save your photo to your computer, before adding it to blogger, add a short copyright to the end of your file name: chevron-pillow-ssorensendesigns.jpg. You want it at the end so it won't interfere with seo.Although image file names can easily be altered once you've uploaded your picture to the internet, and sometimes sites encrypt the title anyway, it doesn't hurt to slap your copyright on the file name.
You've worked hard to take great photos and make quality products. Don't let someone rip off your talents and hard work without a fight! Protect your images online by adding your copyright in these 4 easy steps, giving thieves a reason to look for stolen images elsewhere.
SUBSCRIBE (never miss a post!): Subscribe to ShannonSews
BLOGLOVIN: ShannonSews on Bloglovin
FACEBOOK: facebook.com/SSorensenDesigns
TWITTER: @ShannonSews1
INSTAGRAM: ShannonSorensenDesigns on Instagram
SHOP: Shannon Sorensen Designs + Fairface Washcloths
YOUTUBE: youtube.com/ShannonSews

What great information! Thanks, Shannon.
ReplyDelete