My mom and grandma always used this type of light-weight towel for drying dishes after a big family meal.
Now they are my first choice for drying dishes since they are lint free, light-weight and dry quickly. And since they come in white, they are the perfect craft project (paint, fabric or embroidery)!
Where did the idea of using Flour Sacks Towels come from?
More than 80 years ago, during the 1930's and 40's when times were tight due to the Great Depression, our frugal female ancestors transformed the large, plain cotton sacks in which they received their flour, sugar, cornmeal and chicken feed, into clothing, curtains, dish towels, pillow cases and toys.But these large cotton sacks didn't stay plain for long. Seizing a great marketing opportunity, flour and feed companies began producing cotton sacks with decorative patterns, borders and colored designs. If women liked the pattern on the sack, they'd buy that brand of product, and use the fabric to sew whatever they needed. Those fabulously thrifty women!
Photos from the 1930's show people wearing up-cycled flour sack clothing.
 |
| {photo credit} |
But I digress. I'm a sucker for the history, stories and fashion from the 20's, 30's & 40's. Back to the tutorial!
To Dip Dye your White Flour Sack Towel, here's what you'll need:
(*affiliate links included)
Dip Dye supplies
- Rit Dye
- Cotton flour sack towel
- Stainless steel sink or bucket
- Disposable rubber gloves
- Stainless steel spoon or stir stick
- Rags
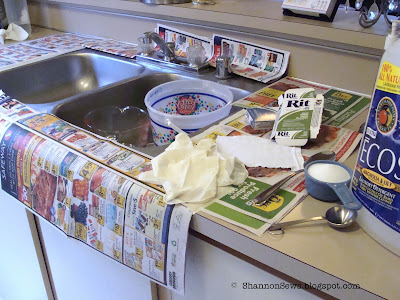
- Newspaper to protect surface
- Hot water
- Disposable container to mix dye
- Salt
- Fabric Detergent
- Hanger
- Source of water
Dip Dye Instructions and Tips
- Protect your working surface by laying down newspaper.
- Don't stain your porcelain sink, bathtub, counter top, or linoleum! Use a stainless steel sink or large bucket. Work outside if possible.
- Have a water supply close by.
- Read the instructions on the Rit Dye package.
- I used 3 gallons of hot water in a stainless steel sink with 1 Tbsp detergent (to evenly disperse the dye) & 1 cup salt (helps intensify dye color)
- Use disposable rubber gloves! Or your hands will be a lovely shade of whatever you're making.
- First dissolve the dye in 2 cups of hot water in a disposable container (before adding it to the rest of the water, detergent and salt in the sink). I used 1 box blue with 1/2 box green.
- Wet your towel first, wring it out, and smooth it out before immersing it in the dye
- Immerse your towel in the dye to the level you want it, swishing it back and forth so there's no distinct line mark.
- Keep dye off the white part of the towel.
- To get the color gradient effect, hold your towel in the dye for a shorter amount of time on each section from the top down, as seen in the photo. Start at the top and gradually increase the time each section is immersed in the dye as you go down. (The bottom of the towel was held in the dye much longer than the top.)
- The longer you immerse your towel in the dye, the darker it will be. *For all-over color, keep your towel immersed for about 30 minutes, stirring often to distribute the color evenly.
- When ready, lift your towel from the dye and carefully ring out the excess dye.
- Using hot water 1st, begin rinsing your towel from the dye line down (to keep the top white); then change to cold water and rinse until water runs clear.
- Hang your towel to dry OR toss it in the washing machine with detergent, on cold (like I did).
- Hang or machine dry (I threw mine in the dryer).
And it's ready to use!
It's the same batch of dye, and the same process I used for my Dip Dye T-shirt.
{WATCH} the Dip Dye T-shirt Instructional Video to see how it's done!
Never miss a post! Subscribe to ShannonSews
Like on facebook.com/SSorensenDesigns
Follow @ShannonSews1 on Twitter
Subscribe to youtube.com/ShannonSews


Found your blog from a link on another blog. I was perusing your old posts when I came across this one about the flour sacks. It interested me because I have my mother's family Christening gown which my Grandmother made over 100 years ago. The under slip was made of a flour sack. It is one of my most prized possessions as my mother and her siblings were all Christened in it as were most of my cousins, a niece and nephew - both my godchildren, and my own son, 24 years ago.
ReplyDeleteHow neat that you have your mother's family Christening gown! A prized possession for sure. I'm still amazed at all the clothing that was made from flour sacks. The women in that time period sure knew how to make what they had work for them. Thanks for sharing your personal story with me!
Delete