Wednesday, October 3, 2012

Create your own Stencil with Freezer Paper

Use freezer paper to make your own stencilsGive a crafter 5 minutes and she'll find a new use for something.

Did you know Freezer Paper can be crafty? Oh yes, it's not just for meat, my friends.

It can be used as a fabric stabilizer when painting on fabric, and it can also be used to make your own stencil designs. I'm sure there are many other things its good for that have nothing whatsoever to do with meat.

I've been wanting to try making my own stencil using Freezer Paper for a long time. When I made my niece's Domestic Diva Tool Pouch, I finally found a good excuse to try it.

Freezer paper is like magic! Try it once and you'll be hooked. You'll want to stencil everything in the house.


How to create your own stencil with freezer paper


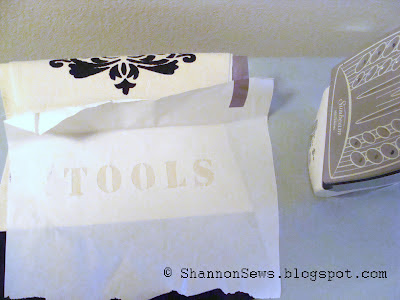
First step: (shown in the photo above) Print out the words or image you want to stencil and tape it to the freezer paper's non-waxy side. (You may be able to print directly on your freezer paper, if your printer doesn't use heat.) 

With something underneath to protect your cutting area (self-healing mat, cardboard, magazine) carefully cut out each letter through the paper and freezer paper.


Cut out your stencil design with a sharp exacto knife

Carefully peel off your taped paper. If you have cut out letters that have a center to them, be sure to keep those little pieces. You'll need to iron them on.


Once your design is cut out and tape peeled off it's ready to be iron on

Iron the shiny (waxy) side down to the fabric. Make sure to adhere especially around each letter.

Place the freezer paper stencil's waxy side face down on the fabric and iron on

Apply your fabric paint with a sponge directly over the stencil and allow time to dry.

Paint directly over stencil with fabric paint

I was a little pressed for time, so I whipped out the hair dryer to cut the drying time.
Before removing stencil allow to dry or use hair dryer


I added a pre-made stencil design before the front was complete. I used spray adhesive on the back of this plastic stencil and adhered it to the fabric. Both the freezer paper and bonded plastic stencil peeled off easily when dried.

Adhere pre-made plastic stencils to fabric with spray bond


And here is the finished stencil. I really love the way it turned out.

Freezer paper stencils and adhered stencils peel away easily to reveal the design

There was a little bit of paint bleeding on the letters, but I think it will just take time to perfect the art of stenciling.

Cutting small details with an exacto knife also takes patience and practice. Since making this pouch, I purchased a knife with a skinnier blade and will see if it makes cutting with precision a little easier.

For the back of the pouch, I used a pre-made plastic stencil and adhered it with Craft Bond spray adhesive.

Use adhesive bond to adhere pre-made stencils to fabric


Here's the back. The paint bled a little through the stencil, but still looks nice. I guess I'll just need to spend more time stenciling. Practice makes perfect, you know.


Add personal details to fabric with freezer paper stencil designs

Here is one last look at the tool pouch, in case you haven't seen the finished product. Read about how I made this Domestic Diva Tool Pouch and what gems are tucked inside.

Finished zipper pouch showing freezer paper stencil designs


Never miss a post! Subscribe to ShannonSews
Like on facebook.com/SSorensenDesigns
Follow @ShannonSews1 on Twitter
Subscribe to youtube.com/ShannonSews

Monday, January 9, 2012

How to use a Hemmer Foot a.k.a how to sew a rolled hem

Okay, so as promised, I'll tell you a little more about using a hemmer foot to produce that lovely ruffly pillow I bragged about (the one I made my mom for Christmas).


I posted a while back about sewing with a hemmer foot to make this lovely pink frosting-like pillow case back in August.


But I have to admit, since that time I've gotten even better at using a hemmer foot and found a few tricks that help make practically perfect seams every time. I know, there I go bragging again. Bear with me.

I found some great tips on this video. I'm so much better at learning something when I can watch it and practice it. I watched another video and gleaned some goodness off of hers too, but for the life of me I can't find it again. Sorry nice lady!


Three of the best tips I found
for using a hemmer foot for a rolled hem-

#1. SLOW AND STEADY (take a chill and slow it down)
#2. Fold over material and finger-press to create a starter seam
#3. Help your hemmer foot do the work by continuing to fold over your seam & hold fabric taut


Okay, lets put these tips to work:

  • I folded over and created a start to the seam the same width as the groove in the hemmer foot (I used a 4mm).  This is cotton fabric, so pressing the seam down with my finger held it well.


  • I folded it over again and finger-pressed it. This became the start to the seam.


  • I put this seam directly under the hemmer foot and stitched a few stitches to secure it


  • Next, I pulled the fabric up and in the hold of the hemmer foot.


  • I continued to fold over the material as it feed through, while holding it taut (slightly-tight but not too tight). It helped guide the material through the foot neatly.


  • Here's me in action. Keeping the continuous fold, while guiding the material and holding it taut. (You have no idea how tricky it was to get this shot. What I won't do for my blog.)


  • Check out the left seam. Straight, straight, straight!


  • So precise. And practically perfect. What'd I tell ya?

  • Gotta love this technique!


It made sewing these ruffles so much easier.


Don't do it the hard way, give those sewing feet a try!


Never miss a post! Subscribe to ShannonSews
Like on facebook.com/SSorensenDesigns
Follow @ShannonSews1 on Twitter
Subscribe to youtube.com/ShannonSews

Tuesday, April 12, 2011

Big bow pillow

It's sad to admit, but I've been so caught up in ruffles that I completely forgot how much I love bows!

Since I also love pillows, I wanted to put the two together. For inspiration, I googled "Big Bow Pillow" and found a link to a Big Bow Pillow. Imagine that. The internet really works.

I thought her idea was really cute, so I decided to pull out some of my flannel material (because I love soft) and found some complimentary sheer polyester, for a daintier touch, to use for a bow.


Maybe mine should be called Giant Bow Pillow because I think I got overzealous, but I still love how it turned out.

Soft, cozy flannel with just the right touch of sheer elegance.
Now if I can just find a place to put it.


Linked to:

Wednesday, April 6, 2011

Newsie - newspaper. reader. reporter. news enthusiast pillow

This Newsie pillow case was so much fun to make! I wanted something unique and eye-catching and love how it turned out.


I made the 12" x16" pillow case out of soft, white jersey knit with an existing newsprint design. I'm sure there's a way to make your own newsprint design...I might have to try that at some point.
That blush color was too good to pass up, so I accentuated it with a touch of femininity and texture.

and I couldn't leave the back out, so I brought around a little design from the front.

A perfectly fun little pillow design for an avid newspaper reader, writer, reporter or news enthusiast. As for me? Although I do watch the news and read a newspaper now and again, I happen to just like the way it looks. And isn't that what design is all about? Maybe I should ask Nate Berkus.

Linked to:

Wednesday, March 9, 2011

Fixing a low neckline

I found this cool t-shirt a while ago on one of Macy's sale racks. Unfortunately, the neckline is a little low for my comfort...and I always intended on fixing it...but as that goes, it's been in my closet for a while.


Since my husband had to work early this morning (and we were up with the roosters), I decided to make the most of my early morning and finally fix this low neckline.

Here are a few ideas to fill in those low necklines, and although all of them are cute ideas, I ended up liking the last one the best...after 6 previous attempts.

Design #1 - flat ruffles
I tried a flat ruffled look by cutting strips from a navy t-shirt and laying them systematically on the inside of the neckline (the t-shirt is inside out). This design would also be cute sewn right on the front of the neckline.


Although it is a cute look, after trying it on I decided the navy knit was a bit too heavy for this t-shirt design.

Design #2 - Flowing ruffles
I had a ruffled strip of black sheer polyester from something I had cut up, so I thought I'd try it underneath the neckline...but after trying it on (while still pinned on underneath - and ouch, watch those pins), it looked like I had black lettuce growing up from under my shirt. No thank you.

But it might be lovely on a different shirt...and maybe sewn directly onto the front.

Design #3 - Modern day dickie
I was going to cut it down to fit, of course, but I pinned it quickly to try on (the shirt is still inside out)...and it just wasn't the look I was going for. I really had wanted to keep the original shape of the neckline, but it would work well just to fill in the "v neck" (cut to size, of course).


Design #4 - flat strip
Next, I decided to go back to the strips and just lay one around the inside of the neckline. However, once again, after trying it on, I saw it just wasn't the right look. A bit too taylored or something.

So for design #5 I tried the same flat strip look on the outside of the neckline...but again, although it's kind of cute, after trying it on, it just wasn't exactly what I was looking for.

Design #6 - rows of flat strips
Remember how I said I had wanted to keep the original line of the neckline? Well at this point I was realizing I needed to get over it. This project was becoming much longer than I had anticipated (isn't that always the way?) and I wanted to get this t-shirt done already!

So, I decided to cut the strips a little shorter and go with a little different idea of "filling in the v-neck". This is from the inside...but again, after trying it on, it didn't look like I thought it would.


HOWEVER, as all designers know, sometimes it is your mistakes that lead you to your final destination. With that said, drum roll please...

Design #7 make-your-own-design-on-the-front (for a lack of better words)

With the strips in design #6, I designed a little something directly on the front of the shirt. And I actually liked it.

Now if only I had the energy to sew it on.
haha
Actually, I'm not kidding.
Seriously folks? By this point, all this trial and error at the early hours of the morning has made me really tired...so now that I've FINALLY settled on a design, I think I'll have to wait to sew it on later. I have to leave for work in a half an hour...if only I'd slept in when the rooster crowed.

(and in case you're wondering, we don't live on a farm. And we don't have a rooster. But if we did he would have been crowing. The End.)


Linked to:

Monday, September 20, 2010

Flower embellished t-shirt refashion

I wanted to make a shirt with a flowered neckline.

So I found two matching square neck t-shirts on clearance.
I cut one of them into about 1" wide strips and ruffled them for the flowers.
I used coordinating 1" wide satin ribbon I already had, and ruffled that for flowers.

I created the flowers by putting the ruffles in a random circular pattern until it looked right and pinned.

Then I sewed right over the top of them until it looked like this:

I like the coordinating colors and textures.
Let's hope the flower fad sticks around too...

Fabric flower attempt #1

I've seen so many fabric flowers lately and have been wanting to make one. However, I have a confession. Sad but true, I've been intimidated by my glue gun.

So the time came when I decided to be vulnerable and finally took it out of it's package. And it turns out its not even a little bit scary.

After cutting a strip of aqua jersey and cream polyester and ruffling both of them, I created my first glue-gunned flower.
It's a little on the simple side, and next time I'll put a piece of felt on the back to give it extra stability, but I think it gives this otherwise drab vest a little something.


Let's just say there are more complex flowers on the horizon, since my glue gun and I are now friends.

Blogging tips