Wednesday, August 29, 2012

Free online photo editing with iPiccy

edit photos online for free at iPiccy
I've used Photoshop for eons. It's always been my go-to for photo editing, until I met iPiccy. I tell you, it was love at first click.

iPiccy is a new free online photo editing website. It's online (no software to install). It does many functions Photoshop does in a snap. It's easy enough for anyone to use. And it's free. What? I know, right?!
*I don't secretly work for iPiccy, I just love it so much I wanted to make sure you all knew about it!

It's really easy to use, so no need to be intimated.


▶▶▶Here's a quick overview to see what iPiccy's like.◀◀◀

  • Just go to iPiccy.com and upload your photos

easily upload your photos with iPiccy's new online photo editing


  • You can find all the regular photo fixes for exposure, color, tone, sharpening, etc.

fix pictures online for exposure, color, tone

  • It has more advanced editing options with a click, i.e., eliminate blemishes, remove shine, airbrush...(everything she's already had done) hahaha
iPiccy lets you edit out blemishes, remove shine and airbrush for nearly perfect photos


  • You can quickly create a whole variety of photo layouts from their templates
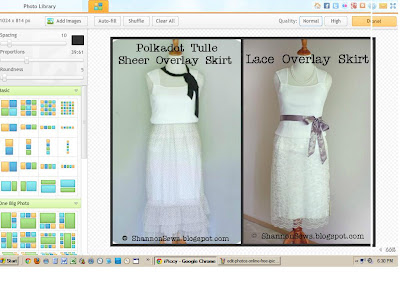
Create a variety of photo layouts with iPiccy's online editing software
  • and even round the edges of your photos

Round corners of your photos with quick editing

  • There are options to add frames to your photos, create collages and add textured backgrounds.

Photo edits allow you to add frames, create collages and add textured backgrounds to your photos


  • "Filter options" change the tone and coloring of the photo (kind of like using color filters in Photoshop). I'm in love with the Anthony setting. It gives photos kind of an aged/washed look, making skin tones more creamy.

Editing filters give photos different tones and coloring

  • Artsy settings let you change photos into looking more like animations, comic books, aged pictures, pencil sketches or even Pop Art. Cool!

Online editor has setting for Andy Warhol-like Pop Art

This isn't all inclusive, but I hope it helps those of you who need a free place to edit your photos! 
Happy editing! ♥ 


UPDATE: Try Picmonkey.com! Great fonts, banners, layouts, etc. Sorry iPiccy, I think I have a new crush.


Never miss a post! Subscribe to ShannonSews
Like on facebook.com/SSorensenDesigns
Follow @ShannonSews1 on Twitter
Subscribe to youtube.com/ShannonSews

Thursday, January 13, 2011

Take great photos for your blog and online shop


Great pictures are key to showing people the best, most genuine version of what you've created - the look, the feel, the color, the texture.

Have you ever tried to post a sewing or crafting project online, but the pictures you take aren't doing it justice? Have you seen other projects posted that are hard to see due to their dim lighting and blurred photos?

It's a tragedy I tell you! I know how much time it takes for us to create our lovely creations.

Having been a photographer for many years, I wanted to share a few tips with you so you can take the best photos of the precious things you've spent so much time creating.

Tip #1: Use lots of natural light.
  • Photography is all about light.
  • Go outside with your project, if possible. A cloudy day with filtered light or a shady area on a bright sunny day are best (direct sun causes harsh tones and shadows).
Here's a little behind the scenes for this pillow-

A chair set out on the deck on a cloudy day. The outdoor filtered light wraps perfectly around each delicate ruffle.

  • If you can't go outside, place your project by windows. You might still need a fill flash to avoid blur. When in doubt - turn your flash on. If you don't have enough light to work with and don't use a flash, you'll get blurry photos. Yuck.
The shot below was taken with window light, a tripod and white poster board to bounce light back onto the pillows. Again, I love the way natural light softly wraps around the pillow detail.

Here is the behind the scenes:

  • When all else fails, if you can't go outside and don't have much light from windows, and can't wait until the next day for daylight, use a flash inside. *Bouncing light off of a white ceiling is best to avoid unflattering shadows.

Tip #2: Get in close!
  • If you were in a shop and were interested in a pillow you saw across the room, would you continue admiring it from afar?
or would you walk up to look at it, hold it, feel it, study the details?
You want your pictures to convey the details, the color, the texture, drawing them in, as if they had it right in front of them.


Tip #3: Try different angles and backgrounds
  • Set up your project and take photos as you walk around it, get down low, stand up high, one side and then the other. Try different backgrounds. You'll be amazed at how certain angles highlight just the right details.


Tip #4: Take lots of photos
With digital cameras, we have the freedom of taking as many pictures as we want. Out of 15 pictures, you might find 3 or 4 that work really well.
It's better to take a bunch of pictures and delete what you don't use, then have to re-do your photo shoot because you didn't get any great pictures.


Tip #5: Clean up your background

  • You want your pictures to focus on your creation, not the messy room you're taking the picture in. Take a few minutes to set your surroundings up. Keep it clean and focused. Turn off overhead lights that might be omitting a yellow cast.
haha - this one is so bad in so many ways
Focus on what you're trying to present. Ahhh, much better.


Other tools:

Tripod - keeps your camera stable, you can use it outside, it keeps your hands free, helps in lower light situations with the timer setting to avoid blur.

White pieces of large cardstock or foam board are great for bouncing extra light back into your project.

Use a photo editing program like Photoshop. These programs are great for lightening, darkening, cropping, enhancing or creating photo layouts. Try to take the best photos you can from the start, so you don't have to put all your time and energy into fixing bad ones.

If you have any questions about the tips and techniques I've discussed, please feel free to contact me. I'd be happy to help! Pass this tutorial along to your friends!

~Shannon


Linked to:
FingerprintsontheFridge
TrulyLovely
30Days
AllThingzRelated
SomewhatSimple
TotallyTutorials
ToolsareforWomenToo
FirefliesandJellyBeans
Blogging tips