Friday, January 16, 2015

Decorating with Thrifted Furniture

decorating with thrifted furniture and diy on a budget
It's been a while! I feel like I've finally gotten off the crazy train to nowhere, having moved into a new house right after Thanksgiving and hitting Christmas and New Years head-on, while tripping over boxes, and never knowing where anything was, or where all our crap stuff was going to go!

Anywho, with the start of this new year and new home, my inner DIYer has kicked into overdrive. How will we decorate? How can we turn one thing into another so we don't have to buy a new one? How can we make it unique? How can we Pinterest the crap out of this place?! Ha!

FRONT ROOM DECOR ON A BUDGET

Here is a front room sitting area before-after. This spot has changed the most since we've moved in, well, because we keep changing it!

It's an odd space because the front door opens right to it - a long rectangular entry way / front room / dining room. We're trying to figure out how to divide the space, while keeping it functional, comfortable and inviting. We love the final version and didn't have to spend much to do it.

decorating, thrifted furniture, diy decorating, decorating on a budget

Decorating with Thrift Store and Craigs List Finds

One of my favorite parts about decorating with thrifted furniture, is getting to go to all the thrift shops and perusing Craigs list til you find just the right thing.

I can't lie though, there have been several heart-pounding moments when someone else picked up what I wanted and I thought I was going to have a nervous break-down. Luckily, my powers of mental persuasion worked and I pounced once they put it down (on the item, not the person). Either way, I'm not proud.

Front Room Details:

Let me start out by telling you that not everything is thrifted. I try to find as many thrifted items as I can, but once in a while I splurge on a few great new items to tie it all together.

Another great tip when decorating on a budget, is to remember that you can essentially go thrift shopping in your own house! Hunt through boxes of things you've packed away, and take things from one room and put them in another! Budget Brilliance!
decorating with thrift store furniture, diy decorating

Bookshelf - pre-built into the wall. Filled with new and thrifted items.

Beach Scenes Picture - Ikea (purchased several years ago)

Sunburst Mirror - I made it a couple years ago

Soft Seagreen Throw - Home Goods (bought last year for our apartment front room makeover)

Faux fur Rug - New this year at Marshalls

Camel colored Couch - Craigs list (are you sitting down?) $25.00 - like new. Best post-holiday deal of my life!

White metal side table - Ikea (purchased years ago)

Solid wood lamp base - garage sale a few years ago

White textured lamp shade - thrifted recently


DIY Thrifted Coffee Table 

ONE OF MY FAVORITE THRIFTY DECORATING TRICKS WAS THE DIY COFFEE TABLE made with a base from a thrifted wooden stool and the glass top from an Ikea table we already had. Unique and lovely.
diy coffee table unique ideas, different coffee table base ideas

budget decorating diy coffee table ideas, unique coffee table

unique diy coffee table use unique base and top

Round Glass Coffee Table - Base: an wooden stool purchased at a thrift shop / glass top from Ikea (purchased many years ago)

Round Woven Basket - Marshalls (purchased a few years ago)

Ceramic Elephant - thrifted (just got it and LOVE IT!)

Colored rocks - gift

Wooden woven Pineapple - Marshalls (bought several years ago)

Bubble glass Candle holder - estate sale (found a few years ago)

That's all for now! Feels good to finally get our home put together. I'll share more as we go along! xo

SUBSCRIBE (never miss a post!): Subscribe to ShannonSews
BLOGLOVIN: ShannonSews on Bloglovin
FACEBOOK: facebook.com/SSorensenDesigns AND facebook.com/FairfaceWashcloths
TWITTER: @FairfaceCloths
INSTAGRAM: ShannonSorensenDesigns on Instagram
SHOP: Shannon Sorensen Designs + Fairface Washcloths
YOUTUBE: youtube.com/ShannonSews

Wednesday, September 26, 2012

Thrifted Table Makeover

Makeover a thrifted table to look like newI've been looking for a little table to put next to the couch for many moons. Something small and simple. It's way too easy to drop mail and keys on the coffee table and in three seconds it looks like a big old mess.

As luck would have it, my manager was going to give away this little red table from our after-school program room, so he said I could take it.

Free furniture! And just the kind of table for that little empty spot next to the couch. It would be perfect! But not red.

Eeek gad! That meant another painting project. After updating my dressers and desk I thought I was done with the painting projects already. Not sooo fast.


So off to Home Depot I went for a can of moca brown spray paint.  I already had sandpaper and a tarp from my other furniture makeovers, so I was all set.

After a little elbow grease with the sanding block and a shake, shake, shake of the moca brown spray paint, it was as good as new.

Spray paint an old table to look like new

It took a little finagling to spray the whole thing inside and out (I took the drawer out, knob off and was down on my knees in strange positions as I sprayed them all out on the confined space of my small deck), but was totally worth it.

Fix up a thrifted table with spray paint

I love the dark brown color. I thought about distressing it, but decided just to keep it clean and simple. It now sits perfectly by the side of the couch. And for only the cost of a can of spray paint? Fabulous!

Fixing up thrifted furniture is a cheap alternative to buying new

Looking for new furniture for your house? Before you start shelling out the big bucks, check out the pieces at your local thrift stores. Fixing up thrifted furniture is a cheap alternative to buying new and as you can see, with a little love and spray paint? It can look as good as new!


Never miss a post! Subscribe to ShannonSews
Like on facebook.com/SSorensenDesigns
Follow @ShannonSews1 on Twitter
Subscribe to youtube.com/ShannonSews

Wednesday, September 19, 2012

Thrifted Desk Makeover: sturdy sewing machine table

Thrifted furniture makeover before and after photosDid you check out my Thrifted Dresser Makeovers last week? Even after all of that, I was so not done painting. My mission this summer was to get all the painting done before I headed back to my school-year job, and by golly, I'd get it done if it killed me!

This desk, like my dressers, also has sentimental value. I grew up with this desk. When we moved into our new house in 2nd grade, my dad bought it at an unfinished furniture store. I remember sitting in the garage watching him transform it with bright white paint and sunny yellow nobs. Ah, the memories.


All it needed was a little TLC after all these years. So I hammered the baseboard back in place and got me some pretty paint.


Look for discounted paint for thrifted dressers in Home Depot's Oops Paint SectionI seriously lucked out when I found this Tiffany blue paint for only .50 cents in Home Depot's "Oops" Paint section! Since I didn't have enough for the whole desk, I used blue for the drawers and antique white for the rest (like the dressers).

*Be sure to refer back to the supplies you might need in the painted dressers post before you get started with your own thrifted furniture makeover.


Another quick tip? If you're removing hardware and setting it aside while you paint, make sure to screw your nuts and bolts together on the original knob. Saves time and you won't misplace any of them.


Painting tip: Keep screws, bolts and nuts together when removing hardware


▶▶▶KIDS DESK TURNED SEWING TABLE

It turns out, this old desk works perfectly as a sewing machine table. Lucky for me, this old style craftsmanship is solid wood, and as sturdy as can be. No wobbles, which is especially important when that old sewing machine motor cranks. Plus it has deep drawers for additional storage. (A crafty girl can't have too much storage!)

Lets have one last look, shall we?
I did, after all, ache like I'd just done yoga for hours after I was finished. Painting requires more squatting muscles than I knew existed. Obviously somebody's out of shape!

Thrifted dresser makeover before photo

Use sturdy thrift furniture for sewing table


Never miss a post! Subscribe to ShannonSews
Like on facebook.com/SSorensenDesigns
Follow @ShannonSews1 on Twitter
Subscribe to youtube.com/ShannonSews

Friday, September 14, 2012

Thrifted Dressers Makeover: before and after

Fix up thrifted furniture with paint and hardware Do you know how long fixing up these thrifted dressers has been on my summer to-do list? Well I'll tell you. Three whole years.

Finally, the weather here in Seattle has actually been good enough to get it done! Bam!

Thrifted dressers makeover: After


These dressers actually have a history. Can you still call them "thrifted" if you swiped them from your parents house? I say yes.

Once upon a time, the one on the left stood in my bedroom and the one on the right, in my sister's room. They were lovely back in the day.

Some time during high school I tried out my crafty skills (or lack thereof) and painted my bright white dresser with cream colored exterior house paint and changed my nobs from bright yellow to dark green with an old can of spray paint I found in the garage. Spiffy.

And there she stood, until I got my real craft on.


Painting thrifted (or in my case, swiped) furniture can completely transform it, so before you go buying new, consider stopping by a thrift shop - they're full of potential. 

Make a list of painting supplies you may need to fix up your thrifted furnitureMake sure you have all the right tools before you start your thrifted furniture makeover project. Home Depot is really helpful if you aren't sure what you need.

And for sure, check out the Oops Paint section at Home Depot. It's paint people bought but didn't want and it's yours at a major discount.

I got this entire gallon of antique white for only $7, marked down from $28!


Before you paint your thrifted furniture, make sure to cover the ground with a tarp or drop cloth
Supplies you might need:
Tarp                            
Paint roller                  
Foam brush for details  
Primer
Paint
Putty to fill in dings
Sandpaper
Rags (dry and wet)
Disposable gloves
Newspaper
Old clothes and shoes to paint in (paint'll gettcha!)


Oh, and another thing? Get ready to use your muscles people! There's a lot of crouching, bending, stooping, squatting, and up and down with the paint brushes. I know, I sound like a pathetic couch potato but I was surprised at how tired and sore I was when I was done! For you athletic types, however, it'll be a breeze.

Here's another look at the before and afters. My favorite part of a makeover.

For the hardware on this one, I replaced the old green nobs with antique glass nobs I found at an estate sale last year.♥

Thrifted furniture transformation before and after
Thrifted Dresser - BEFORE on L and AFTER on R

My husband wasn't particular on what hardware he had (as most men may not be), so we spray painted his yellow knobs white. I like the clean look.

Thrift dresser before and after makeover
Thrifted Dresser - BEFORE on L and AFTER on R
And here they sit on either side of our bedroom (sorry, my camera lens isn't wide-angle enough to get them both in the same photo).

I'll admit, I've probably gone a bit too far by making him have a vase full of flowers on his dresser, along with the decorative mirror hanging over it. Poor thing. I may need to get him a manly box or something so he doesn't feel like I've completely taken over. But who are we kidding?


Fixed up thrifted furniture looks like new after makeover


Never miss a post! Subscribe to ShannonSews
Like on facebook.com/SSorensenDesigns
Follow @ShannonSews1 on Twitter
Subscribe to youtube.com/ShannonSews

Monday, August 20, 2012

Sew an easy top or dress from two scarves

sew an easy shirt with two scarves
At the beginning of the summer I was on a mission to find 2 coordinating scarves to make into a swanky top, because of this tutorial.

I looked at every thrift store in town, but had a hard time finding them, until I stumbled on two matching scarves. Bonus!

They were 35x35 (larger than I wanted), but as it turns out, it's enough to even make a dress!


Okay, let's get to it.


Here's how I made a lovely breezy top 
from just two scarves 
(& a dress, just to show you how it's done).


find two thrifted scarves to sew into a shirt Start by finding 2 coordinating (or matching) scarves. My scarves are a soft polyester. Thrifted: $3.99 each.


Be sure to set your pressure dial to 1 (so your pressure foot is more gentle on the fabric) and use a small needle (I used a 9) so you don't leave holes in the delicate fabric.


sew shoulder seams but leave opening for neck
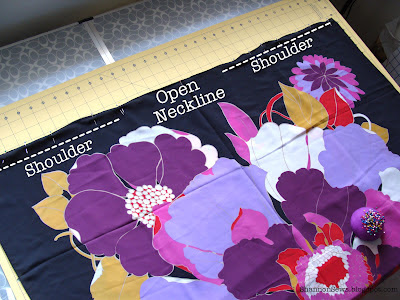
Measure how wide you want your neckline to be. Mine was about 10-11 inches.

Put your scarves right sides together. Mark the center.

Using the neckline measurement, leave measured space open in the center. Pin and sew your shoulder seams.


sew up sides of scarf, leaving sleeve hole open
Next, measure how wide you want your sleeve opening to be and mark it so you know when to stop sewing.

Pin and stitch from the hemline up to stop mark.


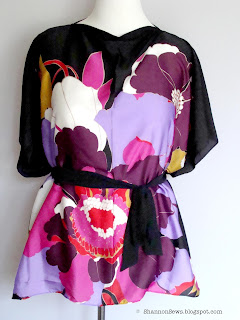
Sewn dress made with two scarvesTHE DRESS: If you wanted to make your scarves into a dress, you're all done (I tied a sash around it). Can you believe how easy that was??!! 

If I were totally hip I could see myself wearing this as a dress with dark purple leggings and black shoes.

Dang it! I'm not quite hip enough...so I'll be doing some trimming and turning it into a shirt instead.

But first, here are a few more shots of the dress, without the sash:

  
scarves sewn to make a dress is fashionably flowyWithout defining the waist, its pretty mumu flowy.  Some people can totally get away with that, but not me. I'm mumu enough as it is.


easy flowery shirt sewn from refashioned scarves
THE SHIRT: To make the dress into a shirt, it really is as easy as it sounds = Cut off the bottom.

And hem it. (blah). The purpose of this thrifty project was to find 2 scarves to easily sew into a top. There was to be no hemming. No hemming! It was almost all it was cracked up to be.

I ended up cutting off about 6 inches and hemming the bottom.
Then I added 2 belt loops on the side, to hold my sash in place (it's still mumu roomy without a sash).

Fashion flower pattern is in for fallI love the flow of it. And the flowery colored prints are right on for fall.

Top sewn from two scarves creates a delicate flowy feel

So feminine and pretty. I think I'll be wearing it with a black pencil skirt.
It even created it's own drapey cowl neckline. add belt loops to a shirt to hold a sash at shannonsews dot blogspot dot com

If you've made yourself a shirt or dress out of a scarf, I'd love to see it!
It's so darn easy. 
I'll be on the lookout for more square scarves, this time a little more my size (no hemming ;). ♥


Never miss a post! Subscribe to ShannonSews
Like on facebook.com/SSorensenDesigns
Follow @ShannonSews1 on Twitter
Subscribe to youtube.com/ShannonSews


Linked to:
Tip Junkie handmade 

projects

Friday, July 13, 2012

Sheer Scarf Overlay + Tank Top Refashion


Ever since I ran across this top made from simply sewing 2 scarves together, I have been on a mission to find two complimentary square scarves, worthy of sewing my own top.

Unfortunately, I'm having a heck of a time finding two scarves that are a) in good condition, and b) a good match. In fact, several thrift stores didn't even have any old square scarves (as seen below: Catherine Deneuve in the 1960′s). This project is meant to be thrifty, so I don't want to buy new ones.

{image}
In the interim, I ran across a sheer orange scarf in a thrift shop and thought of the orange tank top I never wear...how about a sheer overlay tank rop refashion? Perfect, since I was itching to refashion something with scarves.

Okay, here I go. Be forewarned, this may or may not be the easiest way to do this. I like to fly by the seat of my pants. 

First I cut open the tank top right along the seams.
Make sure you have an extra large fitting tank top because after you sew the sheer scarf overlay on the front, it will be quite a bit smaller around.

*The colors in these photos changed based on lighting, but they are the same orange tank.


I layed the sheer scarf down in half and cut a piece a little larger than the front piece of the tank top.

After cutting, I hemmed the two long raw edged sides, since I wanted the sheer piece to hang lower than the bottom hemline of the tank top. 


I layed the sheer scarf over the top of the front side of the tank top and pinned it down


After sewing the sheer to the tank top, I turned them right-side-out


Now the sheer scarf is sewn to the front piece of the tank top.


As you can see, the new skinnier shoulder strap is much more narrow than the back. I did a little tweaking, since I would be wearing this tank with a sweater over it anyway, by folding the other edges in slightly and sewing it down on the side before sewing the strap on.


The 3rd picture (upper right) is the strap sewn on, but I'm not done with it.

To cover those unsightly straps, I cut and sewed a couple pieces of remaining scarf material together to create tubes to wrap around the straps. The 3rd picture (bottom right) shows a little tack stitch to hold the wrapped tube in place. It covered the strap trouble spot perfectly.


And there it is.

I showed my husband and said I would be wearing it with...(he interjected, Birkenstocks?). I laughed and said, "I was going to say a sweater. Birkenstocks??" He said he's never seen me wear something with "these types of colors". They seem more "tree hugger-hippy" than what I normally wear.

So it's settled. I'll probably never wear it. But at least I figured out how to make it. hahahaha :)

Maybe next time.


Never miss a post! Subscribe to ShannonSews
Like on facebook.com/SSorensenDesigns
Follow @ShannonSews1 on Twitter
Subscribe to youtube.com/ShannonSews
Friday, January 13, 2012

What's your story?


I've been wondering lately, about you. 


I'm always yammering on about my obsession with ink blot t-shirts, what socks I'm picking out, and other ridiculous important things like that, that I haven't given you time to get a word in edgewise.
I promise, I'm really not that bad of a date.


So, I'd like to pause from my usual ramblings and find out more about YOU.


I often wonder, how many of you...

are crafters and/or seamstresses yourselves?
have your own etsy, or other online shops?
have your own blog?
like to sew or craft but just don't have the time?
enjoy other people's craftiness but aren't interested in doing it yourself?
just enjoy reading blogs?

or none of the above??


What's your story?
I'd love to know.

{The poll is located in the upper right corner of my blog} 
::through January 31st::
click as many as apply

Nice to meet you. :)


Never miss a post! Subscribe to ShannonSews
Like on facebook.com/SSorensenDesigns
Follow @ShannonSews1 on Twitter
Subscribe to youtube.com/ShannonSews
Blogging tips