Saturday, June 21, 2014

6 Summer T-shirt Projects you don't want to miss!

Now that summer is upon us, it's time to get your craft on! 

Check out these 6 Must-have T-shirt Projects and be sure to add them to your summer activity to-do list!

t-shirt decorating ideas summer kids adults fabric paint, tie dye, ink blot
6 Summer T-shirt Decorating Projects you don't want to miss! © ShannonSorensen

Decorating your own t-shirts gives you countless numbers of ways to express yourself and makes a perfect lazy day summer activity.

 DIY Summer T-shirt Tutorials

Follow these links to get right to the tutorials
Happy Summer!

Choose from a simple to complex design. All you need is a t-shirt, fabric paint, freezer paper, an exacto knife and an iron.

This project is addicting! You'll get a unique, symmetrical design simply by swirling and blopping paint, folding your t-shirt over and tada! You've got one-of-a-kind ink blot t-shirt! Watch me create a few designs on my YouTubeChannel*Ink Blot T-shirt Kits are also available and make a great kids birthday party activity!

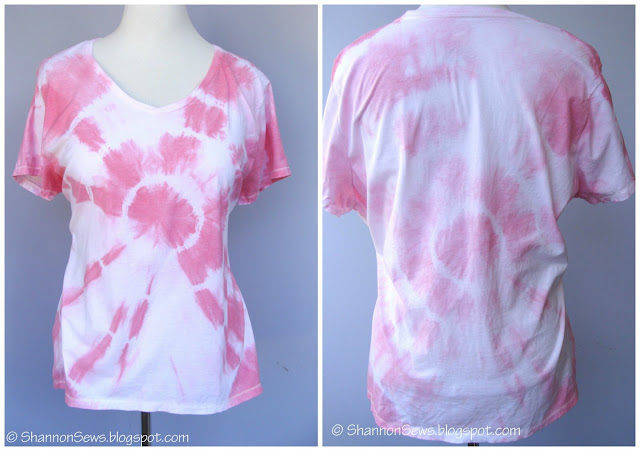
Who doesn't love a good tie dye t-shirt in the summer? The popular sunburst design is easy to create with your favorite color dye and a few rubber bands. Use one color or go crazy with two! Cool designs in a snap!

This cute Painted Dots T-shirt can be made by using a round make-up sponge and your favorite fabric paint. Use round make-up sponges for the dots, or try wedges for a geometric design. The varieties are endless!

Making your own imprinted design allows you to capture the detail of an object, and transfer it right onto your t-shirt. Whether you use metal keys, or another interesting object from around the house, you'll be amazed at how cool this design method can be!

Interested in playing around with natural dyes? Who would have thought black beans could create a cool t-shirt dye? I didn't until I tried it. Not only do black beans work well as an all-natural dye, but so do everyday foods like spinach, onions, berries and deep colored spices like turmeric. Although the process requires a little more preparation, it certainly is fun to try!


Once you try some of these fun summer t-shirt decorating projects - I'd love to hear how they turned out!


Linked to:
http://alittleclaireification.com/2014/06/20/patriotic-recipes-crafts-best-of-the-weekend-party/
http://www.reasonstoskipthehousework.com/skip-housework-24/
http://too-much-time.com/
http://www.bedifferentactnormal.com/2014/06/show-tell-saturday-062114.html
http://www.whatscookingwithruthie.com/2014/06/20/super-saturday-49/

SUBSCRIBE (never miss a post!): Subscribe to ShannonSews
BLOGLOVIN: ShannonSews on Bloglovin
FACEBOOK: facebook.com/SSorensenDesigns AND facebook.com/FairfaceWashcloths
TWITTER: @ShannonSews1
INSTAGRAM: ShannonSorensenDesigns on Instagram
SHOP: Shannon Sorensen Designs + Fairface Washcloths
YOUTUBE: youtube.com/ShannonSews

Saturday, November 2, 2013

Men's Shirt to Women's Cardigan Refashion

As promised, I jumped on my next refashion project shortly after my successful sweater to cardigan refashion. My sister-in-law said this men's-shirt-to-women's-cardigan refashion, had Anthroplogie appeal...very nice compliment indeed!

refashion men's shirt to women's cardigan
{Refashion: men's shirt to women's cardigan © ShannonSorensen}

When my husband came home and saw my newly refashioned cardigan, he jokingly asked if he needed to lock up his clothes when he left the house, for fear they'd end up women's clothing by the time he came back. I laughed, but secretly my mind started scanning his side of the closet to see if there was anything with potential.

Turn a Men's Shirt into a Women's Cardigan
(husbands beware)


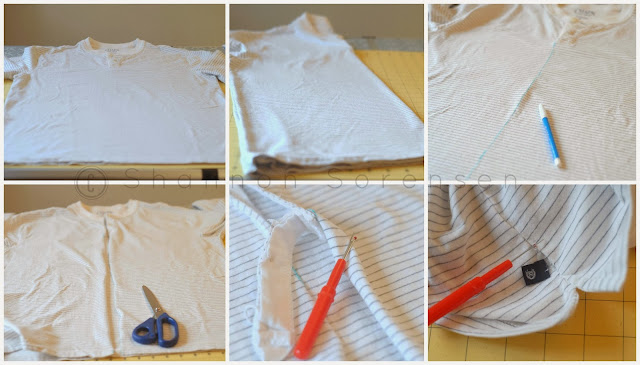
  • Lay out your shirt.
  • Fold shirt in half to find the center.
  • Mark the center with a washable pen.
  • Cut up the center line of your shirt.
  • Unpick any necessary seams.
  • Remove any unwanted tags.

turn a mans shirt to womens cardigan refashion
{Refashion tutorial: shirt to cardigan © ShannonSorensen}


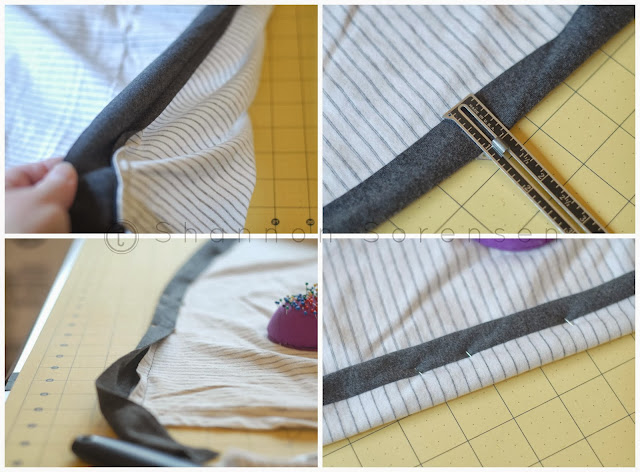
  • Decide on coordinating binding. I cut up a soft xl clearance men's gray turtle neck.
  • Measure how long your binding needs to be.
  • Cut two strips for each side of your cardigan opening. Mine were 2" wide.
  • Trim off any excess or unwanted fabric from the cardigan before you add your binding.
  • Lay the binding right sides together, edge to edge and pin.
  • Using a ball point needle, pressure (1) and slightly wider stitch for stretchy jersey, stitch binding to cardigan. 


DIY sewing project shirt to cardigan
{DIY cardigan from a man's shirt © ShannonSorensen}


  • Your binding should now be sewn to your cardigan.
  • Roll it over to the inside opening of the cardigan, measuring evenly. Mine was rolled over 1".
  • Pin into place. *For the top and bottom edges, see the pictures in the next segment.
  • Check front to make sure the binding looks even.

shirt to cardigan refashion how to add binding
{Add binding to create your cardigan: shirt refashion © ShannonSorensen}


  • *To finish binding at the bottom and top, fold under the stitched edge so it's lined up.
  • Next fold the excess binding up over the edge of the cardigan.
  • Now roll the whole binding over and pin.
  • Again, check that binding is even.
  • Stitch on the front side of the binding, avoiding pins, as close to the inner edge as possible. Your stitches will catch the binding inside and secure it.


alter a shirt to a cardigan tutorial
{Refashioned shirt to cardigan: adding binding © ShannonSorensen}

  • To add faux pockets, cut a strips of coordinating bias tape. I wanted to use more of the gray jersey, but it ended up too bulky.
  • Put the cardigan on and determine where you want your pockets, then pin the bias strips evenly on either side of the cardigan, folding under the raw edges on either side. 
  • Stitch as close the the side and bottom edges as you can, leaving the top open.
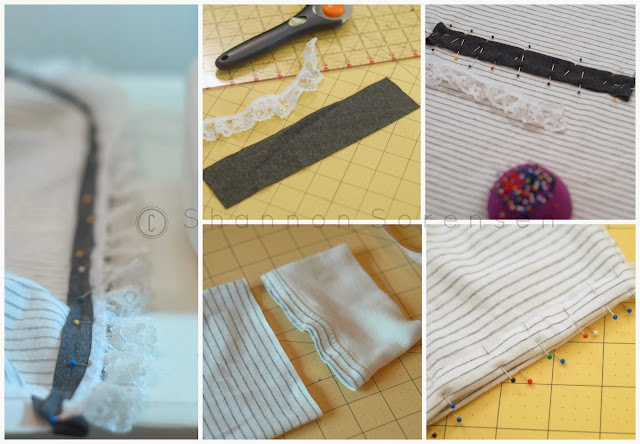
  • Add lace embellishment if you choose.

how to add / sew faux pockets to a top or cardigan
{How to add faux pockets to a cardigan: refashion © ShannonSorensen}


  • After finishing this much of the cardigan, the front dark gray binding by itself, still felt a little too masculine, so I added a strip of lace to either side of the cardigan opening.
  • To give the back a little detail, I cut a 2" wide strip of the dark grey jersey, folded it over and sewed it closed. After turning it right side out, I pinned the piece down to the middle lower back and embellished it with matching lace.
  • To finish the sleeves, I cut off the binding and simply folded the edges under and sewed.


add lace and hem sleeves to a cardigan refashion

And voila! One man's shirt is another women's treasure.
From shirt to cardigan just like that.

before and after refashioned shirt to cardigan
{Men's Shirt to Women's Cardigan: before & after © ShannonSorensen}

I love the details, especially the back. It gives it just that little something.
turn a shirt into a cardigan tutorial

Not sure what's next on the horizon, but with my to-be-refashioned-pile a mile high, I'm sure there will be something! :)


SUBSCRIBE (never miss a post!): Subscribe to ShannonSews
BLOGLOVIN: ShannonSews on Bloglovin
FACEBOOK: facebook.com/SSorensenDesigns
TWITTER: @ShannonSews1
INSTAGRAM: ShannonSorensenDesigns on Instagram
SHOP: Shannon Sorensen Designs + Fairface Washcloths
YOUTUBE: youtube.com/ShannonSews

Linked to: http://sewmanyways.blogspot.com/http://www.flamingotoes.comhttp://www.thegirlcreative.com/, http://www.crumbsandchaos.net/, http://www.craftionary.net/, http://www.reasonstoskipthehousework.com/, http://www.sugaranddots.com/, http://www.fingerprintsonthefridge.com/, http://www.niftythriftythings.com/,  http://www.scatteredthoughtsofacraftymom.com/,  http://www.sewcando.com/,  http://threemangoseeds.blogspot.com/, , http://www.madincrafts.com/, http://www.craft-o-maniac.com/, http://www.creatingreallyawesomefreethings.com/, http://www.linesacross.com/, http://www.sugarbeecrafts.com/, http://www.hopestudios.blogspot.com / , http://bebetsy.com

Thursday, October 17, 2013

Sweater to Cardigan Refashion Tutorial

How to turn a sweater into a cardigan
{image Sweater to Cardigan Refashion © ShannonSorensen}
It's sweater season again and I've been rummaging through my bags of forgotten sweaters. The ones that don't fit, yet I can't seem to part with.

This v-neck pink argyle sweater has always been one of my favorites, but one day it started fitting tighter and haven't worn it since. Until now.

Give any old sweater new life, by turning it into a cardigan, with this easy refashion tutorial!


How to Turn your Sweater into a Cardigan

1. Choose a coordinating bias tape OR you can make your own or use bias tape with fabric and these tools.

2. Measure the front of your sweater and cut that much bias tape + extra to tuck under on the top and bottom edge. Measure and draw a straight line down the front of your sweater.

3. Cut the front of your sweater using the line as your guide (no turning back now!).


refashion your old sweater into a cardigan with this tutorial
{Sweater to Cardigan Refashion © ShannonSorensen}

This binding will be turned to the inside of your sweater. If you want the binding to show on the outside, follow these steps with the sweater inside out. I'll have a tutorial for this method soon.

4. Pin the binding down with the shorter side flush with the edge of your sweater cut.

5. Fold the top and bottom edge of your binding over and pin.

6. Using a ball point needle (best for sewing with knits), and low pressure (I set my dial to 1) stitch down the creased fold all the way from the top to the bottom edge.
Refashion tutorial turn your sweater into a cardigan
{Refashion: Sweater to Cardigan © ShannonSorensen}

7. Fold the stitched binding over to the inside, covering up the raw edges.

8. Pin the folded binding from top to bottom. Be sure to tuck under the top and bottom edges.

9. Stitch as close the the edge of the binding as you can (the inside edge). My machine has a setting that moves the needle to the left hand side, so that is what I used.

10. Admire your handy work. You're all done!

Sew your own cardigan from an old sweater
{Transform your old sweater into a cardigan step-by-step © ShannonSorensen}

I'm so happy I'll be able to wear this sweater again, transformed into a new cardigan.

turn your old sweater into a cardigan refashion
{Sweater to Cardigan Refashion © ShannonSorensen}

I love the peekabo turquoise accent inside. You would never know it wasn't made this way in the first place.

How to turn a sweater into a cardigan
{Turn a old sweater into a cardigan: tutorial © ShannonSorensen}


refashion project, turn a shirt into a cardigan
{image © ShannonSorensen}
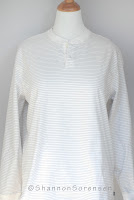
My next project is refashioning this men's long sleeved striped shirt into a cardigan...the wheels are turning! Stay tuned!

SUBSCRIBE (never miss a post!): Subscribe to ShannonSews
BLOGLOVIN: ShannonSews on Bloglovin
FACEBOOK: facebook.com/SSorensenDesigns
TWITTER: @ShannonSews1
INSTAGRAM: ShannonSorensenDesigns on Instagram
SHOP: Shannon Sorensen Designs + Fairface Washcloths
YOUTUBE: youtube.com/ShannonSews


Linked to: http://www.diybydesign.blogspot.com/http://www.mygirlishwhims.com/http://www.creationsbykara.com/,  http://ivyandelephants.blogspot.com/http://www.gingersnapcrafts.com, http://www.firefliesandjellybeans.com, http://www.theshabbycreekcottage.com, http://www.aglimpseinsideblog.com/, http://www.the36thavenue.com/ http://www.thecraftyblogstalker.com, http://www.livelaughrowe.com/ http://www.allthingswithpurpose.com, http://becomingmartha.com, http://www.thirtyhandmadedays.com, http://shabbynest.blogspot.com, http://www.uncommondesignsonline.com/
All Things with Purpose

Saturday, October 5, 2013

Arrows T-shirt DIY with stencil and fabric paint

arrow t-shirt with stencil and paint diy
{DIY Arrow T-shirt © ShannonSorensen}
I just realized I haven't posted since September. Time has whirled by since school started!

We had such a beautiful Seattle summer, but last weekend it started raining again. I mean a lot of rain. Buckets.

During our torrential downpour, I decided to put my craft on. Time to give some life to this plain blue t-shirt.

I love all the arrow designs I'm seeing lately, so I decided to create my own.


How to Make a Stenciled Arrow T-shirt:

(*product links included for your convenience.)
PRINT & CUT STENCIL: Find a clip art image online, print it on heavy card stock & cut it out with a craft knife tool

OR Use a this cute pre-made arrows stencil


how to create a stencil for arrow t-shirt design
{Make an Arrow Stencil © ShannonSorensen}

1. PROTECT YOUR FABRIC: I ironed a piece of freezer paper to the inside of my t-shirt so the paint wouldn't go through. You can also use a piece of cardboard.

2. FABRIC PAINT: I like SoSoft fabric paint because it leaves a flexible, soft finish. Put a piece of saran wrap on a plate or surface for easy use and clean up.

3. APPLY PAINT: Hold down stencil and use a foam brush or other applicator and gently blot paint through the stencil on the shirt. Move stencil as needed and repeat.

4. FINISHED DESIGN: Let your painted design dry. SoSoft Paint doesn't require ironing to set the color, but once dried, you can heat set paint with a dry hot iron (using a cover cloth) for 2-3 minutes.
Instructions for making a stenciled painted t-shirt design with arrows
{Instructions for making an arrow painted / stenciled t-shirt © ShannonSorensen}

I love the way it turned out! It's fun by itself and a pair of jeans, with a black long-sleeve t-shirt under it, or paired with a jacket or cardigan.
DIY Painted Arrows T-shirt finished
{DIY Arrow Stenciled T-shirt © ShannonSorensen}

Arrow t-shirt, how to make your own with paint and stencil
{Painted Arrows T-shirt DIY © ShannonSorensen}

The wheels are still turning as I try to come up with a design for my other plain t-shirt...and speaking of turning wheels, it's time to go for a bike ride. It's been a week or so since I've been able to go because of the rain, but we're getting a break today!

(*This post contains product links, added for your convenience. As an Amazon Associate I earn from qualifying purchases through Amazon.com. )


SUBSCRIBE (never miss a post!): Subscribe to ShannonSews
BLOGLOVIN: ShannonSews on Bloglovin
FACEBOOK: facebook.com/SSorensenDesigns
TWITTER: @ShannonSews1
INSTAGRAM: ShannonSorensenDesigns on Instagram
SHOP: Shannon Sorensen Designs + Fairface Washcloths
YOUTUBE: youtube.com/ShannonSews

Linked to: http://www.uncommondesignsonline.comhttp://sewmanyways.blogspot.com/http://www.flamingotoes.comhttp://www.niftythriftythings.com/http://diyshowoff.comhttp://www.keepingitsimplecrafts.com/http://www.ishouldbemoppingthefloor.comhttp://sewcando.blogspot.comhttp://craftomaniac.blogspot.com,   http://www.madincrafts.com,  http://www.sugarbeecrafts.com/,  http://www.hopestudios.blogspot.com/http://www.skiptomylou.org, http://becomingmartha.com/, http://www.504main.com, http://www.thirtyhandmadedays.com

Sunday, July 21, 2013

Black Bean Tie Dye Shirt: Natural Dyes

DIY black bean dye tie dyed t-shirt
{Photo: Tie Dye Blue T-shirt using all-natural Black Bean Dye}
Who knew black beans weren't just for dinner anymore?

I have to say, I'm still in awe at the outcome of this black bean tie-dyed t-shirt. Blue dye. From black beans. Who would have thought??

Well, a bunch of people, actually, because there is a lot of natural dying going on out there that I didn't even know existed. And it's not just with black beans.

Natural dyes are made from pretty much everything in nature. Flowers, fruits, spices, vegetables, herbs, legumes...you name it.

The colors you can get from natural dyes are beautiful, and truth be told, there's just something that feels good about using natural dyes as opposed to chemical ones. Here are a few Natural Dye sites I pinned on Pinterest (one of my favorites is the turmeric tank top).

How to Make Blue Dye from Black Beans

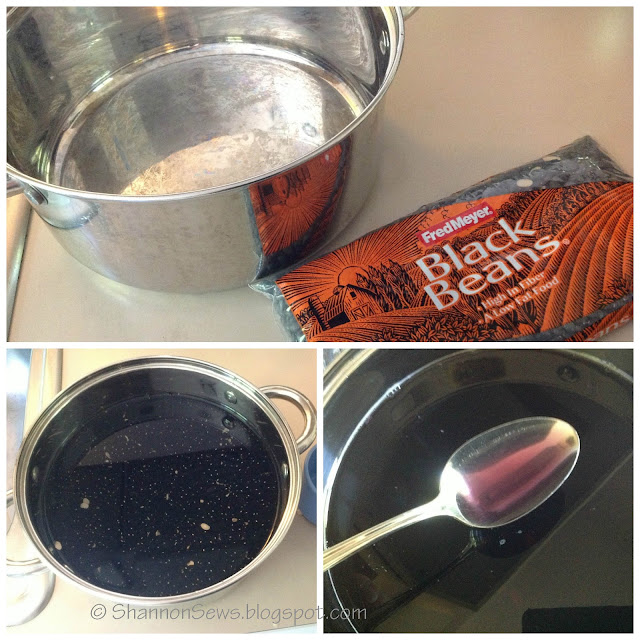
*Soak black beans in a pot of water for 24-36 hours, stirring occasionally. I used 1 bag of dried black beans and about 8 cups of water. I wanted to make sure the beans didn't soak up all the liquid.

*This natural dye tutorial is a great resource for how many beans vs. how much water, along with other details about making dye from black beans.

Several hours in, I checked and my water had turned purpley. Exciting!

How to make blue dye from black beans
{Photo: Make natural blue dye from black beans}


Get your Shirt Black Bean Dye-Ready 

This is where I failed.

Bind black bean dye color to shirt using Alum and Cream of Tartar
{photo: mortant cotton shirt}
In order for the black bean dye to adhere to the cotton shirt, you have to mordant it with Alum and Cream of Tartar. Again, refer to the above link for instructions on this process.

The problem I ran into, is that this chemical process requires you to cook your shirt for 1 hour in a pot you will not use again (toxic). I didn't have an old pot and after scouring a couple thrift shops, didn't want to spend $10 for a used stock pot I would never use again. Call me cheap, but this old white t-shirt wasn't even worth $10. I would take my chances for it to fade away, since it may not even turn out anyway.


Soak your shirt in Black Bean Dye

After letting the beans soak about 30 hours (*and a couple hours since I last stirred) I removed the liquid from the beans by carefully straining it through a mesh strainer into mason jars. You don't want debris to come up from under the beans and cloud your dye, so do it carefully or ladle it off the top.

I wetted my white t-shirt, folded it in a fan pattern, and rubber-banded it to give it tie-dye stripes.
After adding the black bean dye to my shirt in a small bucket, I set it outside for about 36 hours.


All natural black bean dye creates blue hues the longer you soak your shirt
{photo: Tie dye shirt soaking in black bean dye}

The Black Bean Dye T-shirt Reveal

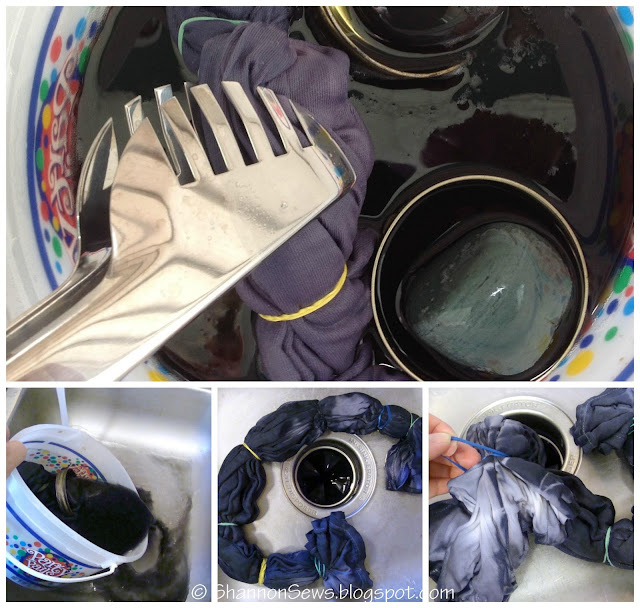
~Mid-way through I checked on it and it was certainly more purple than before it went in! (if you're wondering, I used rocks w/ mason jar lids to weigh down the shirt in the dye)
~By the time 36 hours rolled around (bottom small pictures), it was quite a bit darker and more blue.

~Dump the black bean dye down the sink.
~Remove the rubber bands and rinse shirt thoroughly with cold water. Excitement mounting!


Make blue dye from black beans after soaking shirt for 36 hours
{Photo: Black bean dye turns shirt blue after a 36 hour soak}


And holy moley, that's what the black bean dye fuss is all about! So cool! I love the pattern. Reminds me of bamboo. I love the color. I love that this was made from an all natural dye. And yes, it turned out cool so fingers crossed it doesn't wash out any time soon!


Finished Black bean dye t-shirt: blue tie dye design
Hanging in the breeze - the colors lightened just a bit as it dried.
I couldn't help myself from glancing at it out the window.
Glorious.

natural black bean dye creates blue results
{Photo: Results: Blue tie dyed t-shirt from all natural black bean dye}

 Is it weird to want to dye everything in the house?


Similar projects you might like:
Pink Sunburst Circles Tie Dyed Shirt
Dip Dyed T-shirt
Dip Dyed Kitchen Towels


SUBSCRIBE (never miss a post!): Subscribe to ShannonSews
BLOGLOVIN: ShannonSews on Bloglovin
FACEBOOK: facebook.com/SSorensenDesigns
TWITTER: @ShannonSews1
INSTAGRAM: ShannonSorensenDesigns on Instagram
SHOP: Shannon Sorensen Designs + Fairface Washcloths
YOUTUBE: youtube.com/ShannonSews
Linked to: http://sewmanyways.blogspot.com/, http://www.iheartnaptime.net, http://www.flamingotoes.com http://www.niftythriftythings.com/ http://www.ishouldbemoppingthefloor.com, http://sewcando.blogspot.com, http://creatingreallyawesomefreethi ngs.com, http://makingtheworldcuter.blogspot.co m, http://craftomaniac.blogspot.com, http://www.skiptomylou.org, http://diyshowoff.com http://www.linesacross.com   http://www.keepingitsimplecrafts.com/madincrafts.com, http://www.sugarbeecrafts.com/, http://www.hopestudios.blogspot.com/  http://todayscreativeblog.net/http://bebetsy.com http://www.diybydesign.blogspot.com/, http://www.733blog.com/, http://www.sew-much-ado.com/, http://www.mygirlishwhims.com/ http://somedaycrafts.blogspot.com/, http://www.creationsbykara.com/ http://www.gingersnapcrafts.com/, http://www.rolleduppretty.com/, http://raegunwear.blogspot.com/, http://ivyandelephants.blogspot.com/, http://www.adornedfromabove.com, http://www.theshabbycreekcottage.com, http://www.somewhatsimple.com/, http://www.aglimpseinsideblog.com/, http://www.houseofhepworths.com/, http://www.the36thavenue.com/  http://www.livelaughrowe.com/  http://www.allthingswithpurpose.com, http://www.thecraftyblogstalker.com, http://myfashionforwardblog.com/http://becomingmartha.com/, http://www.thirtyhandmadedays.com/, http://www.504main.com/

Thursday, July 18, 2013

Tie Dye Sunburst Rings T-shirt DIY

Make tie dye rings t-shirt tutorial
Although I'm from Seattle, I'm not a hippie. People seem to think those of us from Seattle or Portland all wear tie-dye and hug trees.

On this rare occasion, however, I'll admit I'm mimicking the stereo-type. I decided to make my own tie-dye t-shirt, and although I do like trees, I don't think I've ever hugged one.

I purchased pink Rit dye (*affiliate link) found a perfect white v-neck t-shirt (*see info below) and followed this great tie dye tutorial on Pinterest.

The only problem I found was that because I hadn't pre-wetted my t-shirt, the colors didn't disperse as well. I still love it though. Note for next time.

How to make tie dye rings t-shirt with rit dye

I love how the pinks gently fade in and out of the white of the shirt and go from shades of faded rose to pedal pink and everything in-between.

make sunburst rings tie dye t-shirt with rit dye

*Okay, about the white t-shirt. Are you sitting down? I found the PERFECT white Hanes t-shirt at Walmart for only $5.00 for this project! I'm still in shock. It's medium weight, soft, and perfect to wear as-is or turn into a craft project.

I'll admit, I had to get one in a few different colors. They are so comfortable - not at all what I would expect for 5 bucks! I'm not getting paid by Walmart, I just wanted to share the link so you can see them. Go to your local Walmart and see if they carry them!


Closing thoughts on tie dye: I always had the idea that tie dye was messy and drippy and stainey and I could only do it in the summer on a giant lawn with a hose and gallon sized buckets. But the truth is, making this t-shirt in a pot on the stove (as you can see in my how-to video) made all the difference.

When I made my first dip-dye t-shirt, I had a lot of color running down the sink when I rinsed my shirt. This time around, there was very little to rinse because the color had locked on to the shirt through the use of heat. Just a thought. This project's not as crazy as you think it might be.

{WATCH} the making of my Tie Dye Sunburst Rings T-shirt


Never miss a post! Subscribe to ShannonSews
Follow ShannonSews on Bloglovin
Like facebook.com/SSorensenDesigns
Tweet @ShannonSews1 on Twitter
Follow me on Instagram
Subscribe to youtube.com/ShannonSews

Wednesday, May 22, 2013

Sew a basic cotton top: round or scoop neckline

sew a basic cotton round neck top
I've vented many times about how I never have anything to wear. I know, ironic, isn't it? Someone who loves to sew but never has anything to wear.  Hmm. Still stumps me.

Anywho, the other day I ventured out to Old Navy to find "something to wear", but came up empty handed. Shocker.

I did, however, do some snooping, as is often the case for me when I shop. I love to look at how things are made. I'm sure some poor shop has footage of me studying the inside of garments, while snapping a pic or two with the old camera phone. I have no shame.

ENTER Old Navy dressing room: (Like I said, no shame) I wanted to know how this simple top was made, so I laid it down in the dressing room to see the actual shape of it.

sew a basic shirt design like this top from Old NavyLook at how basic this pattern is! It's practically a square!  If only I could have lugged my pattern paper in there with me... ha! I guess I have a little dignity.

When I left the store, I didn't have a bag, but at least I had an idea. I was going to sew my own basic round neck top, because why buy something when you can make it yourself?! I'm so cheap frugal that way.


Sew your own basic cotton top


Start with a Basic Shirt Pattern

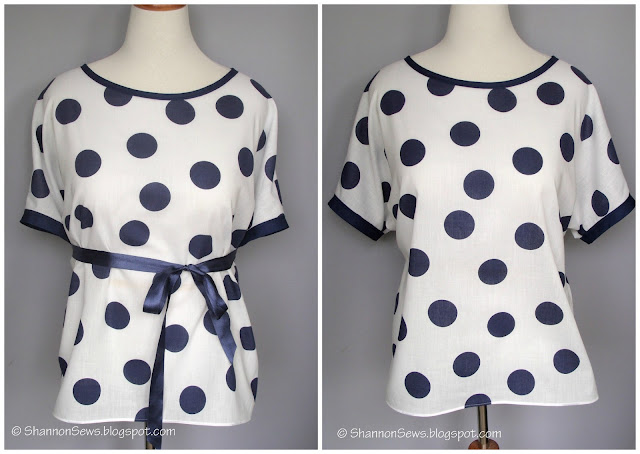
Be sure to read my post on how to make your own basic shirt pattern. This is the exact pattern I used to make my cotton polka dot top.

Here's a quick photo recap of how I made my own basic shirt pattern:

sew your own cotton top by making your own shirt pattern

Cut out the shirt and necklines

As mentioned in my previous post, I laid out the fabric in half and then folded it under in half again, to cut both shirt pieces out at once (except for the neckline).

secure your pattern to your shirt with fabric weights or pinscut out your cotton fabric front and back when making your own shirt

The necklines are different for the front and back. The back is higher than the front, so I cut both separately, based on the estimated measurements from my pattern. I always opt to cut shorter initially, so I can lower the neckline if needed.

cut shirt necklines lower in back and higher in front when making your own shirt

With both pieces cut out, I was ready to sew the shoulder seams together. Serge or zig zag stitch the raw shoulder edges to secure.

Sew the Shoulder Seams

I laid both shirt pieces (right sides together), pinned and sewed the shoulder seams. Then ironed them open nice and flat.

sew shoulder seams together first when making your own shirt

Finish the neckline and dolman sleeves with bias tape

I finished the neckline and sleeves with navy blue double fold bias tape. It was really easy to work with.

I simply opened the folded tape, laid it edge to edge right sides together, sewed on the fold, folded the tape over and stitched the other side to secure. I may be investing in a bit more bias tape after seeing how easy it was!  *Here's a good tutorial from Coletterie on bias binding


use bias binding tape to finish neckline and sleeves

Stitch up the side seams & hem the waist line

After finishing the neck and sleeves, I laid the top right sides together again and stitched up the side seams. I did a simple zig-zag stitch to secure the raw edges of the fabric.

I hemmed the bottom of the shirt using a rolled hem foot. I posted here about using a rolled hem foot (a.k.a sewing a rolled hem). It was incredibly simple.

simple shirt hemline using a rolled hem foot

And that's all there was to it!

Give necklines and sleeves a clean finish by sewing with bias binding tape

It's a cute top with or without the ribbon. I may even go crazy and use a bright ribbon like yellow, red or orange. How daring of me.

make your own round or scoop neck cotton top

I think it's safe to say there may be more summer tops in my future. This pattern is so versatile I could make t-shirts or add details to cotton tops. Lots of possibilities!


Never miss a post! Subscribe to ShannonSews
Like on facebook.com/SSorensenDesigns
Follow @ShannonSews1 on Twitter
Subscribe to youtube.com/ShannonSews

Linked to: http://www.diybydesign.blogspot.com/, http://www.733blog.com/,http://www.sew-much-ado.com/, http://www.mygirlishwhims.com/,http://somedaycrafts.blogspot.com/, http://www.gingersnapcrafts.com/, http://www.rolleduppretty.com/,http://raegunwear.blogspot.com/, http://www.adornedfromabove.com

Sunday, May 19, 2013

Make a Basic Shirt Pattern

make your own easy shirt pattern
It may seem daunting, but making your own basic shirt pattern is as easy as laying down a t-shirt you like, and tracing around it.

Then end.

Well, okay, it's not really the end, but it really is simple!


Make your own Basic Shirt Pattern

Round Neck Top

This shirt pattern is the one I used to make my new cute blue and white polka dot summer top. I gave you a sneak peek on facebook, but will share more pictures and details this week!

Trace a Shirt

The first step in making your own basic dolman sleeve shirt pattern is to find a shirt to trace that you already like the fit of. *[for more info, see dolman sleeves versus in-set sleeves]

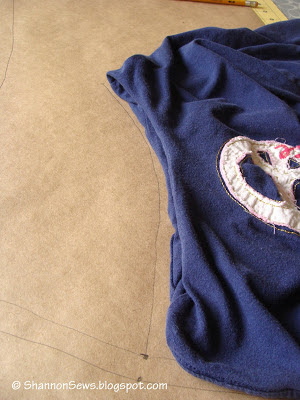
Fold the shirt in half, shoulder seams together, and lay your shirt down on a piece of pattern paper. (I use craft paper)

make a basic shirt pattern by tracing an existing shirt

Trace around your t-shirt with a pencil.
I made an "actual shirt line" and "with seam allowance line"

*I'm tracing a t-shirt, so keep in mind if you're using the pattern for a cotton shirt you'll need to add a little extra room to account for the difference in fabric and lack of stretch.

trace around an existing shirt to make your own shirt pattern

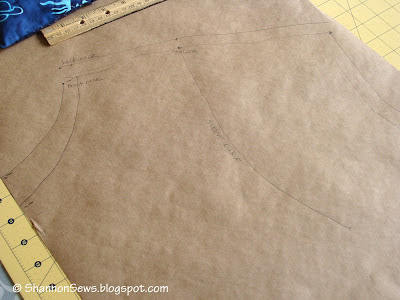
I won't be sewing an in-set sleeve this time around, but I decided to add a sleeve curve line on my pattern in case I ever wanted to. To do this, I tucked the sleeves inside and traced the curve.

trace the sleeve curve to add a sleeve to the shirt pattern

Label & cut out the pattern

I traced the back neckline, eyeballed the front, and labeled everything (i.e. front fold, necklines, shoulder seam, where the sleeve ended, etc).

label the shirt pattern with necklines, shoulder seams, etc.

Cut out your pattern along the seam allowance line.

cut out your self-made shirt pattern along the seam allowance line

Use the new shirt pattern

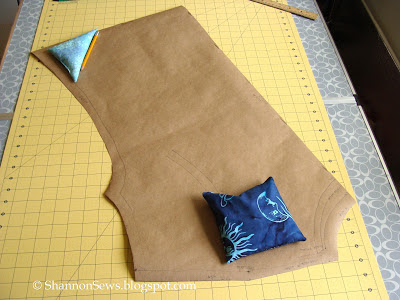
Lay your shirt pattern down on your fabric. I held down the pattern with easy fabric weights I made, but you can also pin down your pattern.

I laid my fabric in half and then turned it under in half so I would be cutting both pieces at once.

lay down the shirt pattern you made on your fabric with fabric weights


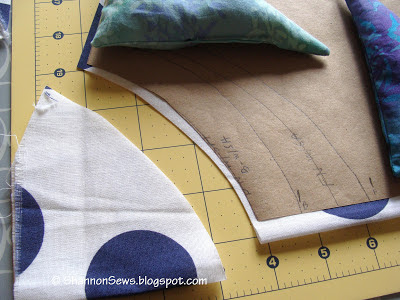
I used a rotary cutter to cut all around the pattern except for the neckline. I gave it a little extra fabric since I'm not using a knit or stretchy fabric.

Make a cotton round neck top pattern, lay on folded fabric, and cut both pieces at once


When cutting the necklines, I generally start a little higher to give myself room to cut lower. The back neckline is higher than the front.

I removed the 2nd layer of fabric and cut each neckline individually.

making your own cotton scoop neck top, cut each neckline separately

New shirt

Here is the start of a cute top, based on my new pattern. You'll have two fabric pieces for front and back.

⇒ Check back later this week to see how this shirt is put together!

simple cotton round neck top made my own pattern

This is a great basic pattern for a t-shirt or round / scoop neck cotton top and can be re-used and re-used and re-used with any number of fabrics and patterns. You can also change it up by altering the neckline, adding darts, sleeves or a different hemline for some variety.


Never miss a post! Subscribe to ShannonSews
Like on facebook.com/SSorensenDesigns
Follow @ShannonSews1 on Twitter
Subscribe to youtube.com/ShannonSews
Blogging tips