Tuesday, September 3, 2013

Protect your Online Photos: 4 Easy Steps

How to make a copyright on your photos to protect them
{image: Protect your online photos}
I had the unfortunate reminder a couple weeks ago, that images floating around the blogosphere can be stolen and claimed as someone else's if you're not careful. Not only had someone stolen my images, but was also claiming she had made what was in the photo. Double slap.

When confronted, the thief said she found my photo on Google and used it since my "name wasn't on it". The image clearly referenced my blog, but didn't have my name on the image. It still obviously wasn't her picture or her work, but I will be smarter from now on and leave a digital fingerprint so thick not even an experienced thief will want to mess with my photos! Take that!

There are several ways to protect your online photos by leaving your own digital fingerprint all over them.

Here's how:

How to Protect your Blog & Online Images

1. Put a copyright watermark on your photos.

The first, most visible way to protect your online images is to put a copyright notice directly on your image. You can do this by popping your photo into Photoshop or an online photo editing site and slapping a copyright directly on your photo.

You can add a watermark across your image or add text to the bottom. Being an avid user of Photoshop, I happen to know that text can easily be erased if it's at the bottom. It's harder to erase when it's written over at least part of the image and even harder to erase when it's across your entire image. It comes down to what you're comfortable with, since it does impact your image to some degree.

how to protect your blog images with a watermark
{Put a watermark on your photos © ShannonSorensen}


2. Add your Copyright to the Title of your Blog Photo

Have you ever hovered your mouse over an online image, and a text box pops up with a little description of the photo? This is an easy way to incorporate your copyright onto your photo without impacting the image itself.

While editing your post in blogger, click the image and a bar will pop up.
Then click Properties.

Protect your online pictures by adding titles with copyright
{Add titles to your photos to protect your pictures © ShannonSorensen}


An Image Properties box will pop up, giving you the option of adding Title Text to your image (alt text is something different.). Add a short description + your copyright.

Add digital fingerprint to your images with title tags
{Add extra protection to your online photos with Title tags © ShannonSorensen} 


Now when anyone hovers over your image, the text box will pop up, giving more information about your photo, along with your copyright. When your mouse is not on the image, the text box goes away (same for my pinterest pin button).

How to prevent your online pictures from being stolen
{Prevent online images from being stolen by adding a title tag with your copyright © ShannonSorensen}

3. Add your Copyright to the Caption under your Blog Image

A caption is the text that shows up below your image. It's a chance to give readers a little more information about your photo, and another place to add your copyright.

Simply click on your image in blogger edit mode, and the bar will pop up (below).
Click on Add Caption.
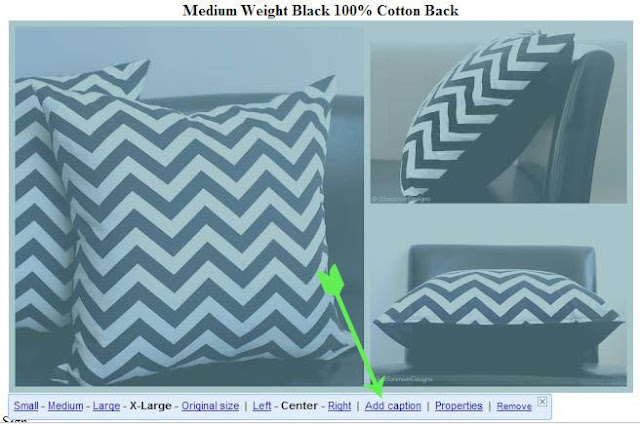

Show ownership of your online pictures by adding a caption with copyright
{Add a caption like this to identify your copyright © ShannonSorensen}


Add a description of your image and include your copyright.
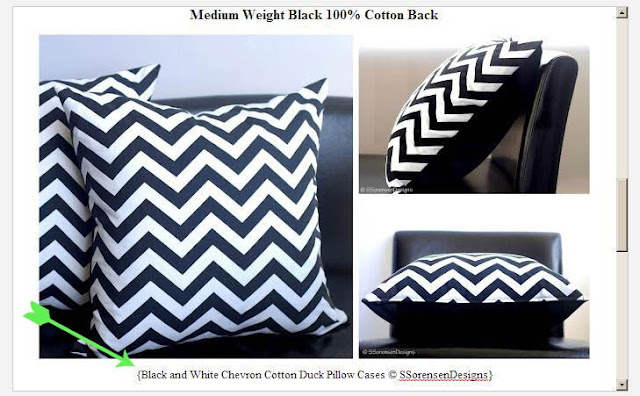
How to prevent having your online photos stolen
{Take ownership of your photos with copyright protection © ShannonSorensen}


4. Add your Copyright to your Image File Name

This may be the least effective way, but it still leaves your digital print on your image. When you save your photo to your computer, before adding it to blogger, add a short copyright to the end of your file name: chevron-pillow-ssorensendesigns.jpg. You want it at the end so it won't interfere with seo.

Although image file names can easily be altered once you've uploaded your picture to the internet, and sometimes sites encrypt the title anyway, it doesn't hurt to slap your copyright on the file name.


You've worked hard to take great photos and make quality products. Don't let someone rip off your talents and hard work without a fight! Protect your images online by adding your copyright in these 4 easy steps, giving thieves a reason to look for stolen images elsewhere.


SUBSCRIBE (never miss a post!): Subscribe to ShannonSews
BLOGLOVIN: ShannonSews on Bloglovin
FACEBOOK: facebook.com/SSorensenDesigns
TWITTER: @ShannonSews1
INSTAGRAM: ShannonSorensenDesigns on Instagram
SHOP: Shannon Sorensen Designs + Fairface Washcloths
YOUTUBE: youtube.com/ShannonSews

Thursday, January 17, 2013

I'm finally tweeting

Shannon Sews on Twitter
It's official.
I'm FINALLY on Twitter. (Gasp!)
It only took me 6-1/2 years to join. I waited so long, someone already swiped my user name. I've been demoted to @ShannonSews1.

Can you believe tweets have been flying since 2006? I feel so old.

There was a time when I didn't even know what a tweet was. And honestly, between Facebook, Blogging, YouTube, Etsy and Pinterest, I don't know what there is possibly left to say. But we'll see if I can come up with something.

I'd love to have a few followers on Twitter, just so I don't feel awkward sitting there at my table for one.  Thanks guys xo


Never miss a post! Subscribe to ShannonSews
Like on facebook.com/SSorensenDesigns
Follow @ShannonSews1 on Twitter
Subscribe to youtube.com/ShannonSews

Sunday, January 6, 2013

Pin images from the web to Pinterest

How to add a pin it button from Pinterest to your computer
I'll admit it, I didn't jump on the Pinterest bandwagon right away. I wasn't even sure how to pronounce it (pine-terest? pint-erest). What did this even mean?

But once I did join the throngs of people pinning fashion, recipes, crafts and diy projects, I was hooked.

It occurred to me, the day after Pinterest Nutella cookies saved the potluck, that some people may not know how to pin things they see online to their Pinterest boards.

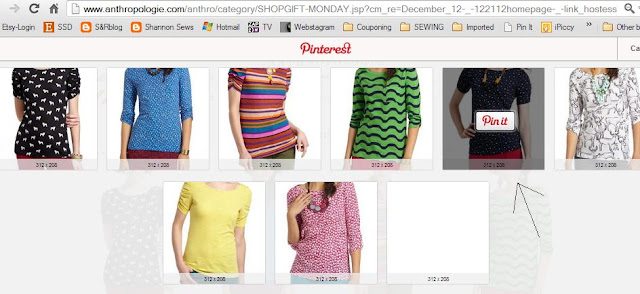
It's easy enough to look through Pinterest boards and "repin" something, but what if you're looking through new arrivals on Anthropologie and see something you'll be the 1st to pin? Let me show you. It's incredibly simple.


How to pin images from the web on your desktop computer to your Pinterest boards:


▶First, go to Pinterest and add a "Pin It" button right to your bookmarks bar.

Install a Pinterest button to your bookmarks bar to pin images from the web


▶Once you've installed your Pin It button, it will appear on your bookmarks bar.

Use a pin it button right from your computer's bookmarks bar


▶Stay logged into Pinterest as you surf the net

How to pin images to Pinterest from any website


▶When you find something you like, click the Pin It button from your bookmarks bar

Instantly save images from the web with a Pinterest Pin It button on your computer

▶Pinterest will swoop in and gather all the images on the page. Click on the image you want to Pin.

Pin images to Pinterest by clicking on the Pin It button


▶Next thing you know, up pops your Pinterest boards. Choose the board you want to save it to and click Pin It.

That's all there is to it!

Save images from the web directly to your Pinterest Boards by installing a Pin It button to your computer


*To add a "Pin It" button to your iphone, ipad and Android, you're cooler than me, so click here


Never miss a post! Subscribe to ShannonSews
Like on facebook.com/SSorensenDesigns
Follow @ShannonSews1 on Twitter
Subscribe to youtube.com/ShannonSews

Friday, October 5, 2012

{Grow} your Blog through Guest Posting

Guest posting to grow your blog and gain new readers
Want to grow your blog and gain new readers?

Guest posting 
is a great way to do it!

If you have something crafty to share and want to share your talents with a new community of readers, I'd love to have you as a guest writer on ShannonSews!

Simply contact me through ssorensendesigns [at] hot mail [dot] com (sorry I have to write it that way or the email spammers will get me) and I'll share the details with you.

Guest Posting doesn't cost a thing, so think of it as a little free publicity! And in this economy, free is always a plus. Am I right?

Looking forward to hearing from you.
Happy Friday!
Enjoy your weekend my friends! xo


Never miss a post! Subscribe to ShannonSews
Like on facebook.com/SSorensenDesigns
Follow @ShannonSews1 on Twitter
Subscribe to youtube.com/ShannonSews

Monday, September 10, 2012

Make Bunting Social Networking Buttons Tutorial

Learn how to make your own bunting style social media buttonsThe other day I came across a blog that had the cutest social networking buttons. You know - the pretty little buttons that connect you with their blog feed, facebook, and etsy shops?


Wherever did she get such cute buttons?, I wondered to myself.

I wanted cute buttons too! So I searched the internet for "free social networking buttons". But they weren't really what I wanted. And they didn't really feel like me.

So I decided to take matters into my own hands and make my own social networking buttons - bunting-style buttons, to be exact, and although I stayed up waaayyy too late making them?  I'm totally gaga over them. And they feel just like me.


....................................................................................................

▶▶▶Want to make your own bunting - style social networking buttons that make you feel all giddy inside? ◀◀◀
I'll show you how!


You will need a photo editing program. I used Photoshop Elements.

Create a new image resolution 300, 3 in. wide x approx .75 high, with a white background (or other color if you prefer)

Create your own custom social networking button with a photo editing program


You can make the bunting design like mine or make your own custom social media button design. What feels like you? Your photo editing program probably has some cool pre-ready images or backgrounds you can use as well.

To make the bunting social networking buttons like mine, I used the triangle shape. I dragged each triangle on the canvas, flipped them upside down, moved each one around to mimic hanging, and filled each one in with turquoise (or red; I alternated per button).

Use the traingle shape in Photoshop Elements to make bunting design for social media buttons


Next, I used the pencil tool to draw lines like string through each triangle and arranged them to look like hand stitches (each "piece of string" is its own layer).

Draw lines with drawing tool for Bunting string design

Lastly, I added text on the main background layer to indicate which button it was. I used Encino, 36 pt.


Make Social Networking buttons for all social media sources like facebook, Pinterest and etsy

Save your button to your computer as a .jpg image.

Now you will need to upload your image to an online photo storage site, so your computer can refer back to it. I use PhotoBucket.

Once you upload your file to your online photo storage site, the site will create HTML code that you can copy and paste back to your blog.  The code will look something like this:
<a href="http://youwebsite.blogspot.com" target="_blank"><img src="http://i103.photobucket.com/ albums/bb222/yourname/your business/facebook.jpg" height="50" border="0" ></a>
For blogger, go to Layout & Add a Gadget. Choose HTML/JavaScript to "add third-party functionality or other code to your blog." Give it a title and add the HTML code in the content section of the box. Save it and place the button (gadget) where you want it on your blog. I put mine on the top right-hand column.

That's all there is to it! The creative possibilities are endless when it comes to designing your own social media buttons. If you have any questions, please feel free to leave a comment and I'd be happy to give additional clarification.


Never miss a post! Subscribe to ShannonSews
Like on facebook.com/SSorensenDesigns
Follow @ShannonSews1 on Twitter
Subscribe to youtube.com/ShannonSews


Linked to:
http://sewmanyways.blogspot.com/, http://www.iheartnaptime.net, http://www.flamingotoes.com, http://sewchatty.blogspot.com, http://www.thegirlcreative.blogspot.com, http://cherishedtreasures-terry.blogspot.com http://www.ishouldbemoppingthefloor.com, http://sewcando.blogspot.com, http://creatingreallyawesomefreethings.com, http://craftomaniac.blogspot.com, http://www.betweennapsontheporch.blogspot.com, http://www.skiptomylou.orghttp://www.sweetlittlegals.com/ http://www.notjustahousewife.net/ http://www.hopestudios.blogspot.com/ http://todayscreativeblog.net/ http://carolynshomework.blogspot.com/ http://www.craftyconfessions.com/http://www.diybydesign.blogspot.com/, http://www.733blog.com/http://www.sew-much-ado.com/, http://www.mygirlishwhims.com/http://somedaycrafts.blogspot.com/, http://www.creationsbykara.com/http://www.gingersnapcrafts.com/, http://www.rolleduppretty.com/http://raegunwear.blogspot.com/ http://www.mineforthemaking.com/, http://www.theshabbycreekcottage.com, http://www.somewhatsimple.com/, http://www.aglimpseinsideblog.com/, http://www.houseofhepworths.com/, http://www.the36thavenue.com/ http://myricandreasen.blogspot.com, http://www.thirtyhandmadedays.comhttp://www.sugarbeecrafts.com/ http://www.delicateconstruction.blogspot.com, http://shabbynest.blogspot.com, http://www.504main.comhttp://westernwarmth.blogspot.com http://www.linesacross.com/

Tip Junkie handmade 
projects

Wednesday, August 29, 2012

Free online photo editing with iPiccy

edit photos online for free at iPiccy
I've used Photoshop for eons. It's always been my go-to for photo editing, until I met iPiccy. I tell you, it was love at first click.

iPiccy is a new free online photo editing website. It's online (no software to install). It does many functions Photoshop does in a snap. It's easy enough for anyone to use. And it's free. What? I know, right?!
*I don't secretly work for iPiccy, I just love it so much I wanted to make sure you all knew about it!

It's really easy to use, so no need to be intimated.


▶▶▶Here's a quick overview to see what iPiccy's like.◀◀◀

  • Just go to iPiccy.com and upload your photos

easily upload your photos with iPiccy's new online photo editing


  • You can find all the regular photo fixes for exposure, color, tone, sharpening, etc.

fix pictures online for exposure, color, tone

  • It has more advanced editing options with a click, i.e., eliminate blemishes, remove shine, airbrush...(everything she's already had done) hahaha
iPiccy lets you edit out blemishes, remove shine and airbrush for nearly perfect photos


  • You can quickly create a whole variety of photo layouts from their templates
Create a variety of photo layouts with iPiccy's online editing software
  • and even round the edges of your photos

Round corners of your photos with quick editing

  • There are options to add frames to your photos, create collages and add textured backgrounds.

Photo edits allow you to add frames, create collages and add textured backgrounds to your photos


  • "Filter options" change the tone and coloring of the photo (kind of like using color filters in Photoshop). I'm in love with the Anthony setting. It gives photos kind of an aged/washed look, making skin tones more creamy.

Editing filters give photos different tones and coloring

  • Artsy settings let you change photos into looking more like animations, comic books, aged pictures, pencil sketches or even Pop Art. Cool!

Online editor has setting for Andy Warhol-like Pop Art

This isn't all inclusive, but I hope it helps those of you who need a free place to edit your photos! 
Happy editing! ♥ 


UPDATE: Try Picmonkey.com! Great fonts, banners, layouts, etc. Sorry iPiccy, I think I have a new crush.


Never miss a post! Subscribe to ShannonSews
Like on facebook.com/SSorensenDesigns
Follow @ShannonSews1 on Twitter
Subscribe to youtube.com/ShannonSews

Thursday, January 13, 2011

Take great photos for your blog and online shop


Great pictures are key to showing people the best, most genuine version of what you've created - the look, the feel, the color, the texture.

Have you ever tried to post a sewing or crafting project online, but the pictures you take aren't doing it justice? Have you seen other projects posted that are hard to see due to their dim lighting and blurred photos?

It's a tragedy I tell you! I know how much time it takes for us to create our lovely creations.

Having been a photographer for many years, I wanted to share a few tips with you so you can take the best photos of the precious things you've spent so much time creating.

Tip #1: Use lots of natural light.
  • Photography is all about light.
  • Go outside with your project, if possible. A cloudy day with filtered light or a shady area on a bright sunny day are best (direct sun causes harsh tones and shadows).
Here's a little behind the scenes for this pillow-

A chair set out on the deck on a cloudy day. The outdoor filtered light wraps perfectly around each delicate ruffle.

  • If you can't go outside, place your project by windows. You might still need a fill flash to avoid blur. When in doubt - turn your flash on. If you don't have enough light to work with and don't use a flash, you'll get blurry photos. Yuck.
The shot below was taken with window light, a tripod and white poster board to bounce light back onto the pillows. Again, I love the way natural light softly wraps around the pillow detail.

Here is the behind the scenes:

  • When all else fails, if you can't go outside and don't have much light from windows, and can't wait until the next day for daylight, use a flash inside. *Bouncing light off of a white ceiling is best to avoid unflattering shadows.

Tip #2: Get in close!
  • If you were in a shop and were interested in a pillow you saw across the room, would you continue admiring it from afar?
or would you walk up to look at it, hold it, feel it, study the details?
You want your pictures to convey the details, the color, the texture, drawing them in, as if they had it right in front of them.


Tip #3: Try different angles and backgrounds
  • Set up your project and take photos as you walk around it, get down low, stand up high, one side and then the other. Try different backgrounds. You'll be amazed at how certain angles highlight just the right details.


Tip #4: Take lots of photos
With digital cameras, we have the freedom of taking as many pictures as we want. Out of 15 pictures, you might find 3 or 4 that work really well.
It's better to take a bunch of pictures and delete what you don't use, then have to re-do your photo shoot because you didn't get any great pictures.


Tip #5: Clean up your background

  • You want your pictures to focus on your creation, not the messy room you're taking the picture in. Take a few minutes to set your surroundings up. Keep it clean and focused. Turn off overhead lights that might be omitting a yellow cast.
haha - this one is so bad in so many ways
Focus on what you're trying to present. Ahhh, much better.


Other tools:

Tripod - keeps your camera stable, you can use it outside, it keeps your hands free, helps in lower light situations with the timer setting to avoid blur.

White pieces of large cardstock or foam board are great for bouncing extra light back into your project.

Use a photo editing program like Photoshop. These programs are great for lightening, darkening, cropping, enhancing or creating photo layouts. Try to take the best photos you can from the start, so you don't have to put all your time and energy into fixing bad ones.

If you have any questions about the tips and techniques I've discussed, please feel free to contact me. I'd be happy to help! Pass this tutorial along to your friends!

~Shannon


Linked to:
FingerprintsontheFridge
TrulyLovely
30Days
AllThingzRelated
SomewhatSimple
TotallyTutorials
ToolsareforWomenToo
FirefliesandJellyBeans
Blogging tips