Thursday, September 4, 2025

Paint your Toilet Seat Stains Away

Another one of my very popular posts is about toilet seats, of all things. Who would have guessed? 

It seems that many of us have found ourselves trying to clean a toilet seat that just won't come clean, whether from actual stains or cleaning them for so long that they appear dirty and stained.

how to fix a stained toilet seat

Look no further. Whether you live in your own house with a stained toilet seat and want to fix it for yourself or you live in an apartment and need your toilet seat to look like new again when the inspection comes around, you can find the answers here: 

>Read this post for details - DIY Fix: Paint your toilet seat so it's like new again!


The #1 Fix: How Stained Toilet Seats can Look New Again


Wednesday, July 12, 2023

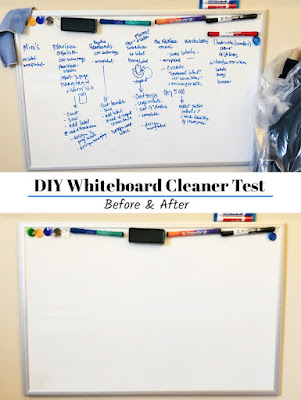
Do DIY Whiteboard Cleaners Work?

white board cleaners DIY
I'll admit, I'm not the best at cleaning my whiteboard regularly. In fact, my latest "brain dump" has been sitting on my whiteboard for 2 years. Cringe.

According to Polyvision, the best way to maintain the cleanliness of your white board is to clean it regularly with white board cleaner. Oops.

Since I didn't have any white board cleaner on hand, I tried out several DIY Whiteboard Cleaners to see if I could get my 2 year old marker off without leaving anything behind. Here's what happened:

DIY Whiteboard Cleaners Test

*I used a soft microfiber cloth with each mixture

1. Water + 1 tsp White Vinegar

 = Fail 

2. Water + Rubbing Alcohol

 = Fail

3. Hydrogen Peroxide only

= Fail  

4. Windex only 

= Success!

While this technically isn't a DIY recipe, it is a household cleaner that most people have, versus whiteboard cleaner that not everyone has on hand. 

I used Windex all over my whiteboard and it took off all the most recent (2 year old) text. 

However, it didn't take off the ghost lines that have been there for years (those marker lines you can still see faintly after cleaning your whiteboard). 


5. 70% Isopropyl Alcohol only 

= Success! 

*Rubbing Alcohol is the ONLY thing that removed the "ghost lines" that have been there for years! I didn't use this all over my whiteboard because I was afraid it might damage the glossy finish, but it didn't. I still would recommend only using rubbing alcohol on the most stubborn stains.


cleaning white boards with DIY cleaners before and after


DIY Whiteboard Cleaner Winners

Disclaimer: I have included convenient links to each product. As an Amazon Associate I earn a small commission for each sale purchased through my links. Thanks for your support!


use windex to clean whiteboards
The Best DIY Whiteboard Cleaner

Windex (which isn't so much DIY, as it is more of just a household item for other things)

Buy it here: Windex


erase whiteboard ghost lines with rubbing alcohol
The Best DIY Whiteboard Cleaner for Ghost lines

70% Isopropyl Alcohol (aka Rubbing Alcohol)

Buy it here: 70% Isopropyl Alcohol


use microfiber cloths to clean whiteboards

The Best Whiteboard Microfiber Cloths

Buy it here: Microfiber Cloths Set


best cleaner for white boards Expo

Buy here: The Best Actual Whiteboard Cleaner (that you should be using  every week)


Watch me get this 2 year old stubborn writing off my whiteboard!


Shannon Sorensen is the creative force and blogger behind Shannon Sews

You can watch her Youtube videos, follow her on Instagram and 

She is also the founder and CEO of Fairface Washcloths, a popular sensitive skin care line of washcloths, and hosts the Fairface Podcast and Cut, Sew, Grow Podcast on Apple podcasts.

She is currently working on a program to help others find success with their own sewn products with her upcoming course line Cut, Sew, Grow.

You can follow her on Instagram @FairfaceWashcloths, @CutSewGrow and @ShannonSorensenDesigns 


Saturday, November 22, 2014

DIY Fix: Paint your toilet seat so it's like new again!

diy toilet fix paint toilet seat get rid of marks look new again
"Want to see my toilet?" said no one. Ever.
Well, except for me that is, because I seriously want to show you my toilet.

This DIY fix was just too good not to share because it worked like a charm!

Why are you so worried about your toilet, you ask? We are in the process of moving, and by in-process I mean I think about how much I need to pack. Every day. And then I blog about painting my toilet. 

We are finally leaving a loud city apartment and upgrading to a house in the quiet tranquility of a rural small town, just outside Seattle. We're really excited, but the packing, cleaning and moving part isn't so much fun (especially since in July we actually packed and moved everything out, but due to a bad situation, ended up having to move right back in. Blah!).

So, in an attempt to leave this place better than we found it (and a full deposit refund!) we need to pretty up the old toilet seats that have been cleaned so many times the paint has started to rub off. They're not gross and dirty I promise! Just in need of a little re-painting so they look as clean as they really are.

I stumbled on this Toilet Seat Makeover post that gave me the how-to's, and promptly ran over to Home Depot to grab some spray paint. And away I went.

HOW TO PAINT YOUR TOILET SEAT SO IT LOOKS LIKE NEW

WHAT YOU WILL NEED (*product links included)
  • Rust-oleum Painter's Touch 2x Ultra Cover Spray Paint + Primer in Gloss White - through Amazon or Home Depot (as recommended by the other website & worked great; unless your toilet's a different color)
  • A well-ventilated area such as outside or a garage  (*I tried to spray paint the toilet seat in the bathroom as the other site directed, but I fumigated myself. Gah! So I took it outside, even though it was like 30 degrees. I'd rather freeze than faint.)
  • Newspaper, painters cloth or other cover that can get painty
  • Clothes to spray paint in
do it yourself fix toilet seat spray paint look new again
PAINTING INSTRUCTIONS

STEP 1: Give your toilet a quick and thorough cleaning, and let the toilet seat dry completely.

STEP 2: Remove your toilet seat (SIMPLE! just use a flat-head screw driver) and bring toilet seat to a well-ventilated place

STEP 3: Use your drop cloth or newspaper to cover areas of the toilet seat you don't want to get painted.

STEP 4: Follow the directions on the spray paint can and shake til its well mixed

STEP 5: Spray a light coating 6-10 inches away on the toilet seat and let it dry. Don't spray too close or over spray or you'll get drips and bubbles. I waited about 30 or so minutes in-between each coating.

STEP 6: Repeat step 5 as many times as you need to for desired results. (*previous website warned not to over-spray or it won't look good)

STEP 7: Once completely dry (which according to the can, and by can I mean paint (pun fully intended), it should be "dry enough to handle in 1 hour/ fully dry in 24 hours"), & return your *LIKE NEW* toilet seat to your throne.

It really is a great transformation because this re-painted toilet seat now looks as clean as it is! It will sparkle and shine so much they may give us a bonus in addition to our deposit! Ha! Not likely. But the new tenants will be happy with their toilets, and what's not to love about that?

Now if you'll excuse me, I've got to go pack! ;)

*This post contains product links, added for your convenience. As an Amazon Associate I earn from qualifying purchases.


Where you'll find me:
SHOPS: Etsy: Shannon Sorensen Designs + Fairface Washcloths AND FairfaceWashcloths.com
FACEBOOK: SSorensenDesigns AND FairfaceWashcloths
TWITTER: @ShannonSews1
INSTAGRAM: ShannonSorensenDesigns AND FairfaceWashcloths
YOUTUBE: youtube.com/ShannonSews
SUBSCRIBE (never miss a post!): Subscribe to ShannonSews
BLOGLOVIN: ShannonSews on Bloglovin

Saturday, June 21, 2014

6 Summer T-shirt Projects you don't want to miss!

Now that summer is upon us, it's time to get your craft on! 

Check out these 6 Must-have T-shirt Projects and be sure to add them to your summer activity to-do list!

t-shirt decorating ideas summer kids adults fabric paint, tie dye, ink blot
6 Summer T-shirt Decorating Projects you don't want to miss! © ShannonSorensen

Decorating your own t-shirts gives you countless numbers of ways to express yourself and makes a perfect lazy day summer activity.

 DIY Summer T-shirt Tutorials

Follow these links to get right to the tutorials
Happy Summer!

Choose from a simple to complex design. All you need is a t-shirt, fabric paint, freezer paper, an exacto knife and an iron.

This project is addicting! You'll get a unique, symmetrical design simply by swirling and blopping paint, folding your t-shirt over and tada! You've got one-of-a-kind ink blot t-shirt! Watch me create a few designs on my YouTubeChannel*Ink Blot T-shirt Kits are also available and make a great kids birthday party activity!

Who doesn't love a good tie dye t-shirt in the summer? The popular sunburst design is easy to create with your favorite color dye and a few rubber bands. Use one color or go crazy with two! Cool designs in a snap!

This cute Painted Dots T-shirt can be made by using a round make-up sponge and your favorite fabric paint. Use round make-up sponges for the dots, or try wedges for a geometric design. The varieties are endless!

Making your own imprinted design allows you to capture the detail of an object, and transfer it right onto your t-shirt. Whether you use metal keys, or another interesting object from around the house, you'll be amazed at how cool this design method can be!

Interested in playing around with natural dyes? Who would have thought black beans could create a cool t-shirt dye? I didn't until I tried it. Not only do black beans work well as an all-natural dye, but so do everyday foods like spinach, onions, berries and deep colored spices like turmeric. Although the process requires a little more preparation, it certainly is fun to try!


Once you try some of these fun summer t-shirt decorating projects - I'd love to hear how they turned out!


Linked to:
http://alittleclaireification.com/2014/06/20/patriotic-recipes-crafts-best-of-the-weekend-party/
http://www.reasonstoskipthehousework.com/skip-housework-24/
http://too-much-time.com/
http://www.bedifferentactnormal.com/2014/06/show-tell-saturday-062114.html
http://www.whatscookingwithruthie.com/2014/06/20/super-saturday-49/

SUBSCRIBE (never miss a post!): Subscribe to ShannonSews
BLOGLOVIN: ShannonSews on Bloglovin
FACEBOOK: facebook.com/SSorensenDesigns AND facebook.com/FairfaceWashcloths
TWITTER: @ShannonSews1
INSTAGRAM: ShannonSorensenDesigns on Instagram
SHOP: Shannon Sorensen Designs + Fairface Washcloths
YOUTUBE: youtube.com/ShannonSews

Monday, April 28, 2014

How to fix a hole in your t-shirt: tutorial

fix a hole in your t-shirt tutorial
It's been a while since I've shared a tutorial, and since my how to fix a hole in gauze or light-weight fabric post has been so popular, I thought I'd share how to fix a hole in t-shirts that might also be of help.

You know those holes. The little ones that suddenly pop up on your t-shirts. Where did you come from?? Let them sit...and slowly they start to get bigger.

Well have no fear! There's a quick and easy way to stop those little t-shirt holes in their tracks and make them look like they were never there at all.

How to fix a hole in your t-shirt

fix a small hole in your t-shirt: quick fix instructions
Supplies Needed
(*product links included)
Stitch Witchery
Light-weight Stabilizer
Parchment Paper
Iron
Ironing Board
Damp, clean, non-terry cloth
Straight Pin or safety pin
Scissors


Step 1: Put a medium-sized piece of parchment paper down on your ironing board. Turn your t-shirt inside out and place it on your ironing board on top of your parchment paper and locate the hole you want to fix. *The parchment paper under your t-shirt will prevent the stitch witchery from accidentally adhering to your ironing board.

tutorial how to fix a hole in t-shirt quick, easy

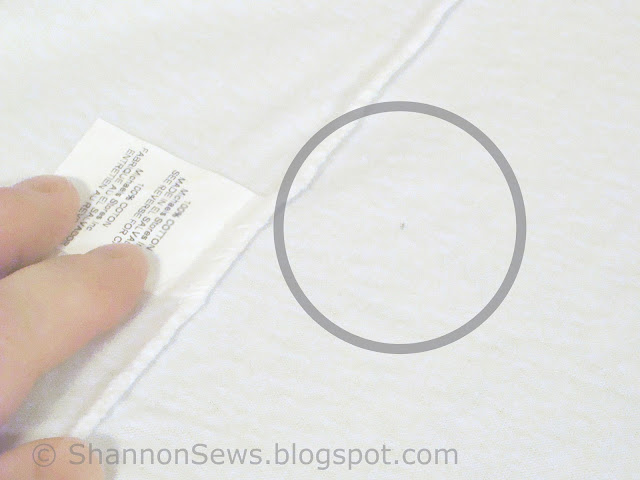
Step 2: Using your pin, gently pull and tuck the fibers around the hole to come together as closely as possible.


fix t-shirt rip, hole with stitch witchery

Step 3: Cut a small piece of stitch witchery and a bigger piece of light-weight stabilizer. Place stitch witchery directly over t-shirt hole and place stabilizer over the top of that. Turn on your iron according to the stitch witchery instructions and grab your damp towel cover.


DIY fix t-shirt hole with stitch witchery and stabilizer


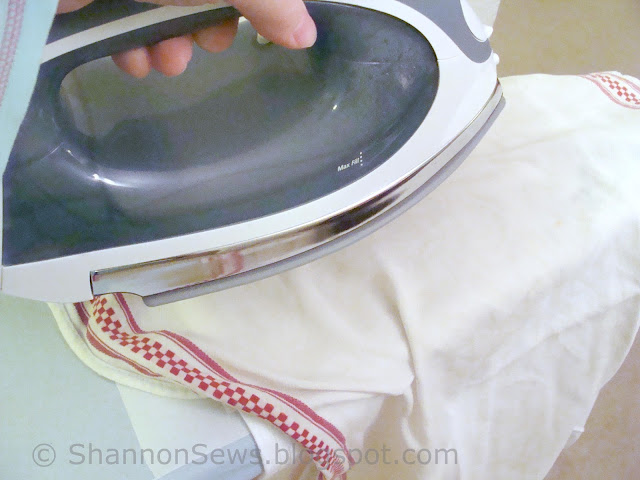
Step 4: [Your layers should be as follows: Ironing board + Parchment Paper + T-shirt + Stitch Witchery + Stabilizer + Damp Cover Towel + Iron]. Following the instructions on the stitch witchery package, "glue" stitch witchery in place.


using stitch witchery mend t-shirt hole

Step 5: Once completed, carefully remove your hot towel and check your results. Check to make sure the hole completely fused closed from the front and the stabilizer is secure inside. Repeat if necessary.

The outside results should appear as if the hole was never there. The inside of the t-shirt will have a small piece of stabilizer attached to secure the fixed hole. You can cut the stabilizer down to be smaller inside if needed.

how to mend a hole in your t-shirt a DIY tutorial


This method also works well on slightly bigger rips by using bigger pieces of stitch witchery and stabilizer.

Remember to check out the post on how to fix holes in light-weight fabric such as a shirt or skirt with this same method, with great results!

*This post contains product links, added for your convenience. As an Amazon Associate I earn from qualifying purchases.


SUBSCRIBE (never miss a post!): Subscribe to ShannonSews
BLOGLOVIN: ShannonSews on Bloglovin
FACEBOOK: facebook.com/SSorensenDesigns AND facebook.com/FairfaceWashcloths
TWITTER: @ShannonSews1
INSTAGRAM: ShannonSorensenDesigns on Instagram
SHOP: Shannon Sorensen Designs + Fairface Washcloths
YOUTUBE: youtube.com/ShannonSews

Sunday, April 13, 2014

Green Household Cleaning Tips & Recipes

green, non-toxic cleaning recipes, alternatives, home and laundry
Green, non-toxic cleaning recipes and tips © ShannonSorensen
I have been obsessed lately with Green Cleaning Alternatives for Laundry and around the House. Obsessed! My Pinterest board overfloweth.

My recent share about removing yellow laundry stains with hydrogen peroxide has been buzzing. I'm guessing there are many of you out there looking for greener alternatives in your lives as well!


Non-toxic Green Cleaning Ideas for your Home & Laundry

Green Cleaning Products:

The first time I used white vinegar and baking soda to clean the bathroom sink, I was over the moon with excitement! It fizzes! It bubbles! It cleans without harsh chemicals!

And at that moment, not only was I hooked on vinegar and baking soda (you had me at fizz), but I was on a mission to find greener, non-toxic alternatives to cleaning my home! Woohoo!

Here are a few of my favorite must have's:

BAKING SODA (fights odors and gently scrubs)

WHITE VINEGAR (antifungal, kills germs and bacteria) - part vinegar + part water + pure peppermint essential oil = great multi-purpose spray (with minimal vinegar scent)

HYDROGEN PEROXIDE
 3% - powerful disinfectant *especially when sprayed over vinegar - not pre-mixed; whitener and alternative to bleach, so careful where you spray it.
Tip: Once open, hydrogen peroxide begins to deteriorate its effectiveness. Keep stored in original brown container and swap off a spray top from another bottle to spray directly.

PURE ESSENTIAL OILS not only smell great, but have cleaning/anti-fungal properties, depending on the oil.

DAWN DISHWASHING LIQUID not sure how "green" it is, but it de-scums showers, aids in removing yellow sweat shirt stains and re-de-fines what I thought dishwashing liquid could do!

SPRAY BOTTLES I stocked up on empty spray bottles at Home Depot - good quality for under a dollar each!

GLASS CANNING JAR (or other like container) to store/shake Baking Soda. Poke holes in the top of the lid and use it to shake out baking soda for cleaning jobs.

CLEANING RAGS to be used and washed millions of times to eliminate waste!


Green cleaning Recipes and Uses:


KITCHEN
My go-to all purpose cleaner for Counters, Stove & Sink - mix 50 white vinegar / 50 water solution + pure peppermint essential oil in a spray bottle and use as daily anti-fungal/disinfectant to wipe down counter, stove top and sink. For a little extra scrub, after spraying the 50/50 mix, shake baking soda in the sink and let it fizz. Then wipe clean. Awesome.

If cooking with raw meat, spray hydrogen peroxide over the top of the 50/50 spray and then wipe. (*see note above for hydrogen peroxide)

I have also put a couple drops of pure lemon essential oil on a warm rag and wiped everything down after spraying with the 50/50 mix. Mmmmm. It smelled so fresh and bright! It's fun to try different essential oils.


BATHROOM:

Tub: Option 1
Straight vinegar or 50/50 mix (depending on cleaning need). Heat in microwave and pour warmed mixture into spray bottle. Add a few generous squirts blue Dawn liquid soap. Shake. Spray shower and tub down generously. Leave to let soak. After soaking, wipe down and rinse. *Modified from One Good Thing by Jillee

**This mix works like a charm, but smells really strong (especially when using straight vinegar) and can be a bit overwhelming while sprayed. Make sure to run your exhaust fan and leave the door/window open for ventilation. ***Another option that I like is to combine this cleaning mixture in a bucket and use a rag or sponge to wipe it over all tub and shower surfaces and let sit, instead of spraying it on...although I could do without it dripping down my arm...

For a mild scouring powder: shake baking soda around the tub. Spray with a little 50/50 mix and scrub.

For mildew spots: Mix hydrogen peroxide + baking soda into a paste. Apply with an old tooth brush to mildew spots and let sit for 30 minutes or so before rinsing.


Tub: Option 2
Mix a squirt of liquid soap (i.e. castile liquid soap: see also natural cleaning solutions) + pure essential peppermint oil to 1 c. baking soda. Form a paste by adding water to the mixture and use it to scrub your tub and sink. *adapted from Martha Stewart

***This mix worked great, although a little more scrubbing than option 1. The peppermint smelled like I collided with a toothpaste truck. In a good way. Fresh and clean. Other antibacterial essential oils you could choose from are: tea tree, eucalyptus, or rosemary. Here's a link to an Essential Oils Directory I found (just a resource, not a product endorsement).

For mildew spots: Hydrogen peroxide mixed with baking soda into a paste. Apply with an old tooth brush and let sit 30+ minutes before rinsing.


Sink/Vanity
Spray 50 white vinegar/50 water mixed with + your favorite essential oil all over sink and vanity. Shake baking soda on top of spray to use as mild scrubber. I sometimes spray hydrogen peroxide over the top of the vinegar/water mix to act as an extra disinfectant. Wipe everything down.

For a lingering fresh smell: After cleaning, take a cotton ball with a few drops of essential oil and wipe around areas that won't get wet, to leave a fresh scent throughout the bathroom for longer. (so far I have used lavender and lemon)


Toilet
Spray 50 white vinegar/50 water spray followed by Hydrogen Peroxide sprayed right out of the brown bottle all over the toilet and seat. Wipe down.
Toilet Bowl- Spray 50/50 vinegar/water mix under the rim and in the bowl and shake baking soda all over inside bowl. Let it fizz...use toilet brush to scrub. Spray Hydrogen Peroxide under the rim with the original brown bottle, + in the toilet, and let it sit for 30 min. without flushing.


LAUNDRY
▪Pre-lauder: erase yellow ring-around-the-collar or other yellow shirt stains with this recipe. It really works!
▪Brighten whites with 1/2 c hydrogen peroxide to laundry wash cycle
▪Add 1/2c-1c vinegar to rinse cycle as a natural fabric softener
▪Add shakes of baking soda to wash cycle to soften and remove funky smells
▪Add a few drops of pure lavender essential oil to rinse cycle for sheets, towels or all your loads!

I am thrilled with these greener, cleaner, non-toxic cleaning options! True, you have to get used to it smelling like you just dyed Easter eggs once-in-a-while from the vinegar smell, but by adding peppermint essential oils, it takes most of the harsh vinegar smell away.

♥♥♥♥♥♥♥♥♥♥♥♥♥♥
+I have re-defined what it means to have a clean home.
+Clean doesn't mean harsh chemicals or bleachy smells.
+I am amazed at how clean things can be with the purest of ingredients.
+Try it - you'll be hooked!


SUBSCRIBE (never miss a post!): Subscribe to ShannonSews
BLOGLOVIN: ShannonSews on Bloglovin
FACEBOOK: facebook.com/SSorensenDesigns AND facebook.com/FairfaceWashcloths
TWITTER: @ShannonSews1
INSTAGRAM: ShannonSorensenDesigns on Instagram
SHOP: Shannon Sorensen Designs + Fairface Washcloths
YOUTUBE: youtube.com/ShannonSews

Friday, February 7, 2014

DIY Bath & Body Works Foaming Hand Soap

copy cat bath and body works make your own foaming hand soap refill peppermint
My sister gave me Twisted Peppermint Foaming Hand Soap from Bath and Body Works for Christmas. Mmmmm! It smells SO good and lifts my spirits every time I use it!

Did you know that Peppermint oil has been shown to increase energy and mental clarity? Um, yes to both please!

So as the bottle began to run low, you can imagine my feelings of woe, never wanting this magic bottle of foaming hand soap to end....so when I stumbled upon this great DIY recipe for foaming hand soap, from Wellness Mama, I knew I'd hit the jackpot!

Bath & Body Works Peppermint Foaming Hand Soap DIY


By combining simple ingredients like distilled water, Peppermint Castille Soap (liquid)  & a dash of oil (I used jojoba oil since it's what I had on hand), the perfect copy cat version of Bath and Body Works Twisted Peppermint foaming hand soap was born! No more crying, now I have a lifetime of refills! And energy to boot!

Be sure to check out the recipe - it's so easy to make! Other DIY foaming hand soap recipes use vegetable glycerin instead of a colored oil and I think I'll do that next time, since it does leave a little yellow jojoba oil floating on top. But nothing a little shake-shake can't help.

I love using DIY skin care products and household cleaning products when I can, because I know exactly what I put in them and always look for gentle ingredients that won't irritate my sensitive skin. My next batch will be using Lavender Castille Soap to make my own foaming shower soap! It only seems to work in a foaming soap container, so don't throw them out when you're done with the bottle!

SUBSCRIBE (never miss a post!): Subscribe to ShannonSews
BLOGLOVIN: ShannonSews on Bloglovin
FACEBOOK: facebook.com/SSorensenDesigns AND facebook.com/FairfaceWashcloths
TWITTER: @ShannonSews1
INSTAGRAM: ShannonSorensenDesigns on Instagram
SHOP: Shannon Sorensen Designs + Fairface Washcloths
YOUTUBE: youtube.com/ShannonSews
Tuesday, January 7, 2014

Remove yellow shirt stains + ring around the collar with hydrogren peroxide

natural bleach alternative get ride of yellow collar stains mens shirts
I often get obsessed with things, and then leave them in the dust for the next big thing. I'm fickle that way. Right now I'm all about "DIY Green Cleaning" my house and laundry.

You should see my Practical/Useful Pinterest Board! It quickly turned into a mass of vinegar, baking soda, lemon, essential oils and hydrogen peroxide cleaning recipes. And it's official. The next obsession has begun.

Don't even get me started with DIY green house cleaning tips, or I'll have you here til midnight, so lets save that for another post. 

Today, I'll share a whitening non-bleach alternative laundry tip that saved us $200 in men's dress shirts! It's truly a miracle cure for removing yellow shirt stains and ring around the collar from my husband's dress shirts. They are like NEW!

Remove yellow stains + ring around the collar

Okay, lets give you the before and after again. Just for the shock effect.
BAM!
using hydrogen peroxide in your laundry to whiten yellow shirts
It's totally real. Not just photoshopped. It will change your life. It will save you money. Let me tell you how its done.

I stumbled upon this miracle cure for removing yellow shirt stains on One Good Thing, by Jillee. If I could hug her, I would. She has a great blog with lots of fantastic tips.

Non-Bleach Alternative for removing yellow shirt stains

What you'll need (*includes product links for easy access):
Small bowl to mix
Scrub brush (mild enough for clothing)
Surface to scrub (inside kitchen sink works well )

Ingredients:
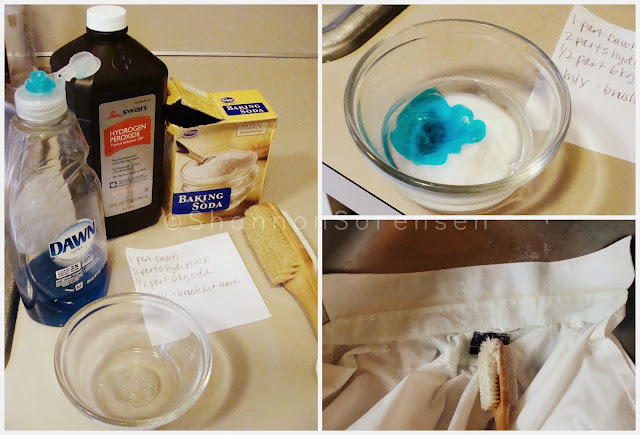
1 part blue Dawn liquid dish soap (*I used 1 Tbsp)
2 parts Hydrogen Peroxide (*2 Tbsp)
1/2 part Baking Soda (*1/2 Tbsp)

Instructions:
Mix together Dawn, Hydrogen Peroxide, and Baking Soda
Gently spoon/pour mixture onto yellow areas
Scrub mixture into shirt with scrub brush
Leave untouched for about 2 hours (that worked for me)
Launder as usual

use hydrogen peroxide to remove yellow collar and mens shirt stains

My husband was shocked and amazed when he came home to see his "new" white dress shirts!
I didn't spare him any details on how I had miraculously saved the day. ha!

*Update: FOR COLORED SHIRTS: I tried it on my husband's light blue shirt and it worked about half as well as it did on white. However, it did remove enough of the stain to make the shirt wearable, so good enough for me!
green laundry using hydrogen peroxide to whiten and remove yellow collar stains

*This post contains product links through Amazon.com and as an Amazon Associate we earn from qualifying purchases.

Linked to: http://www.aglimpseinsideblog.com/, http://www.livelaughrowe.com/, http://www.thecraftyblogstalker.com/, http://www.allthingswithpurpose.com/, http://www.iheartnaptime.nethttp://www.keepingitsimplecrafts.com/ http://sewmanyways.blogspot.com,  http://www.flamingotoes.com,  http://www.niftythriftythings.com/,  http://www.thegirlcreative.comhttp://diyshowoff.com/,  http://www.linesacross.com/,  http://www.sewcando.com/,  http://www.craft-o-maniac.com/,  http://www.skiptomylou.org/,  http://www.madincrafts.com/,  http://www.ishouldbemoppingthefloor.com/, http://www.allthingswithpurpose.com/ 

SUBSCRIBE (never miss a post!): Subscribe to ShannonSews
BLOGLOVIN: ShannonSews on Bloglovin
FACEBOOK: facebook.com/SSorensenDesigns AND facebook.com/FairfaceWashcloths
TWITTER: @ShannonSews1
INSTAGRAM: ShannonSorensenDesigns on Instagram
SHOP: Shannon Sorensen Designs + Fairface Washcloths
YOUTUBE: youtube.com/ShannonSews

Saturday, October 12, 2013

Add water bottle holders to a fanny pack

how to add water bottle holders to a fanny pack
{photo: Add water bottle holders to a fanny pack © ShannonSorensen}
Sometimes I embarrass myself. Sometimes the thrifty-crafty-I-can-make-it-myself side takes over and I should hide my head in shame, but instead I share my faux-pas on the internet.

Since taking up biking, I've needed a fanny pack with water bottle holders for long rides. Many of the good ones are a little pricey and don't have 2 water bottle carriers, so I've been left toting a heavy backpack. Ugh.

In a *frenzied moment* when I was due to go out on the bike in 15 minutes and couldn't bare the thoughts of lugging a heavy backpack again, I grabbed whatever I had on hand (enter: thrifted shower curtain loops + elastic) and slapped this baby together. And I do mean slapped.

It wasn't my best work by any means (mismatched fabric, thread and elastic) and I'm a little embarrassed when "real bikers" pass me and pray they don't laugh at my DIY fanny pack bottle holders, but it did the job. Who needs dignity anyway, when you're wearing biking shorts that feel like a big adult diaper? At least I'd be hydrated.

Here are some quick how-to's:

Add water bottle holders to a fanny pack

easy way to add water bottle slings to fanny pack
{photo:  © ShannonSorensen}
What I did, in the hurried / thrifty version was to cut loops off the top of a thrifted fabric shower curtain to use as the bottle slings, and elastic to secure the water bottles. In my perfect version, I would have used coordinating fabric or nylon webbing (like backpack straps) + matching elastic.

1. Determine the length of your slings.
If there are water bottles you use most often, measure their length to determine how long you need your slings to be. The elastic will help make up for differences in width, but if your bottles are longer, you'll need longer strips for your slings.

2. Cut strips of coordinating fabric for your sling strips. Choose fabric or material that coordinates with your fanny pack or use nylon webbing (like backpack straps). The sling length should be a little over 1/2 to 3/4 the length of your water bottle. The width should be about 1-1/2 inches or more.

3. Sew one end of your sling strip to the waist belt of your fanny pack.

4. Cut 4 pieces of coordinating elastic. Two for each side. Measure the length of elastic by wrapping it around your water bottles and cut it so it fits snug.
make a fanny pack with water bottle carriers
{photo © ShannonSorensen}

5. Sew the elastic to the sling strips - 1 about 1/3 of the way up from the bottom and the 2nd at the top of the sling strip which you will also attach to the waist band of the fanny pack.

And that's about it. It really doesn't take a lot of time and has been a life saver on longer bike rides.

Every time I use this water-bottle-toting-fanny-pack the gunslinger song from old westerns goes through my head and I feel like spinning my water bottles and tossing them back in the holsters.

Saturday, October 5, 2013

Arrows T-shirt DIY with stencil and fabric paint

arrow t-shirt with stencil and paint diy
{DIY Arrow T-shirt © ShannonSorensen}
I just realized I haven't posted since September. Time has whirled by since school started!

We had such a beautiful Seattle summer, but last weekend it started raining again. I mean a lot of rain. Buckets.

During our torrential downpour, I decided to put my craft on. Time to give some life to this plain blue t-shirt.

I love all the arrow designs I'm seeing lately, so I decided to create my own.


How to Make a Stenciled Arrow T-shirt:

(*product links included for your convenience.)
PRINT & CUT STENCIL: Find a clip art image online, print it on heavy card stock & cut it out with a craft knife tool

OR Use a this cute pre-made arrows stencil


how to create a stencil for arrow t-shirt design
{Make an Arrow Stencil © ShannonSorensen}

1. PROTECT YOUR FABRIC: I ironed a piece of freezer paper to the inside of my t-shirt so the paint wouldn't go through. You can also use a piece of cardboard.

2. FABRIC PAINT: I like SoSoft fabric paint because it leaves a flexible, soft finish. Put a piece of saran wrap on a plate or surface for easy use and clean up.

3. APPLY PAINT: Hold down stencil and use a foam brush or other applicator and gently blot paint through the stencil on the shirt. Move stencil as needed and repeat.

4. FINISHED DESIGN: Let your painted design dry. SoSoft Paint doesn't require ironing to set the color, but once dried, you can heat set paint with a dry hot iron (using a cover cloth) for 2-3 minutes.
Instructions for making a stenciled painted t-shirt design with arrows
{Instructions for making an arrow painted / stenciled t-shirt © ShannonSorensen}

I love the way it turned out! It's fun by itself and a pair of jeans, with a black long-sleeve t-shirt under it, or paired with a jacket or cardigan.
DIY Painted Arrows T-shirt finished
{DIY Arrow Stenciled T-shirt © ShannonSorensen}

Arrow t-shirt, how to make your own with paint and stencil
{Painted Arrows T-shirt DIY © ShannonSorensen}

The wheels are still turning as I try to come up with a design for my other plain t-shirt...and speaking of turning wheels, it's time to go for a bike ride. It's been a week or so since I've been able to go because of the rain, but we're getting a break today!

(*This post contains product links, added for your convenience. As an Amazon Associate I earn from qualifying purchases through Amazon.com. )


SUBSCRIBE (never miss a post!): Subscribe to ShannonSews
BLOGLOVIN: ShannonSews on Bloglovin
FACEBOOK: facebook.com/SSorensenDesigns
TWITTER: @ShannonSews1
INSTAGRAM: ShannonSorensenDesigns on Instagram
SHOP: Shannon Sorensen Designs + Fairface Washcloths
YOUTUBE: youtube.com/ShannonSews

Linked to: http://www.uncommondesignsonline.comhttp://sewmanyways.blogspot.com/http://www.flamingotoes.comhttp://www.niftythriftythings.com/http://diyshowoff.comhttp://www.keepingitsimplecrafts.com/http://www.ishouldbemoppingthefloor.comhttp://sewcando.blogspot.comhttp://craftomaniac.blogspot.com,   http://www.madincrafts.com,  http://www.sugarbeecrafts.com/,  http://www.hopestudios.blogspot.com/http://www.skiptomylou.org, http://becomingmartha.com/, http://www.504main.com, http://www.thirtyhandmadedays.com

Tuesday, August 27, 2013

DIY Lavender Water: Make your own

Make your own lavender water recipe and instructions
{Make your own Lavender Water © ShannonSorensen} 
If you've never made one thing I've taught you, you need to make this. It will change your life! And I'm not just being overly dramatic.

Going to the lavender farm on San Juan Island was a life-long dream of mine. And boy, oh boy was it worth the wait.

The gentle scent of lavender is one of the most soothing smells there is. It's like a summery breeze that sweeps over you as it lifts and carries your worries away. (Sigh)

Making your own Lavender Water is incredibly easy, and only takes a few ingredients. It not only smells dreamy, it has health benefits as well (see below). And as I always say, if it's simple enough for me to make, you can certainly do it!


How to Make Lavender Water 

Supplies:
easy to make lavender water tutorial
{Easy Lavender Water Tutorial  © ShannonSorensen}

Directions:
  • Pour 2 cups distilled water through funnel, into a jar or directly into your spray bottle.
  • Drop 16 drops of lavender essential oil into the distilled water (1 oz. oil to 1 oz. water)
  • Add 2 Tbsp Witch Hazel (or other emulsifier listed above)
  • Shake before each use
Your lavender water is ready to use!


Benefits / Uses of Lavender Water


  • Induces relaxation and helps ease anxiety
  • Spritz your sheets at night to sleep better! Lavender lowers heart rate & blood pressure, promoting relaxation
  • Freshen the house, linens, closets, hampers, and more
  • Spray on beds, sheets and pillow cases to keep dust mites away
  • Use when ironing fabrics for that extra fresh scent
  • Spritz baby's crib before nap time
  • Use it as an air freshener near a baby's hamper
  • As a natural anti-inflammatory, spritz your skin, pillow cases and linens to help reduce itching, swelling or red skin (do a spot test to make sure you skin's not too sensitive)
  • Calms nerves, lowers stress and anxiey
  • Can ease breathing with colds and stuffed sinuses (*try steam treatment with lavender water)
  • Soothes sunburns, scrapes and bug bites with a few spritzes
  • Heat lavender water for a soothing foot soak
  • Keep in the fridge and spritz on a hot day to refresh and cool yourself down
  • Dip a soft washcloth in lavender water & use as a cool or warm compress to relieve headaches
  • Spritz yourself before going outdoors to repell insects!
  • Can increase the effectiveness of other relaxants for insomnia, anxiety and depressants (see doctor)
  • Spray household surfaces as a disinfectant
  • Add lavender oil directly to bathwater to improve mood and promote circulation
  • Add lavender oil to laundry rinse water to freshen clothes


It's safe to say I have sprayed just about everything that is spray-able in our house with lavender water! It smells so fresh and clean, and really is calming. I spritz our bed every night and I swear I've been sleeping better. It just makes you feel so much more calm and peaceful.

In a burst of enthusiasm, I asked my husband if it would be okay to spray our "under-clothes" with lavender but he wasn't so keen riding from his office to the car in a shuttle full of men, while smelling like lavender. I don't blame him. ha!
Uses and benefits of lavender water
{Lavender Farm San Juan Island © ShannonSorensen}
*affiliate links have been included for your convenience. As an Amazon associate I earn from qualifying purchases.

SUBSCRIBE (never miss a post!): Subscribe to ShannonSews
BLOGLOVIN: ShannonSews on Bloglovin
FACEBOOK: facebook.com/SSorensenDesigns
TWITTER: @ShannonSews1
INSTAGRAM: ShannonSorensenDesigns on Instagram
SHOP: Shannon Sorensen Designs + Fairface Washcloths
YOUTUBE: youtube.com/ShannonSews

Linked to: http://sewmanyways.blogspot.com/, http://www.flamingotoes.com, http://sewchatty.blogspot.com/,http://www.ishouldbemoppingthefloor.co m, http://sewcando.blogspot.com, http://makingtheworldcuter.blogspot.com, http://www.skiptomylou.org, http://diyshowoff.com http://www.abowlfulloflemons.net/, http://www.craftyconfessions.com/, http://www.hopestudios.blogspot.com/, http://bebetsy.com/, http://www.diybydesign.blogspot.com/, http://www.733blog.com/,http://www.sew-much-ado.com/, http://www.mygirlishwhims.com/,http://somedaycrafts.blogspot.com/, http://www.creationsbykara.com/http://www.gingersnapcrafts.com/, http://raegunwear.blogspot.com/ , http://sparklesandastove.com/things-pretty-linky-party-23-features/, http://myfashionforwardblog.com/, http://www.theshabbycreekcottage.com, http://www.aglimpseinsideblog.com/, http://www.houseofhepworths.com/, http://www.the36thavenue.com/ , http://www.livelaughrowe.com/ , http://www.thecraftyblogstalker.com, http://www.allthingswithpurpose.com

Sunday, July 21, 2013

Black Bean Tie Dye Shirt: Natural Dyes

DIY black bean dye tie dyed t-shirt
{Photo: Tie Dye Blue T-shirt using all-natural Black Bean Dye}
Who knew black beans weren't just for dinner anymore?

I have to say, I'm still in awe at the outcome of this black bean tie-dyed t-shirt. Blue dye. From black beans. Who would have thought??

Well, a bunch of people, actually, because there is a lot of natural dying going on out there that I didn't even know existed. And it's not just with black beans.

Natural dyes are made from pretty much everything in nature. Flowers, fruits, spices, vegetables, herbs, legumes...you name it.

The colors you can get from natural dyes are beautiful, and truth be told, there's just something that feels good about using natural dyes as opposed to chemical ones. Here are a few Natural Dye sites I pinned on Pinterest (one of my favorites is the turmeric tank top).

How to Make Blue Dye from Black Beans

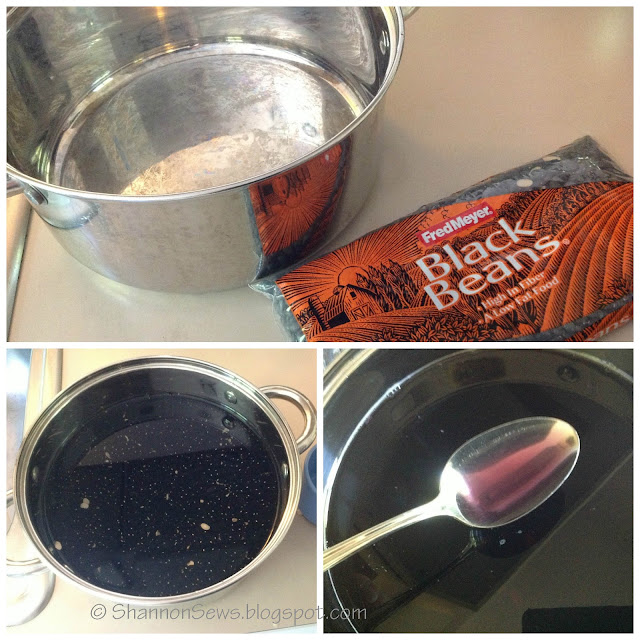
*Soak black beans in a pot of water for 24-36 hours, stirring occasionally. I used 1 bag of dried black beans and about 8 cups of water. I wanted to make sure the beans didn't soak up all the liquid.

*This natural dye tutorial is a great resource for how many beans vs. how much water, along with other details about making dye from black beans.

Several hours in, I checked and my water had turned purpley. Exciting!

How to make blue dye from black beans
{Photo: Make natural blue dye from black beans}


Get your Shirt Black Bean Dye-Ready 

This is where I failed.

Bind black bean dye color to shirt using Alum and Cream of Tartar
{photo: mortant cotton shirt}
In order for the black bean dye to adhere to the cotton shirt, you have to mordant it with Alum and Cream of Tartar. Again, refer to the above link for instructions on this process.

The problem I ran into, is that this chemical process requires you to cook your shirt for 1 hour in a pot you will not use again (toxic). I didn't have an old pot and after scouring a couple thrift shops, didn't want to spend $10 for a used stock pot I would never use again. Call me cheap, but this old white t-shirt wasn't even worth $10. I would take my chances for it to fade away, since it may not even turn out anyway.


Soak your shirt in Black Bean Dye

After letting the beans soak about 30 hours (*and a couple hours since I last stirred) I removed the liquid from the beans by carefully straining it through a mesh strainer into mason jars. You don't want debris to come up from under the beans and cloud your dye, so do it carefully or ladle it off the top.

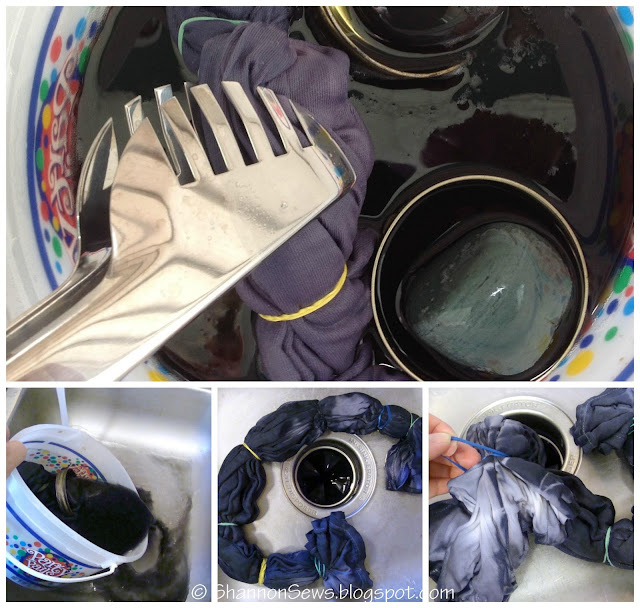
I wetted my white t-shirt, folded it in a fan pattern, and rubber-banded it to give it tie-dye stripes.
After adding the black bean dye to my shirt in a small bucket, I set it outside for about 36 hours.


All natural black bean dye creates blue hues the longer you soak your shirt
{photo: Tie dye shirt soaking in black bean dye}

The Black Bean Dye T-shirt Reveal

~Mid-way through I checked on it and it was certainly more purple than before it went in! (if you're wondering, I used rocks w/ mason jar lids to weigh down the shirt in the dye)
~By the time 36 hours rolled around (bottom small pictures), it was quite a bit darker and more blue.

~Dump the black bean dye down the sink.
~Remove the rubber bands and rinse shirt thoroughly with cold water. Excitement mounting!


Make blue dye from black beans after soaking shirt for 36 hours
{Photo: Black bean dye turns shirt blue after a 36 hour soak}


And holy moley, that's what the black bean dye fuss is all about! So cool! I love the pattern. Reminds me of bamboo. I love the color. I love that this was made from an all natural dye. And yes, it turned out cool so fingers crossed it doesn't wash out any time soon!


Finished Black bean dye t-shirt: blue tie dye design
Hanging in the breeze - the colors lightened just a bit as it dried.
I couldn't help myself from glancing at it out the window.
Glorious.

natural black bean dye creates blue results
{Photo: Results: Blue tie dyed t-shirt from all natural black bean dye}

 Is it weird to want to dye everything in the house?


Similar projects you might like:
Pink Sunburst Circles Tie Dyed Shirt
Dip Dyed T-shirt
Dip Dyed Kitchen Towels


SUBSCRIBE (never miss a post!): Subscribe to ShannonSews
BLOGLOVIN: ShannonSews on Bloglovin
FACEBOOK: facebook.com/SSorensenDesigns
TWITTER: @ShannonSews1
INSTAGRAM: ShannonSorensenDesigns on Instagram
SHOP: Shannon Sorensen Designs + Fairface Washcloths
YOUTUBE: youtube.com/ShannonSews

Linked to: http://sewmanyways.blogspot.com/, http://www.iheartnaptime.net, http://www.flamingotoes.com http://www.niftythriftythings.com/ http://www.ishouldbemoppingthefloor.com, http://sewcando.blogspot.com, http://creatingreallyawesomefreethi ngs.com, http://makingtheworldcuter.blogspot.co m, http://craftomaniac.blogspot.com, http://www.skiptomylou.org, http://diyshowoff.com http://www.linesacross.com   http://www.keepingitsimplecrafts.com/madincrafts.com, http://www.sugarbeecrafts.com/, http://www.hopestudios.blogspot.com/  http://todayscreativeblog.net/http://bebetsy.com http://www.diybydesign.blogspot.com/, http://www.733blog.com/, http://www.sew-much-ado.com/, http://www.mygirlishwhims.com/ http://somedaycrafts.blogspot.com/, http://www.creationsbykara.com/ http://www.gingersnapcrafts.com/, http://www.rolleduppretty.com/, http://raegunwear.blogspot.com/, http://ivyandelephants.blogspot.com/, http://www.adornedfromabove.com, http://www.theshabbycreekcottage.com, http://www.somewhatsimple.com/, http://www.aglimpseinsideblog.com/, http://www.houseofhepworths.com/, http://www.the36thavenue.com/  http://www.livelaughrowe.com/  http://www.allthingswithpurpose.com, http://www.thecraftyblogstalker.com, http://myfashionforwardblog.com/http://becomingmartha.com/, http://www.thirtyhandmadedays.com/, http://www.504main.com/
Blogging tips