Saturday, November 2, 2013

Men's Shirt to Women's Cardigan Refashion

As promised, I jumped on my next refashion project shortly after my successful sweater to cardigan refashion. My sister-in-law said this men's-shirt-to-women's-cardigan refashion, had Anthroplogie appeal...very nice compliment indeed!

refashion men's shirt to women's cardigan
{Refashion: men's shirt to women's cardigan © ShannonSorensen}

When my husband came home and saw my newly refashioned cardigan, he jokingly asked if he needed to lock up his clothes when he left the house, for fear they'd end up women's clothing by the time he came back. I laughed, but secretly my mind started scanning his side of the closet to see if there was anything with potential.

Turn a Men's Shirt into a Women's Cardigan
(husbands beware)


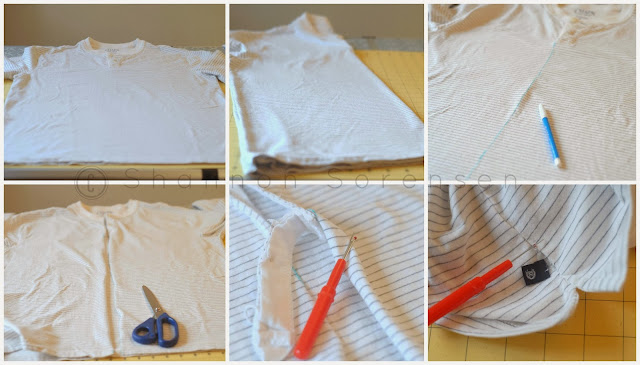
  • Lay out your shirt.
  • Fold shirt in half to find the center.
  • Mark the center with a washable pen.
  • Cut up the center line of your shirt.
  • Unpick any necessary seams.
  • Remove any unwanted tags.

turn a mans shirt to womens cardigan refashion
{Refashion tutorial: shirt to cardigan © ShannonSorensen}


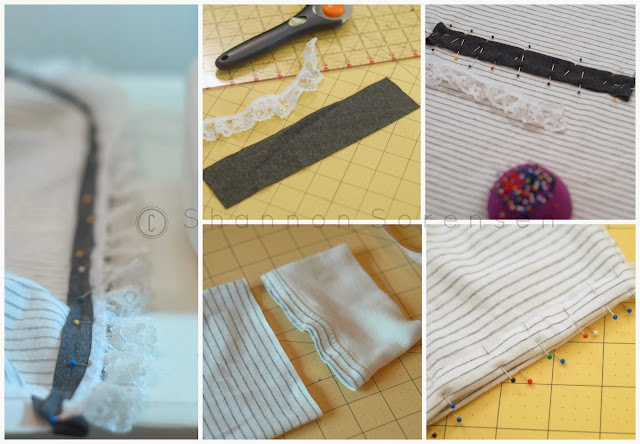
  • Decide on coordinating binding. I cut up a soft xl clearance men's gray turtle neck.
  • Measure how long your binding needs to be.
  • Cut two strips for each side of your cardigan opening. Mine were 2" wide.
  • Trim off any excess or unwanted fabric from the cardigan before you add your binding.
  • Lay the binding right sides together, edge to edge and pin.
  • Using a ball point needle, pressure (1) and slightly wider stitch for stretchy jersey, stitch binding to cardigan. 


DIY sewing project shirt to cardigan
{DIY cardigan from a man's shirt © ShannonSorensen}


  • Your binding should now be sewn to your cardigan.
  • Roll it over to the inside opening of the cardigan, measuring evenly. Mine was rolled over 1".
  • Pin into place. *For the top and bottom edges, see the pictures in the next segment.
  • Check front to make sure the binding looks even.
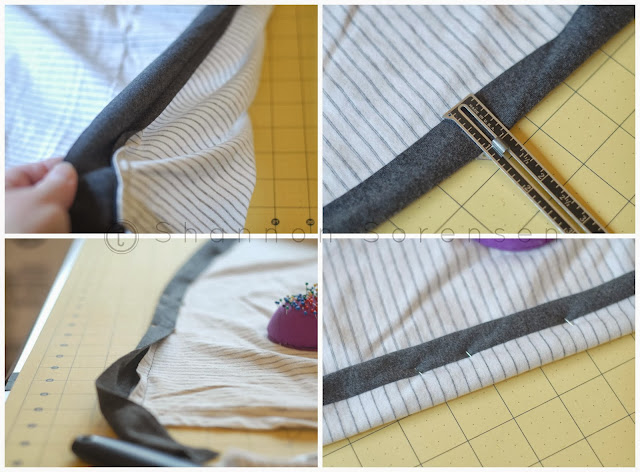
shirt to cardigan refashion how to add binding
{Add binding to create your cardigan: shirt refashion © ShannonSorensen}


  • *To finish binding at the bottom and top, fold under the stitched edge so it's lined up.
  • Next fold the excess binding up over the edge of the cardigan.
  • Now roll the whole binding over and pin.
  • Again, check that binding is even.
  • Stitch on the front side of the binding, avoiding pins, as close to the inner edge as possible. Your stitches will catch the binding inside and secure it.


alter a shirt to a cardigan tutorial
{Refashioned shirt to cardigan: adding binding © ShannonSorensen}

  • To add faux pockets, cut a strips of coordinating bias tape. I wanted to use more of the gray jersey, but it ended up too bulky.
  • Put the cardigan on and determine where you want your pockets, then pin the bias strips evenly on either side of the cardigan, folding under the raw edges on either side. 
  • Stitch as close the the side and bottom edges as you can, leaving the top open.
  • Add lace embellishment if you choose.

how to add / sew faux pockets to a top or cardigan
{How to add faux pockets to a cardigan: refashion © ShannonSorensen}


  • After finishing this much of the cardigan, the front dark gray binding by itself, still felt a little too masculine, so I added a strip of lace to either side of the cardigan opening.
  • To give the back a little detail, I cut a 2" wide strip of the dark grey jersey, folded it over and sewed it closed. After turning it right side out, I pinned the piece down to the middle lower back and embellished it with matching lace.
  • To finish the sleeves, I cut off the binding and simply folded the edges under and sewed.


add lace and hem sleeves to a cardigan refashion

And voila! One man's shirt is another women's treasure.
From shirt to cardigan just like that.

before and after refashioned shirt to cardigan
{Men's Shirt to Women's Cardigan: before & after © ShannonSorensen}

I love the details, especially the back. It gives it just that little something.
turn a shirt into a cardigan tutorial

Not sure what's next on the horizon, but with my to-be-refashioned-pile a mile high, I'm sure there will be something! :)


SUBSCRIBE (never miss a post!): Subscribe to ShannonSews
BLOGLOVIN: ShannonSews on Bloglovin
FACEBOOK: facebook.com/SSorensenDesigns
TWITTER: @ShannonSews1
INSTAGRAM: ShannonSorensenDesigns on Instagram
SHOP: Shannon Sorensen Designs + Fairface Washcloths
YOUTUBE: youtube.com/ShannonSews

Linked to: http://sewmanyways.blogspot.com/http://www.flamingotoes.comhttp://www.thegirlcreative.com/, http://www.crumbsandchaos.net/, http://www.craftionary.net/, http://www.reasonstoskipthehousework.com/, http://www.sugaranddots.com/, http://www.fingerprintsonthefridge.com/, http://www.niftythriftythings.com/,  http://www.scatteredthoughtsofacraftymom.com/,  http://www.sewcando.com/,  http://threemangoseeds.blogspot.com/, , http://www.madincrafts.com/, http://www.craft-o-maniac.com/, http://www.creatingreallyawesomefreethings.com/, http://www.linesacross.com/, http://www.sugarbeecrafts.com/, http://www.hopestudios.blogspot.com / , http://bebetsy.com

Thursday, October 17, 2013

Sweater to Cardigan Refashion Tutorial

How to turn a sweater into a cardigan
{image Sweater to Cardigan Refashion © ShannonSorensen}
It's sweater season again and I've been rummaging through my bags of forgotten sweaters. The ones that don't fit, yet I can't seem to part with.

This v-neck pink argyle sweater has always been one of my favorites, but one day it started fitting tighter and haven't worn it since. Until now.

Give any old sweater new life, by turning it into a cardigan, with this easy refashion tutorial!


How to Turn your Sweater into a Cardigan

1. Choose a coordinating bias tape OR you can make your own or use bias tape with fabric and these tools.

2. Measure the front of your sweater and cut that much bias tape + extra to tuck under on the top and bottom edge. Measure and draw a straight line down the front of your sweater.

3. Cut the front of your sweater using the line as your guide (no turning back now!).


refashion your old sweater into a cardigan with this tutorial
{Sweater to Cardigan Refashion © ShannonSorensen}

This binding will be turned to the inside of your sweater. If you want the binding to show on the outside, follow these steps with the sweater inside out. I'll have a tutorial for this method soon.

4. Pin the binding down with the shorter side flush with the edge of your sweater cut.

5. Fold the top and bottom edge of your binding over and pin.

6. Using a ball point needle (best for sewing with knits), and low pressure (I set my dial to 1) stitch down the creased fold all the way from the top to the bottom edge.
Refashion tutorial turn your sweater into a cardigan
{Refashion: Sweater to Cardigan © ShannonSorensen}

7. Fold the stitched binding over to the inside, covering up the raw edges.

8. Pin the folded binding from top to bottom. Be sure to tuck under the top and bottom edges.

9. Stitch as close the the edge of the binding as you can (the inside edge). My machine has a setting that moves the needle to the left hand side, so that is what I used.

10. Admire your handy work. You're all done!

Sew your own cardigan from an old sweater
{Transform your old sweater into a cardigan step-by-step © ShannonSorensen}

I'm so happy I'll be able to wear this sweater again, transformed into a new cardigan.

turn your old sweater into a cardigan refashion
{Sweater to Cardigan Refashion © ShannonSorensen}

I love the peekabo turquoise accent inside. You would never know it wasn't made this way in the first place.

How to turn a sweater into a cardigan
{Turn a old sweater into a cardigan: tutorial © ShannonSorensen}


refashion project, turn a shirt into a cardigan
{image © ShannonSorensen}
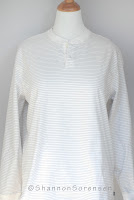
My next project is refashioning this men's long sleeved striped shirt into a cardigan...the wheels are turning! Stay tuned!

SUBSCRIBE (never miss a post!): Subscribe to ShannonSews
BLOGLOVIN: ShannonSews on Bloglovin
FACEBOOK: facebook.com/SSorensenDesigns
TWITTER: @ShannonSews1
INSTAGRAM: ShannonSorensenDesigns on Instagram
SHOP: Shannon Sorensen Designs + Fairface Washcloths
YOUTUBE: youtube.com/ShannonSews


Linked to: http://www.diybydesign.blogspot.com/http://www.mygirlishwhims.com/http://www.creationsbykara.com/,  http://ivyandelephants.blogspot.com/http://www.gingersnapcrafts.com, http://www.firefliesandjellybeans.com, http://www.theshabbycreekcottage.com, http://www.aglimpseinsideblog.com/, http://www.the36thavenue.com/ http://www.thecraftyblogstalker.com, http://www.livelaughrowe.com/ http://www.allthingswithpurpose.com, http://becomingmartha.com, http://www.thirtyhandmadedays.com, http://shabbynest.blogspot.com, http://www.uncommondesignsonline.com/
All Things with Purpose

Monday, September 3, 2012

Refashion a Skirt into a Shirt: Lime Green edition

Refashion a skirt into a shirt
After refashioning my blue ruffled skirt into a shirt, I scoured my closet to see what other skirts I could transform into tops.

This lime green baby had only been worn once because I didn't like where the hemline hit my calf. "You will be a shirt!", I said.


refashion a dress to a skirt or a skirt to a topWant to know a secret? This skirt actually used to be a dress (just like the blue skirt). So as the saying goes, 3rd time's a charm.


I took in the sides just a bit since it was pretty all around flowy. I didn't want to have a Marilyn Monroe moment when the wind blew, if you know what I mean.

sew an easy top by turning a skirt into a shirt


Love the drapy neckline
refashion shirt from a skirt


Want to turn your own skirt into a shirt?

Here are a couple of options:


| Basic guide for turning a skirt into a shirt |
Option 1


Basic guide to refashion a skirt into a shirt
That's how I did it.
But want another cool idea? 

One of my very smart readers suggested flipping the skirt upside down and turning the base hemline into the neckline (see guide below). Makes perfect sense!

| Basic guide for turning a skirt into a shirt |
Option 2

turn your skirt into a top by flipping it upside down
Unfortunately for me, I have a few skirts that no longer fit in the waist (hu hum), so this method won't work for me until I lose a few. Which, lets be honest, isn't going to happen. I keep those "special skirts" to cut up for other refashions. :)


Never miss a post! Subscribe to ShannonSews
Like on facebook.com/SSorensenDesigns
Follow @ShannonSews1 on Twitter
Subscribe to youtube.com/ShannonSews


Linked to:


Monday, August 20, 2012

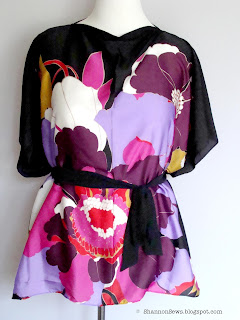
Sew an easy top or dress from two scarves

sew an easy shirt with two scarves
At the beginning of the summer I was on a mission to find 2 coordinating scarves to make into a swanky top, because of this tutorial.

I looked at every thrift store in town, but had a hard time finding them, until I stumbled on two matching scarves. Bonus!

They were 35x35 (larger than I wanted), but as it turns out, it's enough to even make a dress!


Okay, let's get to it.


Here's how I made a lovely breezy top 
from just two scarves 
(& a dress, just to show you how it's done).


find two thrifted scarves to sew into a shirt Start by finding 2 coordinating (or matching) scarves. My scarves are a soft polyester. Thrifted: $3.99 each.


Be sure to set your pressure dial to 1 (so your pressure foot is more gentle on the fabric) and use a small needle (I used a 9) so you don't leave holes in the delicate fabric.


sew shoulder seams but leave opening for neck
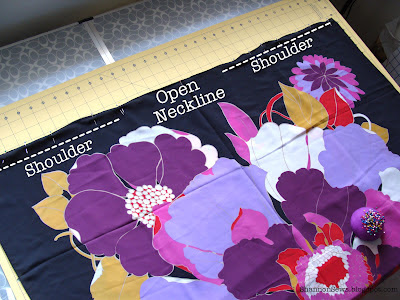
Measure how wide you want your neckline to be. Mine was about 10-11 inches.

Put your scarves right sides together. Mark the center.

Using the neckline measurement, leave measured space open in the center. Pin and sew your shoulder seams.


sew up sides of scarf, leaving sleeve hole open
Next, measure how wide you want your sleeve opening to be and mark it so you know when to stop sewing.

Pin and stitch from the hemline up to stop mark.


Sewn dress made with two scarvesTHE DRESS: If you wanted to make your scarves into a dress, you're all done (I tied a sash around it). Can you believe how easy that was??!! 

If I were totally hip I could see myself wearing this as a dress with dark purple leggings and black shoes.

Dang it! I'm not quite hip enough...so I'll be doing some trimming and turning it into a shirt instead.

But first, here are a few more shots of the dress, without the sash:

  
scarves sewn to make a dress is fashionably flowyWithout defining the waist, its pretty mumu flowy.  Some people can totally get away with that, but not me. I'm mumu enough as it is.


easy flowery shirt sewn from refashioned scarves
THE SHIRT: To make the dress into a shirt, it really is as easy as it sounds = Cut off the bottom.

And hem it. (blah). The purpose of this thrifty project was to find 2 scarves to easily sew into a top. There was to be no hemming. No hemming! It was almost all it was cracked up to be.

I ended up cutting off about 6 inches and hemming the bottom.
Then I added 2 belt loops on the side, to hold my sash in place (it's still mumu roomy without a sash).

Fashion flower pattern is in for fallI love the flow of it. And the flowery colored prints are right on for fall.

Top sewn from two scarves creates a delicate flowy feel

So feminine and pretty. I think I'll be wearing it with a black pencil skirt.
It even created it's own drapey cowl neckline. add belt loops to a shirt to hold a sash at shannonsews dot blogspot dot com

If you've made yourself a shirt or dress out of a scarf, I'd love to see it!
It's so darn easy. 
I'll be on the lookout for more square scarves, this time a little more my size (no hemming ;). ♥


Never miss a post! Subscribe to ShannonSews
Like on facebook.com/SSorensenDesigns
Follow @ShannonSews1 on Twitter
Subscribe to youtube.com/ShannonSews


Linked to:
Tip Junkie handmade 

projects

Monday, August 13, 2012

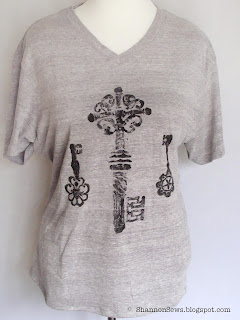
Decorated t-shirt DIY: Key Imprinted Design

key decorated t-shirt

I love old style keys. I would love to sift through a drawer full of them, daydreaming about what doors, suitcases, wooden chests, or jewelry boxes they opened back in their day.  

rows of old style keys

I was so happy with how my Dots Fabric Painted t-shirt turned out, that I had to keep up my momentum and make another.

This time I used fabric paint and yes, metal keys.

T-shirt with key design

Here's how I made this "Key imprinted design" t-shirt, in case you want to make one for yourself!

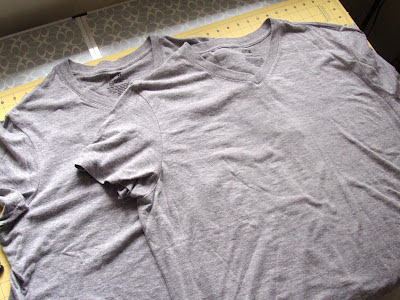
As with my dots shirt, I started with a plain grey men's t-shirt. This was both a re-fit and a refashion. I share my link below, how I re-sized this men's t-shirt for a womanly fit.

Two plain gray t-shirts to decorate

The decorative metal keys, I'd bought at TJ Maxx for home decor, but since I never got them on the wall, why not cover them in fabric paint?!

I laid out my design.

lay out key design

I found a clean old towel to use in-between my shirt layers as protection, but more importantly, to provide cushion for the keys.

For the painted polkadot shirt I designed with sponges, I used a flat/firm surface (cardboard in-between shirt layers).

For the Key tee, I needed something plump in-between the t-shirt layers in order to get all the imprinted details of the key transferred to the shirt.

use towel in-between shirt layers

Tuck the fluffy towel in between shirt layers where you want your keys to be.

towel inserted between shirt layers

Paint the key generously, but not drippy, with black fabric paint, on one side. I use SoSoft Fabric Paint because I love the soft flexible feel it leaves when the paint dries.

paint key with fabric paint

Carefully pick up your painted key and press into the shirt. See how the towel "snuggles" around the key? Got a better word for it?

press painted key on shirt

I helped it a little, just to make sure all the key details transferred to the shirt.

make imprint with key

Carefully remove the key to reveal your design.
Love it!
key leaves painted design imprint

Now on to the next two keys.
Paint them on one side just like you did the first key.

apply paint to next key

And press
press key to leave imprint


details exposed with fabric paint
And press

imprint painted key into shirt

Yay! I love how it turned out.
I left it for up to 48 hours for the paint to dry completely.

painted key design complete


Once fully dry, I heat set the design using a cover cloth, a no steam iron, moving constantly, and 3 minutes of my time.

use no steam iron to set paint

Cool design! My husband was very impressed and said it looked like a designer t-shirt I would have spent $60 bucks on. He really liked the detail the keys left behind. And so did I.

fabric paint set with heat

Next, see this link for how to re-size a men's t-shirt for a woman's fit. It's the same process I used for this t-shirt, but I rounded the hemline, just to be different.

altered big shirt to smaller

Key painted shirt is one of a kind


Never miss a post! Subscribe to ShannonSews
Like on facebook.com/SSorensenDesigns
Follow @ShannonSews1 on Twitter
Subscribe to youtube.com/ShannonSews

Linked to:

Tip Junkie handmade projects

Blogging tips