Monday, February 18, 2019

5 Cold Weather Indoor Craft Ideas to Keep your Kids Occupied

5 simple kid crafts for winter indoor rainy days
Hello everyone! We survived #SeattleSnowmageddon2019 and eventually were able to dig ourselves out of our garage and driveway. It was a doozy of a snow storm, but we had everything we needed to stay warm and keep our tummies way more full than usual for a week (stress eating during an emergency is a real thing).

What I keep hearing from my friends, is while many had enough food to eat, and were lucky enough to have power, they didn't have enough to keep their kids occupied. The stress on parents this past week multiplied as fast as the snowflakes fell and it got me thinking, it might be nice to create a post with activities for kids to do during the cold, and sometimes unexpectedly stormy, winter weather.

I pulled a few of my favorites from the archives that I thought you might like. While being housebound wasn't very fun and cabin fever set in rather quickly, I'm hoping these crafty ideas for cold weather will come in handy for you or your kiddos so no one goes too stark raving mad.

Indoor Craft Ideas for Kids during Cold, Winter Weather


(*affiliate links included in this post. See disclosure below)

Make an Ink Blot T-shirt

kids projects for rainy or wintery days - decorate tshirts with ink blot design
Ink blot t-shirts -an easy, cool, indoor kids activity © ShannonSews
All you need is a blank t-shirt, a piece of cardboard (old cereal box works perfectly), and some fabric paint. This link is to an ink blot t-shirt making party I had at school and the kids LOVED it! They wore their t-shirts for years after.

Keep some fabric paint on hand and, in a pinch, you can use an old shirt that has a stain on it that you can cover up with a paint design.


SUPPLY LIST:
FolkArt Brush on Fabric Paint Beginner Set
Gildan Kids' Ultra Cotton Youth T-Shirt, 2-Pack
Youth Cardboard Shirt Form (or just use the cardboard from a cereal box)


Faux water color painting

kids paint watercolors without paint use crayola washable markers
Faux water color projects for kids © ShannonSews
This craft is SO easy if you have some washable markers and small paint brushes on hand (I used Crayola Washable Markers). If you have access to the internet and a printer, you can print out free coloring pages, clip art or even draw something yourself in a pinch. And it's more fun than just using the regular old kid set of water colors.

This link will take you to my step-by-step instructions (+ a video!) on how to keep anyone occupied for hours (I know, you'll count yourself lucky if your kids focus on this for 20 minutes) but I swear they and you will love it. Even if they knock the water glass over.

SUPPLY LIST:
Crayola Washable Markers
Kids Paint Brushes
White Cardstock
Clip Art (google to find free-bees)
Computer & Printer (or just let them paint their own designs)


Sew easy bean bags or rice bags

Winter sewing projects for kids - sew rice bags or bean bags
Kid friendly sewing- beanbags / rice bags © ShannonSews
I know, the point is not to give your kids ammunition while you're stuck inside the house, but think of all the fun they could have throwing bean bags at targets, downstairs - away from you.

Create a target by cutting out a hole in a box or draw a target and tape it to a box. It can't get more easy than that on a cold, indoor, winter day.

However, for this project you really do need a sewing machine, although, you could use strips of stitch witchery and a hot iron to bind the fabric together, but a sewing machine is the best route. Follow the link to the full tutorial. They are just squares, so even a new little sewer may not have too much trouble with this. I made these as sewing weights, but you follow the same instructions for bean bags the kids can toss and toss and toss - just hopefully not at you or each other.

SUPPLY LIST:
Cotton fabric squares - cut them yourself or buy pre-cut 5" cotton squares
Sewing Machine and thread OR stitch witchery and a hot iron (optional, this method not shown on tutorial)
Dry beans or rice
Old Cardboard box for target practice
Scissors to cut out target hole


Make Paper Roses

Make paper roses - easy for kids - indoor cold weather activities
Easy paper roses - kid projects for rainy days © ShannonSews
This is a really fun activity for kids that know their way around a pair of scissors and can roll up a strip of paper. And if you don't want to get involved in the making, just let one of your older kids help, that you trust with a hot glue gun. I didn't mean that as a joke.

I made this red rose out of 2 pieces of scrapbook paper, and if I can make it, trust me, you can - or even your elementary school aged child can. This link takes you to another blog's tutorial, who showed it much better than I could. They even embellish their flowers with glitter, but this post is about lowering your stress, not heightening it.

SUPPLY LIST:
Colored Cardstock
Scissors
Hot glue gun


Make Your Own Soothing Lavender Water

DIY lavender water for easy indoor kids activity
Lavender water recipe even for kids © ShannonSews
Did you know they make something called Lavender pillow spray to calm and soothe before bed? Maybe if your kids make this lavender water it will make them really relaxed and they will want to go to bed. What a marvelous idea for a housebound snowy, cold or wintry day, don't you think?

You will need a few ingredients on hand like distilled water, though I'm guessing regular tap water would work in a pinch, Essential Lavender Oil, Witch Hazel (or a pinch of rubbing alcohol instead), a measuring cup & spoon, funnel and empty spray bottle.

Since many people have these items in their house already, it could be an easy go-to project...OR for us crafty types who keep a rainy day activities bin, you're set.


SUPPLY LIST:
Distilled water
Essential Lavender Oil
Witch Hazel (ethyl alcohol, isopropyl or vodka) *acts as an emulsifier & helps spray dry faster
Measuring cup & spoon
Funnel
Spray Bottles


I'd love to hear your cold weather stuck-indoors activity ideas for kids! Share in the comments below! And good luck through the rest of the winter. The groundhog may have been wrong?


*This post contains product links, added for your convenience. As an Amazon Associate I earn from qualifying purchases through Amazon.com. 

Saturday, June 21, 2014

6 Summer T-shirt Projects you don't want to miss!

Now that summer is upon us, it's time to get your craft on! 

Check out these 6 Must-have T-shirt Projects and be sure to add them to your summer activity to-do list!

t-shirt decorating ideas summer kids adults fabric paint, tie dye, ink blot
6 Summer T-shirt Decorating Projects you don't want to miss! © ShannonSorensen

Decorating your own t-shirts gives you countless numbers of ways to express yourself and makes a perfect lazy day summer activity.

 DIY Summer T-shirt Tutorials

Follow these links to get right to the tutorials
Happy Summer!

Choose from a simple to complex design. All you need is a t-shirt, fabric paint, freezer paper, an exacto knife and an iron.

This project is addicting! You'll get a unique, symmetrical design simply by swirling and blopping paint, folding your t-shirt over and tada! You've got one-of-a-kind ink blot t-shirt! Watch me create a few designs on my YouTubeChannel*Ink Blot T-shirt Kits are also available and make a great kids birthday party activity!

Who doesn't love a good tie dye t-shirt in the summer? The popular sunburst design is easy to create with your favorite color dye and a few rubber bands. Use one color or go crazy with two! Cool designs in a snap!

This cute Painted Dots T-shirt can be made by using a round make-up sponge and your favorite fabric paint. Use round make-up sponges for the dots, or try wedges for a geometric design. The varieties are endless!

Making your own imprinted design allows you to capture the detail of an object, and transfer it right onto your t-shirt. Whether you use metal keys, or another interesting object from around the house, you'll be amazed at how cool this design method can be!

Interested in playing around with natural dyes? Who would have thought black beans could create a cool t-shirt dye? I didn't until I tried it. Not only do black beans work well as an all-natural dye, but so do everyday foods like spinach, onions, berries and deep colored spices like turmeric. Although the process requires a little more preparation, it certainly is fun to try!


Once you try some of these fun summer t-shirt decorating projects - I'd love to hear how they turned out!


Linked to:
http://alittleclaireification.com/2014/06/20/patriotic-recipes-crafts-best-of-the-weekend-party/
http://www.reasonstoskipthehousework.com/skip-housework-24/
http://too-much-time.com/
http://www.bedifferentactnormal.com/2014/06/show-tell-saturday-062114.html
http://www.whatscookingwithruthie.com/2014/06/20/super-saturday-49/

SUBSCRIBE (never miss a post!): Subscribe to ShannonSews
BLOGLOVIN: ShannonSews on Bloglovin
FACEBOOK: facebook.com/SSorensenDesigns AND facebook.com/FairfaceWashcloths
TWITTER: @ShannonSews1
INSTAGRAM: ShannonSorensenDesigns on Instagram
SHOP: Shannon Sorensen Designs + Fairface Washcloths
YOUTUBE: youtube.com/ShannonSews

Friday, February 7, 2014

DIY Bath & Body Works Foaming Hand Soap

copy cat bath and body works make your own foaming hand soap refill peppermint
My sister gave me Twisted Peppermint Foaming Hand Soap from Bath and Body Works for Christmas. Mmmmm! It smells SO good and lifts my spirits every time I use it!

Did you know that Peppermint oil has been shown to increase energy and mental clarity? Um, yes to both please!

So as the bottle began to run low, you can imagine my feelings of woe, never wanting this magic bottle of foaming hand soap to end....so when I stumbled upon this great DIY recipe for foaming hand soap, from Wellness Mama, I knew I'd hit the jackpot!

Bath & Body Works Peppermint Foaming Hand Soap DIY


By combining simple ingredients like distilled water, Peppermint Castille Soap (liquid)  & a dash of oil (I used jojoba oil since it's what I had on hand), the perfect copy cat version of Bath and Body Works Twisted Peppermint foaming hand soap was born! No more crying, now I have a lifetime of refills! And energy to boot!

Be sure to check out the recipe - it's so easy to make! Other DIY foaming hand soap recipes use vegetable glycerin instead of a colored oil and I think I'll do that next time, since it does leave a little yellow jojoba oil floating on top. But nothing a little shake-shake can't help.

I love using DIY skin care products and household cleaning products when I can, because I know exactly what I put in them and always look for gentle ingredients that won't irritate my sensitive skin. My next batch will be using Lavender Castille Soap to make my own foaming shower soap! It only seems to work in a foaming soap container, so don't throw them out when you're done with the bottle!

SUBSCRIBE (never miss a post!): Subscribe to ShannonSews
BLOGLOVIN: ShannonSews on Bloglovin
FACEBOOK: facebook.com/SSorensenDesigns AND facebook.com/FairfaceWashcloths
TWITTER: @ShannonSews1
INSTAGRAM: ShannonSorensenDesigns on Instagram
SHOP: Shannon Sorensen Designs + Fairface Washcloths
YOUTUBE: youtube.com/ShannonSews

Monday, February 3, 2014

Decorating with a cream couch: budget-friendly front room make-over

redecorate on a budget with cream light colored leather couch
Once there lived a man and his wife who finally decided it was time to be grown-ups and buy a couch of their own.

And so the story goes, they lived happily ever after...and became a couple of lazy couch potatoes.

The End.

Decorating with a Cream Leather Couch

You may be hesitant to decorate with a cream or light-colored couch, but it has the potential to turn your drab and dreary to downright dreamy.

I was very skeptical, myself. "STAINS!" was all I could think about. And leather? "Am I even a cream leather couch person??" Enter: mini-crisis of re-discovery.

But since the day it was delivered, we can't be more in love with it. It's like butta baby!! So soft and so comfortable. It not only brightened up our room a million times over, but it brought some grown-up sophistication to our front room decor (and no, I did not tag team that off of Katherine Lowe's wedding theme "grown-up sexy"). In a nutshell? We. Love. It.

Okay, take a look (if you haven't already jumped)

Front room make-over reveal: Cream Couch

BEFORE 
(don't even say it)
redecorating on a budget with a cream light colored couch
.
.
.
.
AFTER decorate with cream couch light colored couch make-over after
before and after room make-over reveal with white, cream, light couch area rug decorating cream couch makeover

Decorating on a Budget | Front Room Make-over Details

Determine a budget

Re-decorating on a budget is definitely do-able, but the trick is taking your time and doing your research to find great deals. We wanted a new couch for a long time, but it took a while before we found the right couch at the right price. Take advantage of holiday sales, 0% for a year pay-off deals, discounted items, gift money, even thrifted items if in good condition. You can save a ton and still get what you want. Just be diligent and patient.

Creating a palate

Decorating with a cream or light-colored couch is the perfect way to bring in lots of color to compliment your neutral base. You don't want colors all over the map, so decide on what kind of feel you want in your room and what colors would compliment best. I went for Beachy Chic and splashed around colors like aquas, blues, sea greens and sandy tans, to compliment and brighten the space.

Choosing a Couch

Choosing a neutral base was important for us, so we could brighten our space and build color around it. By choosing leather, it made the space feel a little more modern with a touch of sophistication, without being stuffy.
-Couch from Macys Furniture Store, style: Alessia Leather Sofa - Pearl - *Black Friday Sale


Choosing an Area Rug

Choosing the right area rug for your room can literally transform it. It's important to make sure the size and color work for the space. Not only did the blue and cream Moroccan Trellis Rug tie everything together, it helped to anchor the couch and coffee table as a defined space, allowing the other areas of the room to be have their own space.
-Homespun Moroccan Trellis Rug - Spa Blue - from Rugs USA - *80% off 


Adding Accessories: Pillows & Throws

One of the really fun parts of decorating with a new cream sofa is adding throw pillows and blanket throws for pops of color. Each item brings in its own unique touch, while creating a sense of cohesion.

Keeping with our chosen palette, I decided on light aqua, soft, faux fur throw pillows (20"x20") which not only brought in the soft brightness of color I wanted, but also brought in a great texture. Don't forget texture is an important detail to integrate into any space!

THE SOFT FAUX FUR BLANKET THROW is a deeper color within the same color family - more along the lines of sea foam green and compliments the pillows, rug and couch perfectly to give the room that Modern Beachy feel. Plus it's so cuddly soft that it's actually something we love to use, instead of something we just look at.
-Faux Fur Pillows and Throw from HomeGoods - *holiday gift card


decorate with bamboo sunburst mirror wall art

Bamboo Sunburst Mirror Wall Art

I made the Bamboo Sunburst Mirror a few years ago. It was easier than I thought it would be, with stunning results! See this post on how to make your own DIY Suburst Mirror
-DIY ~$14.00 total materials cost


Coffee Table

We didn't splurge on a new coffee table, (although I'd love one!), but this thrifted, 60's style coffee table is perfect for our space at the moment. I tied in accessories that brought color such as aqua glass, texture: rope tied nautical balls, woven & bamboo baskets/trays, and a touch of antique with a thrifted antique mirror used as a tray.
- Thrifted


decorating with a light colored couch accessorize with colors and nature

Other Accessories to add color and texture to a room

Make your space personal with framed photos, wall pictures, candles, lamps, + don't forget to bring the outside in! Plants, rocks, sand, grass, shells, wood, flowers, etc. bring freshness and variety from nature's own textures, colors and diversity.

We still have a long way to go, but it's definitely a good start. I'd love to replace our bookshelf, side table and lamps, but a girl only has so much cash! I reeeeaaaalllly had to hold myself back.

I love how it turned out. It makes me happy every time I walk in the room!
And after almost 2 months, no stains! (knock on wood!)

Update: still no stains after 6 months and counting! Woohoo!


SUBSCRIBE (never miss a post!): Subscribe to ShannonSews
BLOGLOVIN: ShannonSews on Bloglovin
FACEBOOK: facebook.com/SSorensenDesigns AND facebook.com/FairfaceWashcloths
TWITTER: @ShannonSews1
INSTAGRAM: ShannonSorensenDesigns on Instagram
SHOP: Shannon Sorensen Designs + Fairface Washcloths
YOUTUBE: youtube.com/ShannonSews

Saturday, October 5, 2013

Arrows T-shirt DIY with stencil and fabric paint

arrow t-shirt with stencil and paint diy
{DIY Arrow T-shirt © ShannonSorensen}
I just realized I haven't posted since September. Time has whirled by since school started!

We had such a beautiful Seattle summer, but last weekend it started raining again. I mean a lot of rain. Buckets.

During our torrential downpour, I decided to put my craft on. Time to give some life to this plain blue t-shirt.

I love all the arrow designs I'm seeing lately, so I decided to create my own.


How to Make a Stenciled Arrow T-shirt:

(*product links included for your convenience.)
PRINT & CUT STENCIL: Find a clip art image online, print it on heavy card stock & cut it out with a craft knife tool

OR Use a this cute pre-made arrows stencil


how to create a stencil for arrow t-shirt design
{Make an Arrow Stencil © ShannonSorensen}

1. PROTECT YOUR FABRIC: I ironed a piece of freezer paper to the inside of my t-shirt so the paint wouldn't go through. You can also use a piece of cardboard.

2. FABRIC PAINT: I like SoSoft fabric paint because it leaves a flexible, soft finish. Put a piece of saran wrap on a plate or surface for easy use and clean up.

3. APPLY PAINT: Hold down stencil and use a foam brush or other applicator and gently blot paint through the stencil on the shirt. Move stencil as needed and repeat.

4. FINISHED DESIGN: Let your painted design dry. SoSoft Paint doesn't require ironing to set the color, but once dried, you can heat set paint with a dry hot iron (using a cover cloth) for 2-3 minutes.
Instructions for making a stenciled painted t-shirt design with arrows
{Instructions for making an arrow painted / stenciled t-shirt © ShannonSorensen}

I love the way it turned out! It's fun by itself and a pair of jeans, with a black long-sleeve t-shirt under it, or paired with a jacket or cardigan.
DIY Painted Arrows T-shirt finished
{DIY Arrow Stenciled T-shirt © ShannonSorensen}

Arrow t-shirt, how to make your own with paint and stencil
{Painted Arrows T-shirt DIY © ShannonSorensen}

The wheels are still turning as I try to come up with a design for my other plain t-shirt...and speaking of turning wheels, it's time to go for a bike ride. It's been a week or so since I've been able to go because of the rain, but we're getting a break today!

(*This post contains product links, added for your convenience. As an Amazon Associate I earn from qualifying purchases through Amazon.com. )


SUBSCRIBE (never miss a post!): Subscribe to ShannonSews
BLOGLOVIN: ShannonSews on Bloglovin
FACEBOOK: facebook.com/SSorensenDesigns
TWITTER: @ShannonSews1
INSTAGRAM: ShannonSorensenDesigns on Instagram
SHOP: Shannon Sorensen Designs + Fairface Washcloths
YOUTUBE: youtube.com/ShannonSews

Linked to: http://www.uncommondesignsonline.comhttp://sewmanyways.blogspot.com/http://www.flamingotoes.comhttp://www.niftythriftythings.com/http://diyshowoff.comhttp://www.keepingitsimplecrafts.com/http://www.ishouldbemoppingthefloor.comhttp://sewcando.blogspot.comhttp://craftomaniac.blogspot.com,   http://www.madincrafts.com,  http://www.sugarbeecrafts.com/,  http://www.hopestudios.blogspot.com/http://www.skiptomylou.org, http://becomingmartha.com/, http://www.504main.com, http://www.thirtyhandmadedays.com

Tuesday, August 27, 2013

DIY Lavender Water: Make your own

Make your own lavender water recipe and instructions
{Make your own Lavender Water © ShannonSorensen} 
If you've never made one thing I've taught you, you need to make this. It will change your life! And I'm not just being overly dramatic.

Going to the lavender farm on San Juan Island was a life-long dream of mine. And boy, oh boy was it worth the wait.

The gentle scent of lavender is one of the most soothing smells there is. It's like a summery breeze that sweeps over you as it lifts and carries your worries away. (Sigh)

Making your own Lavender Water is incredibly easy, and only takes a few ingredients. It not only smells dreamy, it has health benefits as well (see below). And as I always say, if it's simple enough for me to make, you can certainly do it!


How to Make Lavender Water 

Supplies:
easy to make lavender water tutorial
{Easy Lavender Water Tutorial  © ShannonSorensen}

Directions:
  • Pour 2 cups distilled water through funnel, into a jar or directly into your spray bottle.
  • Drop 16 drops of lavender essential oil into the distilled water (1 oz. oil to 1 oz. water)
  • Add 2 Tbsp Witch Hazel (or other emulsifier listed above)
  • Shake before each use
Your lavender water is ready to use!


Benefits / Uses of Lavender Water


  • Induces relaxation and helps ease anxiety
  • Spritz your sheets at night to sleep better! Lavender lowers heart rate & blood pressure, promoting relaxation
  • Freshen the house, linens, closets, hampers, and more
  • Spray on beds, sheets and pillow cases to keep dust mites away
  • Use when ironing fabrics for that extra fresh scent
  • Spritz baby's crib before nap time
  • Use it as an air freshener near a baby's hamper
  • As a natural anti-inflammatory, spritz your skin, pillow cases and linens to help reduce itching, swelling or red skin (do a spot test to make sure you skin's not too sensitive)
  • Calms nerves, lowers stress and anxiey
  • Can ease breathing with colds and stuffed sinuses (*try steam treatment with lavender water)
  • Soothes sunburns, scrapes and bug bites with a few spritzes
  • Heat lavender water for a soothing foot soak
  • Keep in the fridge and spritz on a hot day to refresh and cool yourself down
  • Dip a soft washcloth in lavender water & use as a cool or warm compress to relieve headaches
  • Spritz yourself before going outdoors to repell insects!
  • Can increase the effectiveness of other relaxants for insomnia, anxiety and depressants (see doctor)
  • Spray household surfaces as a disinfectant
  • Add lavender oil directly to bathwater to improve mood and promote circulation
  • Add lavender oil to laundry rinse water to freshen clothes


It's safe to say I have sprayed just about everything that is spray-able in our house with lavender water! It smells so fresh and clean, and really is calming. I spritz our bed every night and I swear I've been sleeping better. It just makes you feel so much more calm and peaceful.

In a burst of enthusiasm, I asked my husband if it would be okay to spray our "under-clothes" with lavender but he wasn't so keen riding from his office to the car in a shuttle full of men, while smelling like lavender. I don't blame him. ha!
Uses and benefits of lavender water
{Lavender Farm San Juan Island © ShannonSorensen}
*affiliate links have been included for your convenience. As an Amazon associate I earn from qualifying purchases.

SUBSCRIBE (never miss a post!): Subscribe to ShannonSews
BLOGLOVIN: ShannonSews on Bloglovin
FACEBOOK: facebook.com/SSorensenDesigns
TWITTER: @ShannonSews1
INSTAGRAM: ShannonSorensenDesigns on Instagram
SHOP: Shannon Sorensen Designs + Fairface Washcloths
YOUTUBE: youtube.com/ShannonSews

Linked to: http://sewmanyways.blogspot.com/, http://www.flamingotoes.com, http://sewchatty.blogspot.com/,http://www.ishouldbemoppingthefloor.co m, http://sewcando.blogspot.com, http://makingtheworldcuter.blogspot.com, http://www.skiptomylou.org, http://diyshowoff.com http://www.abowlfulloflemons.net/, http://www.craftyconfessions.com/, http://www.hopestudios.blogspot.com/, http://bebetsy.com/, http://www.diybydesign.blogspot.com/, http://www.733blog.com/,http://www.sew-much-ado.com/, http://www.mygirlishwhims.com/,http://somedaycrafts.blogspot.com/, http://www.creationsbykara.com/http://www.gingersnapcrafts.com/, http://raegunwear.blogspot.com/ , http://sparklesandastove.com/things-pretty-linky-party-23-features/, http://myfashionforwardblog.com/, http://www.theshabbycreekcottage.com, http://www.aglimpseinsideblog.com/, http://www.houseofhepworths.com/, http://www.the36thavenue.com/ , http://www.livelaughrowe.com/ , http://www.thecraftyblogstalker.com, http://www.allthingswithpurpose.com

Sunday, July 21, 2013

Black Bean Tie Dye Shirt: Natural Dyes

DIY black bean dye tie dyed t-shirt
{Photo: Tie Dye Blue T-shirt using all-natural Black Bean Dye}
Who knew black beans weren't just for dinner anymore?

I have to say, I'm still in awe at the outcome of this black bean tie-dyed t-shirt. Blue dye. From black beans. Who would have thought??

Well, a bunch of people, actually, because there is a lot of natural dying going on out there that I didn't even know existed. And it's not just with black beans.

Natural dyes are made from pretty much everything in nature. Flowers, fruits, spices, vegetables, herbs, legumes...you name it.

The colors you can get from natural dyes are beautiful, and truth be told, there's just something that feels good about using natural dyes as opposed to chemical ones. Here are a few Natural Dye sites I pinned on Pinterest (one of my favorites is the turmeric tank top).

How to Make Blue Dye from Black Beans

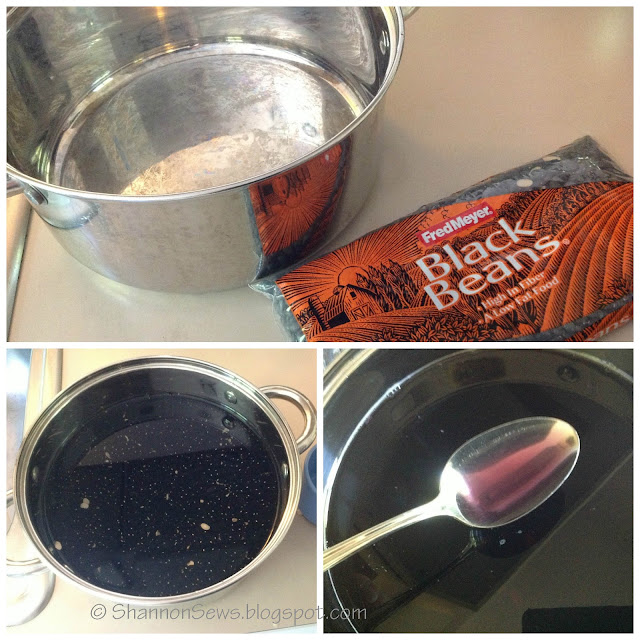
*Soak black beans in a pot of water for 24-36 hours, stirring occasionally. I used 1 bag of dried black beans and about 8 cups of water. I wanted to make sure the beans didn't soak up all the liquid.

*This natural dye tutorial is a great resource for how many beans vs. how much water, along with other details about making dye from black beans.

Several hours in, I checked and my water had turned purpley. Exciting!

How to make blue dye from black beans
{Photo: Make natural blue dye from black beans}


Get your Shirt Black Bean Dye-Ready 

This is where I failed.

Bind black bean dye color to shirt using Alum and Cream of Tartar
{photo: mortant cotton shirt}
In order for the black bean dye to adhere to the cotton shirt, you have to mordant it with Alum and Cream of Tartar. Again, refer to the above link for instructions on this process.

The problem I ran into, is that this chemical process requires you to cook your shirt for 1 hour in a pot you will not use again (toxic). I didn't have an old pot and after scouring a couple thrift shops, didn't want to spend $10 for a used stock pot I would never use again. Call me cheap, but this old white t-shirt wasn't even worth $10. I would take my chances for it to fade away, since it may not even turn out anyway.


Soak your shirt in Black Bean Dye

After letting the beans soak about 30 hours (*and a couple hours since I last stirred) I removed the liquid from the beans by carefully straining it through a mesh strainer into mason jars. You don't want debris to come up from under the beans and cloud your dye, so do it carefully or ladle it off the top.

I wetted my white t-shirt, folded it in a fan pattern, and rubber-banded it to give it tie-dye stripes.
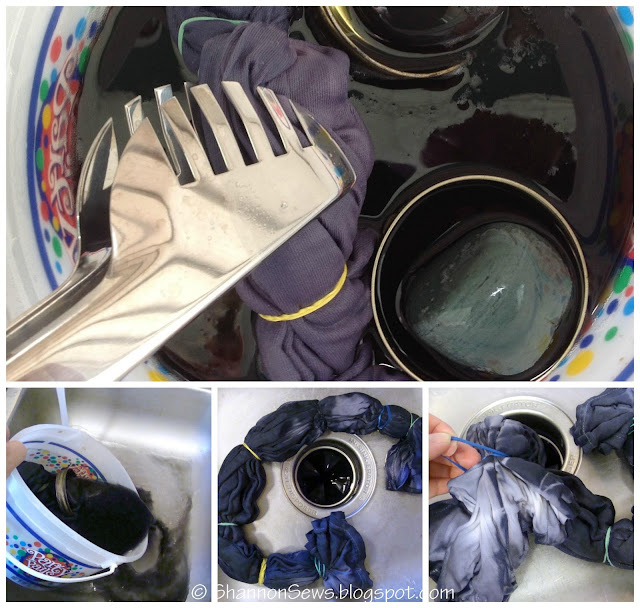
After adding the black bean dye to my shirt in a small bucket, I set it outside for about 36 hours.


All natural black bean dye creates blue hues the longer you soak your shirt
{photo: Tie dye shirt soaking in black bean dye}

The Black Bean Dye T-shirt Reveal

~Mid-way through I checked on it and it was certainly more purple than before it went in! (if you're wondering, I used rocks w/ mason jar lids to weigh down the shirt in the dye)
~By the time 36 hours rolled around (bottom small pictures), it was quite a bit darker and more blue.

~Dump the black bean dye down the sink.
~Remove the rubber bands and rinse shirt thoroughly with cold water. Excitement mounting!


Make blue dye from black beans after soaking shirt for 36 hours
{Photo: Black bean dye turns shirt blue after a 36 hour soak}


And holy moley, that's what the black bean dye fuss is all about! So cool! I love the pattern. Reminds me of bamboo. I love the color. I love that this was made from an all natural dye. And yes, it turned out cool so fingers crossed it doesn't wash out any time soon!


Finished Black bean dye t-shirt: blue tie dye design
Hanging in the breeze - the colors lightened just a bit as it dried.
I couldn't help myself from glancing at it out the window.
Glorious.

natural black bean dye creates blue results
{Photo: Results: Blue tie dyed t-shirt from all natural black bean dye}

 Is it weird to want to dye everything in the house?


Similar projects you might like:
Pink Sunburst Circles Tie Dyed Shirt
Dip Dyed T-shirt
Dip Dyed Kitchen Towels


SUBSCRIBE (never miss a post!): Subscribe to ShannonSews
BLOGLOVIN: ShannonSews on Bloglovin
FACEBOOK: facebook.com/SSorensenDesigns
TWITTER: @ShannonSews1
INSTAGRAM: ShannonSorensenDesigns on Instagram
SHOP: Shannon Sorensen Designs + Fairface Washcloths
YOUTUBE: youtube.com/ShannonSews

Linked to: http://sewmanyways.blogspot.com/, http://www.iheartnaptime.net, http://www.flamingotoes.com http://www.niftythriftythings.com/ http://www.ishouldbemoppingthefloor.com, http://sewcando.blogspot.com, http://creatingreallyawesomefreethi ngs.com, http://makingtheworldcuter.blogspot.co m, http://craftomaniac.blogspot.com, http://www.skiptomylou.org, http://diyshowoff.com http://www.linesacross.com   http://www.keepingitsimplecrafts.com/madincrafts.com, http://www.sugarbeecrafts.com/, http://www.hopestudios.blogspot.com/  http://todayscreativeblog.net/http://bebetsy.com http://www.diybydesign.blogspot.com/, http://www.733blog.com/, http://www.sew-much-ado.com/, http://www.mygirlishwhims.com/ http://somedaycrafts.blogspot.com/, http://www.creationsbykara.com/ http://www.gingersnapcrafts.com/, http://www.rolleduppretty.com/, http://raegunwear.blogspot.com/, http://ivyandelephants.blogspot.com/, http://www.adornedfromabove.com, http://www.theshabbycreekcottage.com, http://www.somewhatsimple.com/, http://www.aglimpseinsideblog.com/, http://www.houseofhepworths.com/, http://www.the36thavenue.com/  http://www.livelaughrowe.com/  http://www.allthingswithpurpose.com, http://www.thecraftyblogstalker.com, http://myfashionforwardblog.com/http://becomingmartha.com/, http://www.thirtyhandmadedays.com/, http://www.504main.com/

Thursday, July 18, 2013

Tie Dye Sunburst Rings T-shirt DIY

Make tie dye rings t-shirt tutorial
Although I'm from Seattle, I'm not a hippie. People seem to think those of us from Seattle or Portland all wear tie-dye and hug trees.

On this rare occasion, however, I'll admit I'm mimicking the stereo-type. I decided to make my own tie-dye t-shirt, and although I do like trees, I don't think I've ever hugged one.

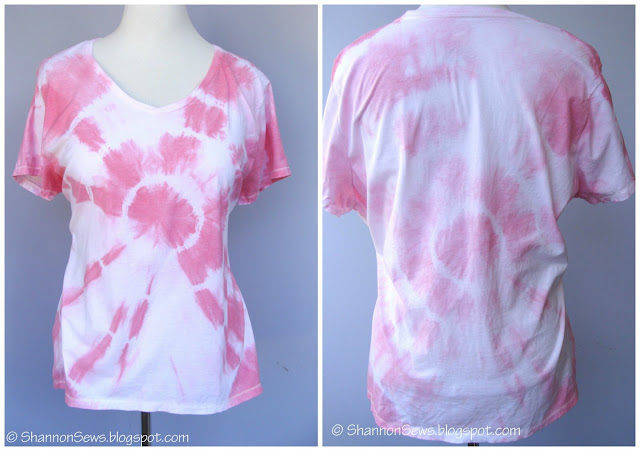
I purchased pink Rit dye (*affiliate link) found a perfect white v-neck t-shirt (*see info below) and followed this great tie dye tutorial on Pinterest.

The only problem I found was that because I hadn't pre-wetted my t-shirt, the colors didn't disperse as well. I still love it though. Note for next time.

How to make tie dye rings t-shirt with rit dye

I love how the pinks gently fade in and out of the white of the shirt and go from shades of faded rose to pedal pink and everything in-between.

make sunburst rings tie dye t-shirt with rit dye

*Okay, about the white t-shirt. Are you sitting down? I found the PERFECT white Hanes t-shirt at Walmart for only $5.00 for this project! I'm still in shock. It's medium weight, soft, and perfect to wear as-is or turn into a craft project.

I'll admit, I had to get one in a few different colors. They are so comfortable - not at all what I would expect for 5 bucks! I'm not getting paid by Walmart, I just wanted to share the link so you can see them. Go to your local Walmart and see if they carry them!


Closing thoughts on tie dye: I always had the idea that tie dye was messy and drippy and stainey and I could only do it in the summer on a giant lawn with a hose and gallon sized buckets. But the truth is, making this t-shirt in a pot on the stove (as you can see in my how-to video) made all the difference.

When I made my first dip-dye t-shirt, I had a lot of color running down the sink when I rinsed my shirt. This time around, there was very little to rinse because the color had locked on to the shirt through the use of heat. Just a thought. This project's not as crazy as you think it might be.

{WATCH} the making of my Tie Dye Sunburst Rings T-shirt


Never miss a post! Subscribe to ShannonSews
Follow ShannonSews on Bloglovin
Like facebook.com/SSorensenDesigns
Tweet @ShannonSews1 on Twitter
Follow me on Instagram
Subscribe to youtube.com/ShannonSews

Thursday, June 13, 2013

Sew your own Bowl Covers

How to sew your own bowl cover tutorial
The school year hasn't even ended yet and I'm already checking off some of my summer to-do's! How's that for ambitious?

I've been meaning to sew myself a bowl cover for my Kitchen Aid for eons. Every time I looked at that shiny silver bowl on the counter I felt guilty. Must. Do. That. Later.

Lets just say "later" never came, and I got really tired of washing the dust out of the bowl every time I used it.


Making your own bowl covers comes in handy, not only for covering your Kitchen Aid bowl, but they are great for covering all sorts of things - storing food in the fridge, taking a large salad for a potluck and oh, one more - you'll never guess. You can also use it to cover your head.

Yes, this simple bowl cover pattern is basically the same as a shower cap. How's that for a two-for-one?!

Okay, lets get started.

How to Make your own Bowl Covers

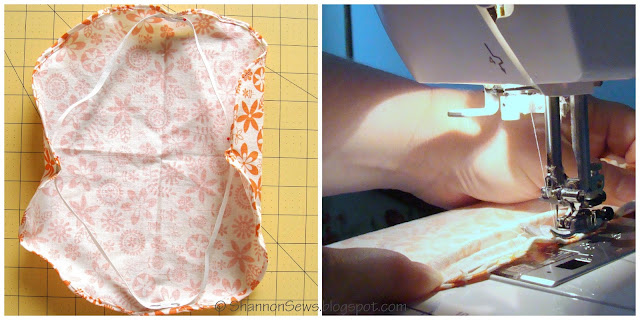
MEASURE

Trace around your bowl so you have the circumference. *You will be adding 1-2 inches around your circle for your pattern or you can choose to trace a bigger bowl than the one you're covering.

To sew your own bowl cover, measure around the circumference of the bowl and add 1 to 2 inches


CREATE YOUR PATTERN & CUT YOUR FABRIC

For your cover to fit, you'll need to add 1-2 inches to the diameter of your bowl. *You can either trace a larger bowl than the one you're making the cover for, draw in the extra room to your pattern, or add it when you cut out your fabric.

Make a bowl cover pattern by tracing a bowl and adding 1 to 2 inches extra on your pattern or fabric


HEM THE CIRCLE

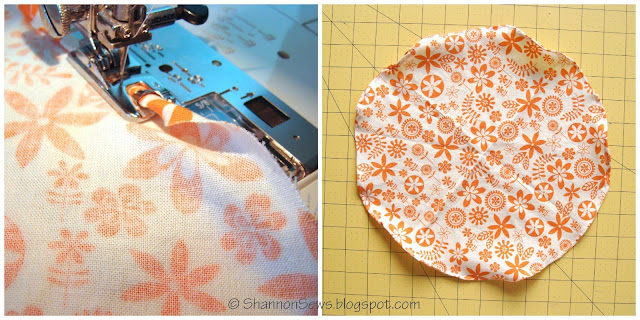
Hemming a curve or circle can be a bit tricky. I chose to use my rolled hem foot. Even with this tool it was a bit of a challenge. I found this great tutorial on How to Hem A Curve by adding some gathering stitches. I'll have to try it on my next bowl cover.

How to hem a circle or curve using a rolled foot or gathering method

STRETCH-SEW YOUR ELASTIC

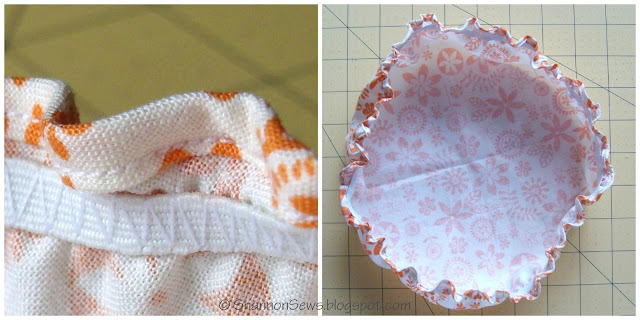
Instead of creating a band or casing to thread elastic through, I decided to stretch-sew it to the fabric circle.
1st: Measure and cut the elastic to the size you want (how tightly you want the bowl cover to fit). 
2nd: Pin elastic in 4ths around the circle to get it evenly distributed.
3rd: Stretch only the elastic (not the fabric) in front and behind the presser foot, as you sew it in place with a zig zag stitch. 

*The best tip is to stretch and sew little sections as a time to make sure you get the best elastic stretch.

How to stretch stitch elastic to your bowl cover

ADMIRE YOUR HANDY WORK

Just about ready to add it to my bowl. I love the dainty ruffled edge!

Create a ruffled edge to your bowl cover by sewing elastic while stretching

USE YOUR NEW BOWL COVER

Sigh. Now every time I catch a glimpse at my Kitchen Aid, I smile. My new bowl cover fits perfectly. I can hide away my Kitchen Aid tools and won't have a dusty bowl to wash. Hip hip hooray!

Easy bowl cover tutorial for Kitchen Aid bowls, pot luck dishes or left-overs


Now it's time to sew a few more bowl covers...pot lucks, family dinners...left-overs...and maybe even a shower cap ;)


Never miss a post! Subscribe to ShannonSews
Like on facebook.com/SSorensenDesigns
Follow @ShannonSews1 on Twitter
Subscribe to youtube.com/ShannonSews

Monday, April 22, 2013

Dip Dyed Flour Sack Towels

dip dye towel tutorial or diy
There's just something about Flour Sack Towels. The look and feel takes me back to an earlier era.

My mom and grandma always used this type of light-weight towel for drying dishes after a big family meal.

Now they are my first choice for drying dishes since they are lint free, light-weight and dry quickly. And since they come in white, they are the perfect craft project (paint, fabric or embroidery)!

Where did the idea of using Flour Sacks Towels come from?

More than 80 years ago, during the 1930's and 40's when times were tight due to the Great Depression, our frugal female ancestors transformed the large, plain cotton sacks in which they received their flour, sugar, cornmeal and chicken feed, into clothing, curtains, dish towels, pillow cases and toys.

But these large cotton sacks didn't stay plain for long. Seizing a great marketing opportunity, flour and feed companies began producing cotton sacks with decorative patterns, borders and colored designs. If women liked the pattern on the sack, they'd buy that brand of product, and use the fabric to sew whatever they needed. Those fabulously thrifty women!
Photos from the 1930's show people wearing up-cycled flour sack clothing. 
Flour sacks were used to sew clothing back in the great depression
{photo credit}

But I digress. I'm a sucker for the history, stories and fashion from the 20's, 30's & 40's. Back to the tutorial!

To Dip Dye your White Flour Sack Towel, here's what you'll need:


Dip Dye Tutorial for dying cotton kitchen towels

(*affiliate links included)

Dip Dye supplies


Dip Dye Instructions and Tips


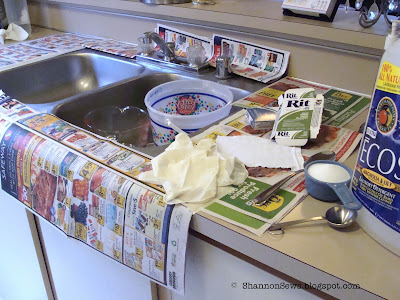
  • Protect your working surface by laying down newspaper.
  • Don't stain your porcelain sink, bathtub, counter top, or linoleum! Use a stainless steel sink or large bucket. Work outside if possible.
  • Have a water supply close by.
  • Read the instructions on the Rit Dye package.
  • I used 3 gallons of hot water in a stainless steel sink with 1 Tbsp detergent (to evenly disperse the dye) & 1 cup salt (helps intensify dye color)
  • Use disposable rubber gloves! Or your hands will be a lovely shade of whatever you're making.
  • First dissolve the dye in 2 cups of hot water in a disposable container (before adding it to the rest of the water, detergent and salt in the sink). I used 1 box blue with 1/2 box green.
  • Wet your towel first, wring it out, and smooth it out before immersing it in the dye
  • Immerse your towel in the dye to the level you want it, swishing it back and forth so there's no distinct line mark.
  • Keep dye off the white part of the towel.
  • To get the color gradient effect, hold your towel in the dye for a shorter amount of time on each section from the top down, as seen in the photo. Start at the top and gradually increase the time each section is immersed in the dye as you go down. (The bottom of the towel was held in the dye much longer than the top.)
  • The longer you immerse your towel in the dye, the darker it will be. *For all-over color, keep your towel immersed for about 30 minutes, stirring often to distribute the color evenly.
  • When ready, lift your towel from the dye and carefully ring out the excess dye.
  • Using hot water 1st, begin rinsing your towel from the dye line down (to keep the top white); then change to cold water and rinse until water runs clear.

Dip Dyed Kitchen Flour Sack Towels

  • Hang your towel to dry OR toss it in the washing machine with detergent, on cold (like I did).
  • Hang or machine dry (I threw mine in the dryer).


And it's ready to use!

It's the same batch of dye, and the same process I used for my Dip Dye T-shirt.
{WATCH} the Dip Dye T-shirt Instructional Video to see how it's done!


Never miss a post! Subscribe to ShannonSews
Like on facebook.com/SSorensenDesigns
Follow @ShannonSews1 on Twitter
Subscribe to youtube.com/ShannonSews
Blogging tips