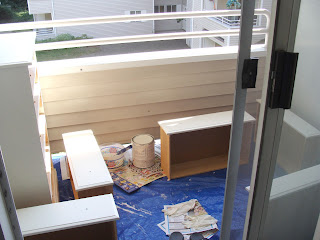
 Do you know how long fixing up these thrifted dressers has been on my summer to-do list? Well I'll tell you. Three whole years.
Finally, the weather here in Seattle has actually been good enough to get it done! Bam!

These dressers actually have a history. Can you still call them "thrifted" if you swiped them from your parents house? I say yes.
Once upon a time, the one on the left stood in my bedroom and the one on the right, in my sister's room. They were lovely back in the day.
Some time during high school I tried out my crafty skills (or lack thereof) and painted my bright white dresser with cream colored exterior house paint and changed my nobs from bright yellow to dark green with an old can of spray paint I found in the garage. Spiffy.
And there she stood, until I got my real craft on.
Painting thrifted (or in my case, swiped) furniture can completely transform it, so before you go buying new, consider stopping by a thrift shop - they're full of potential.
 Make sure you have all the right tools before you start your thrifted furniture makeover project. Home Depot is really helpful if you aren't sure what you need.
And for sure, check out the Oops Paint section at Home Depot. It's paint people bought but didn't want and it's yours at a major discount.
I got this entire gallon of antique white for only $7, marked down from $28!

Supplies you might need:
Tarp
Paint roller
Foam brush for details
Primer
Paint
Putty to fill in dings
Sandpaper
Rags (dry and wet)
Disposable gloves
Newspaper
Old clothes and shoes to paint in (paint'll gettcha!)
Oh, and another thing? Get ready to use your muscles people! There's a lot of crouching, bending, stooping, squatting, and up and down with the paint brushes. I know, I sound like a pathetic couch potato but I was surprised at how tired and sore I was when I was done! For you athletic types, however, it'll be a breeze.
Here's another look at the before and afters. My favorite part of a makeover.
For the hardware on this one, I replaced the old green nobs with antique glass nobs I found at an estate sale last year.♥
 |
| Thrifted Dresser - BEFORE on L and AFTER on R |
My husband wasn't particular on what hardware he had (as most men may not be), so we spray painted his yellow knobs white. I like the clean look.
 | |
|
I'll admit, I've probably gone a bit too far by making him have a vase full of flowers on his dresser, along with the decorative mirror hanging over it. Poor thing. I may need to get him a manly box or something so he doesn't feel like I've completely taken over. But who are we kidding?
Never miss a post! Subscribe to ShannonSews
Like on facebook.com/SSorensenDesigns
Follow @ShannonSews1 on Twitter
Subscribe to youtube.com/ShannonSews


i seriously need these dressers!! for pearce and henry's room. tall and kinda skinny with lots of drawers. i think i have to sell our big ikea one that i love - just way too big, i dont think it will fit in the room once we set up the crib in there too.
ReplyDeleteShoot! I love your Ikea dressers! With two kids in the room plus the furniture though, I can see why you'll need a bit more room. Maybe you can find some kid sized ones at garage sales that you can spruce up!
Delete