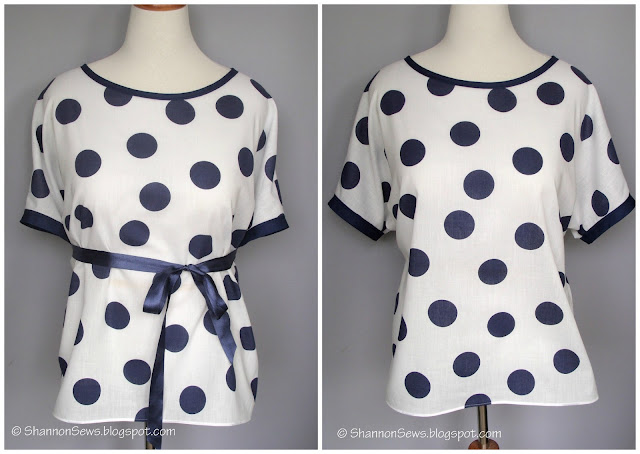
Anywho, the other day I ventured out to Old Navy to find "something to wear", but came up empty handed. Shocker.
I did, however, do some snooping, as is often the case for me when I shop. I love to look at how things are made. I'm sure some poor shop has footage of me studying the inside of garments, while snapping a pic or two with the old camera phone. I have no shame.
ENTER Old Navy dressing room: (Like I said, no shame) I wanted to know how this simple top was made, so I laid it down in the dressing room to see the actual shape of it.
 Look at how basic this pattern is! It's practically a square! If only I could have lugged my pattern paper in there with me... ha! I guess I have a little dignity.
When I left the store, I didn't have a bag, but at least I had an idea. I was going to sew my own basic round neck top, because why buy something when you can make it yourself?! I'm so
Sew your own basic cotton top
Start with a Basic Shirt Pattern
Be sure to read my post on how to make your own basic shirt pattern. This is the exact pattern I used to make my cotton polka dot top.Here's a quick photo recap of how I made my own basic shirt pattern:
Cut out the shirt and necklines
As mentioned in my previous post, I laid out the fabric in half and then folded it under in half again, to cut both shirt pieces out at once (except for the neckline).
The necklines are different for the front and back. The back is higher than the front, so I cut both separately, based on the estimated measurements from my pattern. I always opt to cut shorter initially, so I can lower the neckline if needed.
With both pieces cut out, I was ready to sew the shoulder seams together. Serge or zig zag stitch the raw shoulder edges to secure.
Sew the Shoulder Seams
I laid both shirt pieces (right sides together), pinned and sewed the shoulder seams. Then ironed them open nice and flat.Finish the neckline and dolman sleeves with bias tape
I finished the neckline and sleeves with navy blue double fold bias tape. It was really easy to work with.I simply opened the folded tape, laid it edge to edge right sides together, sewed on the fold, folded the tape over and stitched the other side to secure. I may be investing in a bit more bias tape after seeing how easy it was! *Here's a good tutorial from Coletterie on bias binding
Stitch up the side seams & hem the waist line
After finishing the neck and sleeves, I laid the top right sides together again and stitched up the side seams. I did a simple zig-zag stitch to secure the raw edges of the fabric.I hemmed the bottom of the shirt using a rolled hem foot. I posted here about using a rolled hem foot (a.k.a sewing a rolled hem). It was incredibly simple.
And that's all there was to it!
It's a cute top with or without the ribbon. I may even go crazy and use a bright ribbon like yellow, red or orange. How daring of me.
I think it's safe to say there may be more summer tops in my future. This pattern is so versatile I could make t-shirts or add details to cotton tops. Lots of possibilities!
Never miss a post! Subscribe to ShannonSews
Like on facebook.com/SSorensenDesigns
Follow @ShannonSews1 on Twitter
Subscribe to youtube.com/ShannonSews
Linked to: http://www.diybydesign.blogspot.com/, http://www.733blog.com/,http://www.sew-much-ado.com/, http://www.mygirlishwhims.com/,http://somedaycrafts.blogspot.com/, http://www.gingersnapcrafts.com/, http://www.rolleduppretty.com/,http://raegunwear.blogspot.com/, http://www.adornedfromabove.com


i love the polka dot! i find i can get stuff at old navy for cheap when it goes on clearance:)
ReplyDeleteThanks so much Carissa! I love to snoop the old navy clearance and have found a thing or two myself! :)
DeleteThanks so much for the invite Leslie! I'll be sure to check out your party!
ReplyDeleteI am amazed at how easy it looks:))) I think I will save this link so I can give it a go.
ReplyDeleteHi Joluise - it really is one of the easiest tops to sew! Good luck with yours!
DeleteHey Thanks for this, I am wondering how do you stick the interlock.what i mean is after you have stitched the front and back peace together with a simple stick( -------- like that) how do u lock it (/\/\/\/\ )that stitch?
ReplyDeleteHi Shu,
DeleteThe lock stitch is a zig zag stitch. I put the edge of the raw seam under the center of the presser foot and stitch a zig zag stitch that locks over the raw edge. Since I don't have a serger, this method works well. Good luck to you! :)
I made this shirt today. Thanks so much for the great tutorial!
ReplyDeleteYay! That's so great! Thanks for letting me know Jessie! :)
DeleteIt would help to know if you added more to the seam allowance to account for non stretch fabric.
ReplyDeleteIt would help to know if you added more to the seam allowance to account for non stretch fabric.
ReplyDelete